
1. Introduction
The TechniSat Viola CD-1 is a compact and versatile portable stereo CD player, also known as a boombox. It features a CD player, FM radio tuner, Bluetooth audio streaming, and stereo speakers. Designed for both home and portable use, it can be powered by an AC adapter or batteries, making it suitable for various environments.

Image: TechniSat Viola CD-1 in a modern office environment, demonstrating its versatile placement.
2. Safety Information
Please read and understand all safety instructions before operating this device. Keep this manual for future reference.
- Do not expose the device to rain or moisture.
- Do not block ventilation openings.
- Ensure proper power supply (AC adapter or specified batteries).
- Avoid extreme temperatures and direct sunlight.
- Do not attempt to disassemble or modify the unit. Refer all servicing to qualified personnel.
3. Package Contents
Verify that all items are present in the package:
- TechniSat Viola CD-1 Portable CD Radio
- AC Power Cable (150 cm)
- Instruction Manual
4. Product Overview
4.1 Front Panel Controls

Image: Close-up of the TechniSat Viola CD-1's control panel and display.
The front panel features a digital display and various control buttons for playback, mode selection, and volume adjustment.
4.2 Rear Panel and Side Connections
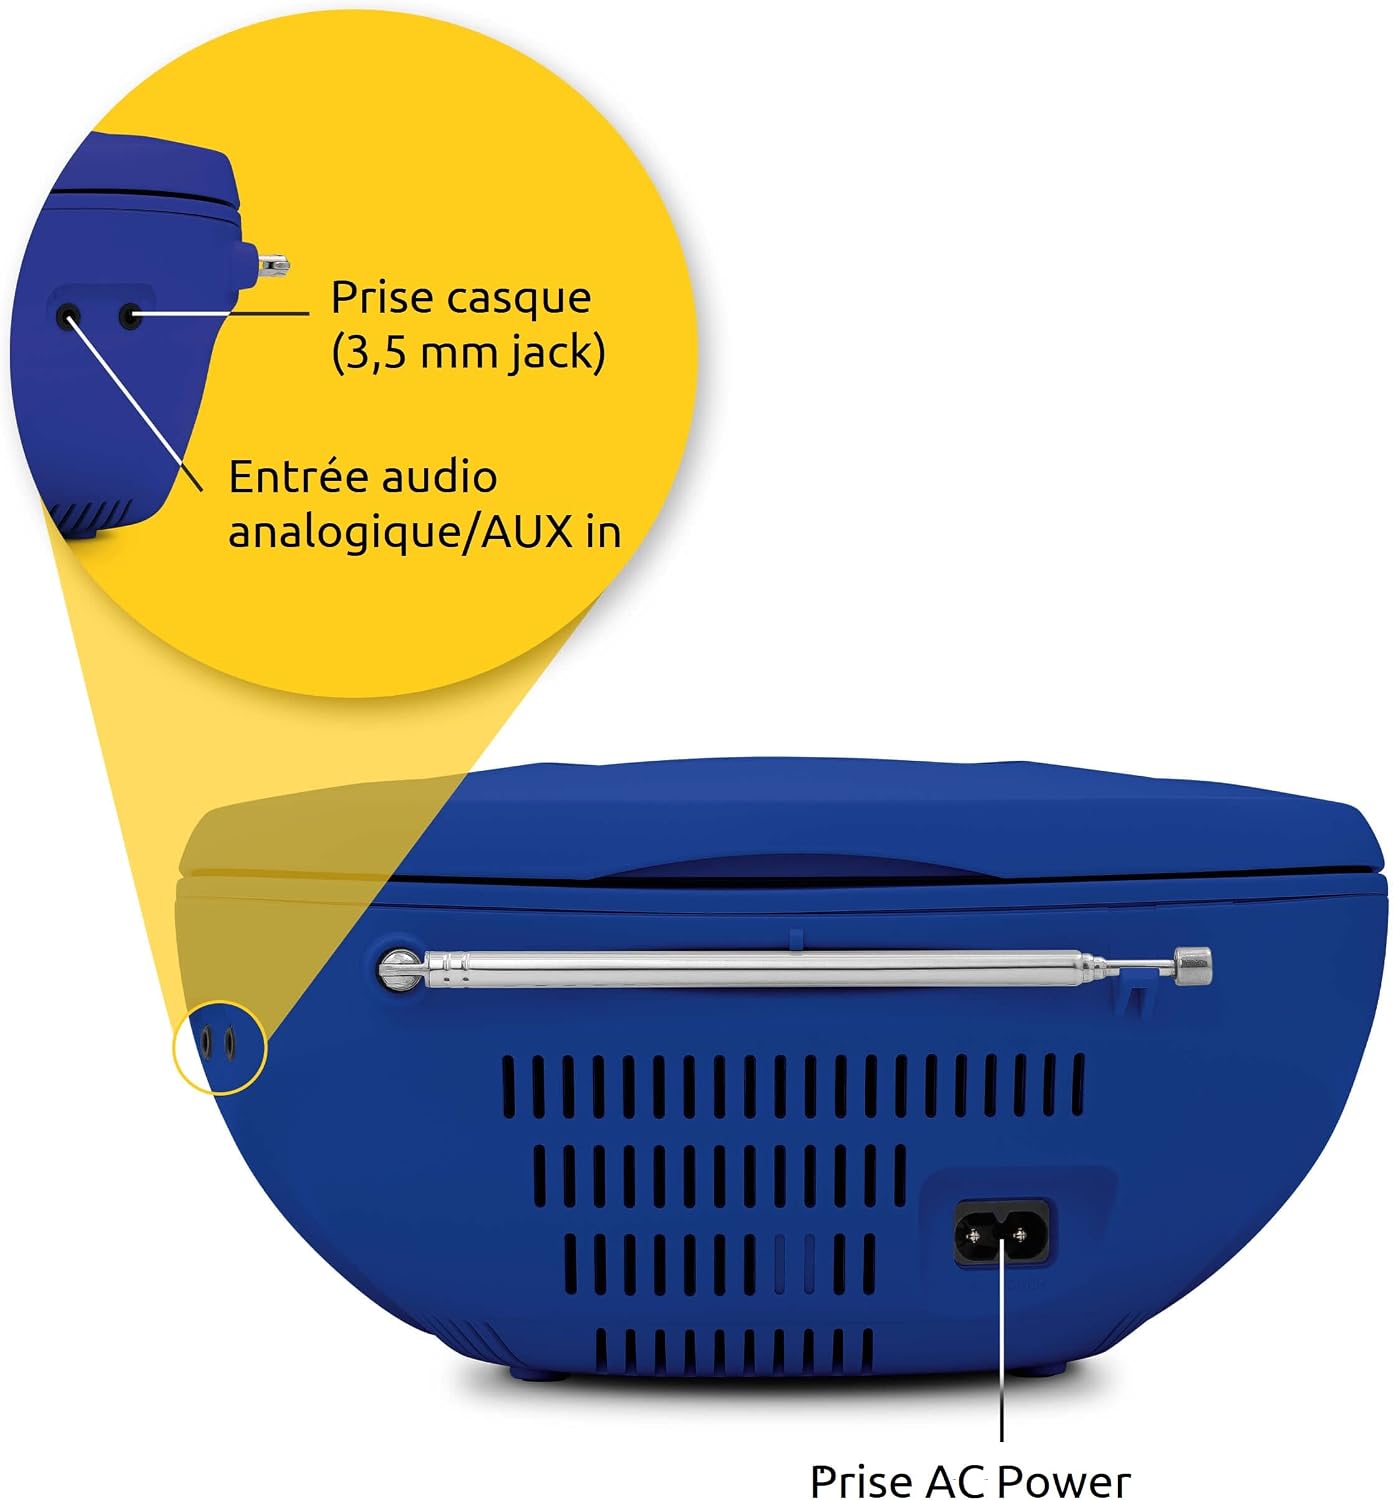
Image: Detailed view of the rear and side ports, including headphone jack, AUX in, and AC power input.
- Headphone Jack (3.5 mm): For private listening.
- AUX In: Connect external audio devices.
- AC Power Input: Connect the provided power cable.
- FM Telescopic Antenna: Extend for optimal FM radio reception.
5. Setup
5.1 Powering the Device
The Viola CD-1 can be powered by AC mains or batteries.
- AC Power: Insert the AC power cable into the AC input on the rear of the unit and plug the other end into a standard wall outlet.
- Battery Power: Open the battery compartment on the bottom of the unit. Insert 6 x 1.5V C-type (R14) batteries, ensuring correct polarity. Close the compartment securely.

Image: The Viola CD-1 being used outdoors, demonstrating its battery-powered portability.
5.2 Antenna Setup
For optimal FM radio reception, fully extend the telescopic antenna located on the rear of the unit. Adjust its position for the best signal quality.
6. Operating Instructions
6.1 Power On/Off
Press the Power button (usually centrally located) to turn the unit on or off.
6.2 CD Playback

Image: The Viola CD-1 with its top-loading CD compartment open, ready for disc insertion.
- Open the CD compartment lid.
- Place a CD (audio CD or MP3 CD) onto the spindle with the label side facing up.
- Close the CD compartment lid securely.
- Press the Mode button to select CD mode.
- Press the Play/Pause button to start playback.
- Use the Skip/Search buttons (forward/backward arrows) to navigate tracks.
- For MP3 CDs, use the Album button to switch between folders.
6.3 FM Radio Operation

Image: Visual representation of FM radio waves, indicating the device's radio functionality.
- Extend the telescopic antenna.
- Press the Mode button to select FM radio mode.
- Press the Scan button to automatically search for and store available stations.
- Use the Program/Memory buttons to cycle through stored stations.
6.4 Bluetooth Audio Streaming

Image: The Viola CD-1 paired with a smartphone, demonstrating wireless Bluetooth audio streaming.
- Press the Mode button to select Bluetooth mode. The display will indicate 'BT' or a similar pairing status.
- Enable Bluetooth on your smartphone or other mobile device.
- Search for available devices and select "VIOLA CD-1" to pair.
- Once paired, you can stream audio wirelessly from your device to the Viola CD-1.
6.5 AUX Input
To connect an external audio source:
- Connect a 3.5mm audio cable from your external device's headphone or line-out jack to the AUX In port on the Viola CD-1.
- Press the Mode button to select AUX mode.
- Control playback and volume from your external device.
6.6 Headphone Use
For private listening, plug 3.5mm headphones into the headphone jack. The internal speakers will automatically mute.
7. Maintenance
To ensure the longevity and optimal performance of your Viola CD-1:
- Cleaning: Use a soft, dry cloth to clean the exterior of the unit. Do not use abrasive cleaners or solvents.
- CD Lens: If CD playback issues occur, use a specialized CD lens cleaner disc.
- Storage: When not in use for extended periods, remove batteries and store the unit in a cool, dry place.
8. Troubleshooting
| Problem | Possible Cause | Solution |
|---|---|---|
| No power | AC cable not connected; Batteries depleted or incorrectly inserted. | Check AC connection; Replace batteries or ensure correct polarity. |
| No sound | Volume too low; Headphones connected; Incorrect mode selected. | Increase volume; Disconnect headphones; Select correct mode (CD, FM, BT, AUX). |
| CD skipping or not playing | CD dirty or scratched; CD inserted incorrectly; Lens dirty. | Clean or replace CD; Reinsert CD correctly; Use a CD lens cleaner. |
| Poor FM reception | Antenna not extended or positioned incorrectly. | Fully extend and adjust the telescopic antenna. |
| Bluetooth pairing failure | Device not in pairing mode; Viola CD-1 not discoverable; Distance too far. | Ensure Viola CD-1 is in Bluetooth mode; Check device's Bluetooth settings; Move devices closer. |
9. Specifications
| Feature | Specification |
|---|---|
| Model | Viola CD-1 |
| Brand | TechniSat |
| CD Player | Supports Audio CD, CD-R, CD-RW, MP3 CD |
| Radio Tuner | FM (UKW) |
| Bluetooth | Audio Streaming (Reception) |
| Speakers | Stereo, 2 x 1 Watt RMS |
| Connectivity | AUX In (3.5mm Jack), Headphone Out (3.5mm Jack) |
| Power Supply | AC (230V) or 6 x 1.5V C-type (R14) Batteries |
| Dimensions (L x H x D) | 21.5 x 10.0 x 21.5 cm |
| Weight | 828 Grams |
| Model Number | 0002/2980 |
10. Warranty and Support
Warranty information for the TechniSat Viola CD-1 is not explicitly provided in the product details. Please refer to your purchase documentation or contact your retailer for specific warranty terms and conditions.
For technical support or further assistance, please visit the official TechniSat website or contact their customer service department.


