
Introduction
The Lutron Caseta Smart Claro Accessory Switch (Model DVRF-AS-IV) is designed to expand the control of your existing Lutron Diva Smart Dimmer (DVRF-6L-WH-R) or Claro Smart Switch (DVRF-5NS-WH). This accessory switch enables 3-way and multi-location lighting control applications, allowing you to control a single light fixture from multiple points. It integrates seamlessly with the aesthetic of the primary smart dimmer or switch and does not require a neutral wire for installation.
Important Safety Information
- WARNING: SHOCK HAZARD. To avoid serious injury or death, always turn OFF power at the circuit breaker or fuse box before wiring.
- All wiring must comply with local and national electrical codes.
- If you are unsure about any part of these instructions, consult a qualified electrician.
- This accessory switch is for indoor use only.
- Do not use with standard (non-smart) dimmers or switches.
Package Contents
- (1) Lutron Caseta Smart Claro Accessory Switch (DVRF-AS-IV)
- Note: Coordinating wallplate sold separately.

Image: Lutron Caseta Smart Claro Accessory Switch (DVRF-AS-IV) in its retail packaging, alongside the ivory-colored switch unit.
Compatibility
This accessory switch is designed exclusively for use with the following Lutron smart controls:
- Lutron Diva Smart Dimmer (Model DVRF-6L-WH-R)
- Lutron Claro Smart Switch (Model DVRF-5NS-WH)
Important: This accessory switch is NOT compatible with the original Caseta dimmers or switches (Models PD-6WCL and PD-5ANS/PD-6ANS).
A smart hub (e.g., Lutron Caseta Smart Hub L-BDG2-WH, sold separately) is required to enable smart control features such as voice assistant integration, app control, personalized scenes, and schedules.
Setup and Installation
Pre-Installation Checklist
- Turn off power: Locate your circuit breaker or fuse box and turn off the power to the switch location. Verify power is off by attempting to turn on the light.
- Tools required: You will typically need a screwdriver and a pair of pliers.
- Neutral wire check: The Claro Smart Accessory Switch does not require a neutral wire for operation, making it compatible with homes of any age.
Wiring for 3-Way and Multi-Location Applications
The following video provides a visual guide for installing the Lutron Caseta Smart Claro Accessory Switch in 3-way and multi-location setups. Please follow all safety precautions.
Video: Installation guide for the Lutron Caseta Claro Smart Accessory Switch in 3-way wiring configurations. This video demonstrates the steps for safely replacing an existing switch and connecting the new accessory switch.
General Wiring Steps (Refer to video for detailed instructions):
- Identify Wires: Carefully remove the existing wallplate and switch. Identify the common wire (often connected to a different colored screw on the old switch) and the traveler wires.
- Connect Ground Wire: Connect the bare copper ground wire from the wall box to the green wire on the Claro Smart Accessory Switch.
- Connect Common Wire: Connect the identified common wire from the wall box to the black wire on the Claro Smart Accessory Switch.
- Connect Traveler Wires: Connect the remaining two traveler wires from the wall box to the red and blue wires on the Claro Smart Accessory Switch. The order of these two connections typically does not matter.
- Secure and Mount: Carefully push all wires back into the wall box. Mount the accessory switch using the provided screws.
- Install Wallplate: Attach your coordinating wallplate (sold separately).
- Restore Power: Turn the power back on at the circuit breaker.

Image: Rear view of the Lutron Caseta Smart Claro Accessory Switch, showing the various colored wires for connection (green for ground, black for common, red and blue for travelers).
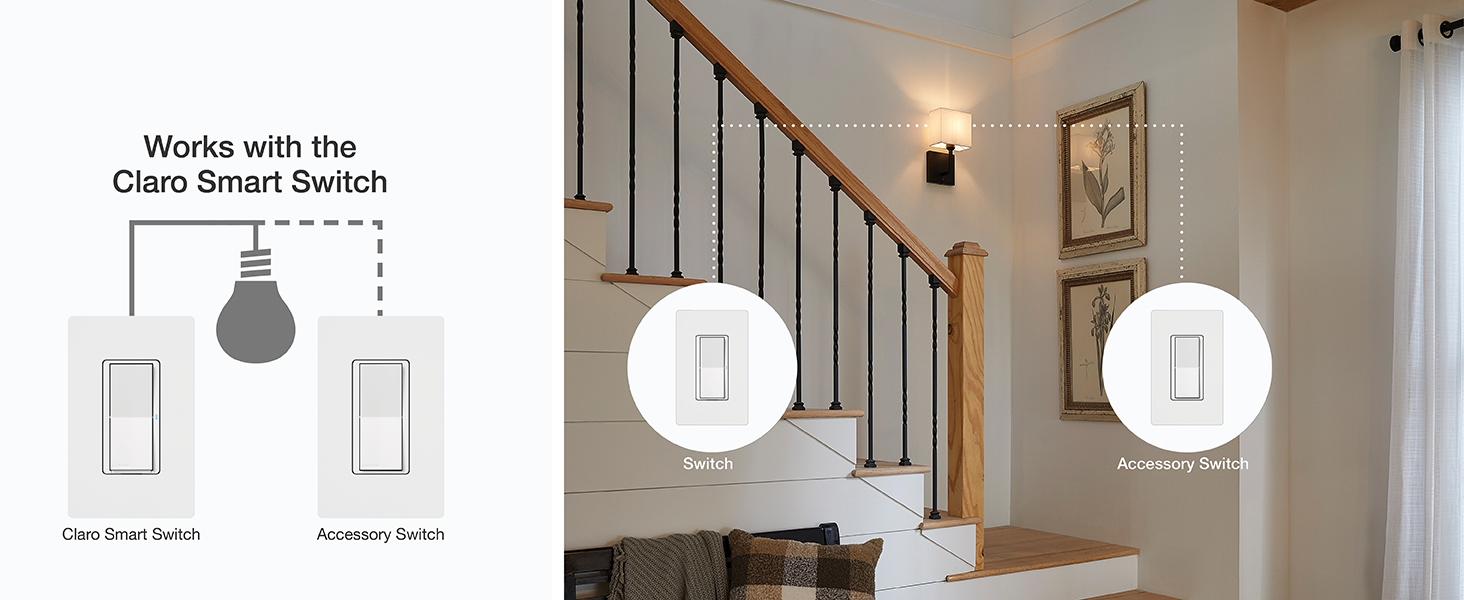
Image: Diagram illustrating how the Claro Smart Accessory Switch works in conjunction with a Diva Smart Dimmer for multi-location control.

Image: Product fact diagram indicating that up to 10 Claro Accessory Switches can be used with a Diva Smart Dimmer or Claro Smart Switch for multi-location applications.
Operating Instructions
Once installed and power is restored, the Claro Smart Accessory Switch provides convenient control of your lights.
- On/Off Control: Press the top or bottom of the paddle to turn lights on or off.
- Delayed Fade-to-Off: Press and hold the paddle for approximately 30 seconds for a gradual fade-to-off effect.
- Diva Smart Dimmer Pairing Functions: When paired with a Diva Smart Dimmer, a single tap on the accessory switch will recall your favorite preset light level. A double tap will bring the lights to full brightness.
- Care: To clean the switch, wipe with a soft, damp cloth. Do not use chemical cleaners.

Image: Close-up of the Claro Accessory Switch, highlighting the paddle for on/off control and the press-and-hold function for a 30-second fade-to-off.
Specifications
| Model Number | DVRF-AS-IV |
| Product Dimensions | 1.44 x 2.94 x 4.69 inches |
| Item Weight | 3.35 ounces |
| Brand | Lutron |
| Operation Mode | ON-OFF |
| Current Rating | 5 Amps |
| Operating Voltage | 120 Volts |
| Contact Type | Normally Closed |
| Connector Type | Hard Wired |
| Circuit Type | 3-Way with Diva smart dimmer or Claro smart switch |
| Neutral Wire Required | No |
Troubleshooting
- Lights not responding:
- Ensure power is restored at the circuit breaker.
- Verify all wire connections are secure and correct according to the installation instructions.
- Confirm compatibility with your primary Diva Smart Dimmer or Claro Smart Switch.
- Accessory switch not matching primary control's behavior:
- Ensure the accessory switch is correctly wired to the primary control.
- If using a smart hub, check the Lutron app for any pairing or configuration issues.
- For further assistance, refer to the Lutron support website or contact customer service.
Warranty and Support
Lutron products are backed by a manufacturer's warranty. For specific warranty details, registration, and technical support, please visit the official Lutron website or contact Lutron customer service directly. Contact information can typically be found on the product packaging or the Lutron website.
Online Resources: For FAQs and helpful hints, visit casetawireless.com.


