
1. Introduction
Thank you for purchasing the Panasonic VL-SE35XLA Video Door Phone. This manual provides essential information for the safe and efficient use of your new device. Please read this manual thoroughly before installation and operation, and retain it for future reference.
Important Safety Information
- Ensure all electrical work is performed by a qualified electrician and complies with local codes.
- Do not expose the outdoor unit to direct water spray or immerse it in water.
- Use only the specified power supply and accessories.
- Avoid installing the outdoor unit in direct sunlight or where it may be subject to extreme temperatures.
- Keep the indoor monitor unit away from heat sources and moisture.
2. Package Contents
Verify that all items are present in the package:
- Indoor Monitor Unit (VL-ME35)
- Outdoor Camera Unit (VL-V522L)
- Wall Mounting Bracket for Indoor Unit
- Mounting Screws and Anchors
- Power Adapter for Indoor Unit
- Instruction Manual (this document)
3. Product Overview
The Panasonic VL-SE35XLA is a wireless video door phone system designed for home security and convenience. It features an indoor monitor with an LCD display and an outdoor camera unit.
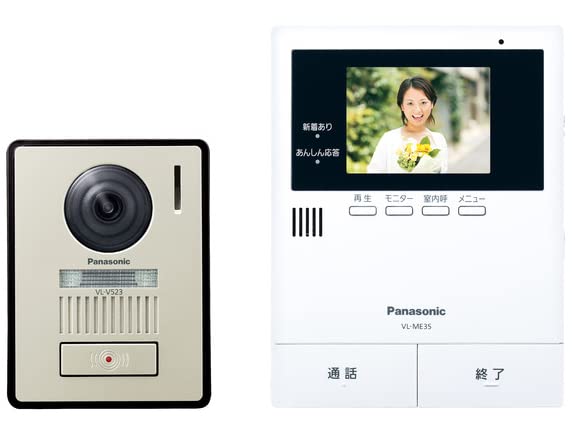
Image: Panasonic VL-SE35XLA Video Door Phone System, showing both indoor monitor and outdoor camera units.
Key Components:
- Indoor Monitor Unit: Features a color LCD display for viewing visitors, communication buttons, and settings controls.
- Outdoor Camera Unit: Equipped with a camera, microphone, speaker, and call button for two-way communication and video capture.
4. Setup and Installation
Proper installation is crucial for optimal performance. Follow these steps carefully.
4.1 Mounting the Outdoor Camera Unit
- Choose a suitable location near your entrance, approximately 1.4 to 1.6 meters (4.6 to 5.2 feet) from the ground, ensuring a clear view of visitors.
- Mark the drilling points using the mounting bracket as a template.
- Drill holes and insert wall anchors if necessary.
- Secure the mounting bracket to the wall with screws.
- Connect the necessary wiring (e.g., power supply, if not battery-operated, and any existing intercom wiring) to the outdoor unit terminals. Refer to the wiring diagram in the separate installation guide for detailed instructions.
- Attach the outdoor camera unit to the mounting bracket.
4.2 Mounting the Indoor Monitor Unit
- Select a convenient indoor location, such as a hallway or living room, within range of the outdoor unit's wireless signal.
- Secure the indoor unit's wall mounting bracket to the wall.
- Connect the power adapter to the indoor monitor unit and plug it into a standard electrical outlet.
- Attach the indoor monitor unit to its wall mounting bracket.
4.3 Initial Power-On and Pairing
- Once both units are powered, the indoor monitor unit should automatically attempt to pair with the outdoor camera unit.
- If pairing does not occur automatically, refer to the 'Pairing' section in the detailed installation guide for manual pairing instructions.
- Test the system by pressing the call button on the outdoor unit. The indoor monitor should ring and display the visitor's image.
5. Operating Instructions
This section describes the basic functions of your video door phone.
5.1 Answering a Call
- When a visitor presses the call button on the outdoor unit, the indoor monitor will ring and display the visitor's image.
- Press the Talk button on the indoor monitor to establish two-way communication.
- To end the conversation, press the End Call button.
5.2 Monitoring the Entrance
- To view the outdoor camera feed at any time, press the Monitor button on the indoor unit.
- The display will show the live video feed from the outdoor camera.
- Press the Monitor button again or wait for the automatic timeout to exit monitoring mode.
5.3 Recording Visitors
- The system supports automatic or manual recording of visitors.
- When a visitor calls, the system may automatically record a short video or still image.
- To manually record during a call or monitoring, press the Record button on the indoor monitor.
- Recorded images and videos can be reviewed through the menu on the indoor monitor.
5.4 Adjusting Volume and Settings
- Use the Volume buttons on the indoor monitor to adjust the ringtone and communication volume.
- Access the Menu button to configure various settings, including display brightness, recording preferences, and date/time.
6. Maintenance
Regular maintenance ensures the longevity and optimal performance of your device.
6.1 Cleaning
- Wipe the indoor and outdoor units with a soft, dry cloth.
- For stubborn dirt, slightly dampen the cloth with water and a mild detergent, then wipe dry immediately.
- Do not use abrasive cleaners, solvents, or alcohol, as these can damage the surfaces.
- Ensure the camera lens on the outdoor unit is clean for clear image quality.
7. Troubleshooting
If you encounter issues, refer to the following common problems and solutions.
| Problem | Possible Cause | Solution |
|---|---|---|
| No image on indoor monitor. | Power issue, units not paired, or out of range. | Check power connections. Ensure units are paired. Reduce distance between units or check for interference. |
| No sound during communication. | Volume too low, or microphone/speaker issue. | Adjust volume settings on the indoor monitor. Check for obstructions on microphone/speaker. |
| Outdoor unit not responding. | Power issue to outdoor unit, or wiring problem. | Verify power supply to the outdoor unit. Check wiring connections. |
| Poor image quality. | Dirty camera lens, poor lighting, or interference. | Clean the camera lens. Ensure adequate lighting at the entrance. |
If the problem persists after attempting these solutions, please contact customer support.
8. Specifications
| Feature | Description |
|---|---|
| Model Number | VL-SE35XLA |
| Brand | Panasonic |
| Connection Technology | Wireless |
| Special Feature | LCD Display |
| Indoor/Outdoor Use | Indoor (Monitor Unit) |
| Color | White |
| Product Dimensions (LxWxH) | 29.7 x 5.9 x 22.9 cm (11.7 x 2.3 x 9.0 inches) |
| Product Weight | 920 g (2.03 lbs) |
| Recommended Use | Outdoor Security (as a system) |
9. Warranty and Support
Panasonic products are manufactured to high-quality standards and are backed by a limited warranty. Please refer to the warranty card included with your product for specific terms and conditions.
For technical assistance, troubleshooting beyond this manual, or warranty claims, please contact Panasonic customer support through their official website or the contact information provided in your product packaging.
- Online Support: Visit the official Panasonic support website for FAQs, software updates, and additional resources.
- Customer Service: Refer to your product documentation for regional customer service contact numbers.


