
1. Introduction
This manual provides essential information for the safe and efficient installation, operation, and maintenance of the Generic WM266 Replacement Pump. This pump is specifically designed as a replacement for Qwik Jon 100 and 102 systems. Please read this manual thoroughly before attempting any installation or operation.
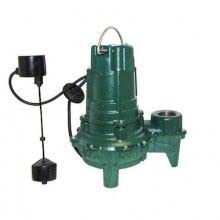
Figure 1: Generic WM266 Qwik Jon Replacement Pump. This image shows the compact design of the pump unit, typically made of cast iron, with visible inlet and discharge ports.
2. Safety Information
WARNING: Failure to follow these safety instructions could result in electric shock, fire, serious injury, or death. Always disconnect power before servicing.
- Ensure all electrical connections are made by a qualified electrician and comply with local codes.
- Do not operate the pump with a damaged cord or plug.
- Never handle the pump or its electrical components with wet hands.
- This pump is designed for specific applications. Do not use it for pumping flammable liquids or in hazardous locations.
- Keep children and unauthorized personnel away from the pump area.
- Wear appropriate personal protective equipment (PPE) during installation and maintenance.
3. Product Overview & Features
The Generic WM266 is a robust replacement pump engineered for reliable performance within Qwik Jon 100 and 102 systems. It features a durable cast iron construction and is designed for efficient waste water removal.
Key Features:
- Power: 1/2 HP motor, 115 Volts, 1 Phase.
- Discharge: 2-inch NPT (National Pipe Taper) for secure plumbing connections.
- Flow Rate: Maximum 115 Gallons Per Minute (GPM).
- Head: Maximum 18 feet of lifting height.
- Cord Length: 10 feet power cord.
- Material: Durable Cast Iron construction.
4. Setup and Installation
Proper installation is critical for the pump's performance and longevity. Refer to the original Qwik Jon system manual for specific plumbing and electrical diagrams.
4.1 Pre-Installation Checklist
- Verify that the power supply matches the pump's requirements (115V, 1 PH).
- Ensure all necessary plumbing fittings and tools are available.
- Confirm the installation area is clean and free of debris.
- Read and understand all safety warnings.
4.2 Installation Steps
- Disconnect Power: Turn off the main power supply to the Qwik Jon system at the circuit breaker.
- Remove Old Pump: Carefully disconnect the plumbing and electrical connections from the existing pump. Remove the old pump from the system.
- Position New Pump: Place the Generic WM266 replacement pump securely within the Qwik Jon unit, ensuring it is stable and level.
- Connect Plumbing: Connect the 2-inch NPT discharge piping to the pump. Ensure all connections are watertight using appropriate sealants and fittings.
- Electrical Connection: Connect the pump's power cord to the dedicated electrical outlet or junction box, following all local electrical codes. Ensure the ground wire is properly connected.
- Secure Components: Ensure all hoses, pipes, and electrical cables are secured to prevent movement or damage.
- Test System: Restore power to the system. Test the pump's operation by introducing water into the Qwik Jon unit to verify proper activation and discharge. Check for any leaks.
5. Operating Instructions
The Generic WM266 pump operates automatically when installed correctly within the Qwik Jon system. It is designed to activate when the water level reaches a predetermined point and shut off once the water is discharged.
- Ensure the pump is always submerged in water when operating to prevent dry running, which can cause damage.
- Do not block the inlet or discharge openings.
- Monitor the pump's operation periodically to ensure it cycles on and off as expected.
6. Maintenance
Regular maintenance helps ensure the longevity and efficient operation of your pump. Always disconnect power before performing any maintenance.
6.1 Regular Maintenance Checks (Quarterly)
- Inspect Power Cord: Check the power cord for any signs of damage, fraying, or wear. Replace if damaged.
- Clean Inlet Screen: If accessible, inspect and clean any debris from the pump's inlet screen to ensure unrestricted flow.
- Check Float Switch: Verify that the float switch (if applicable to your Qwik Jon system) moves freely and activates the pump correctly.
- Inspect Connections: Check all plumbing and electrical connections for tightness and corrosion.
6.2 Storage
If the pump needs to be stored for an extended period, ensure it is thoroughly cleaned, drained of all water, and stored in a dry, frost-free location.
7. Troubleshooting
Before contacting support, review the following common issues and their solutions.
| Problem | Possible Cause | Solution |
|---|---|---|
| Pump does not run | No power; tripped circuit breaker; faulty wiring; clogged impeller. | Check power supply and circuit breaker. Verify electrical connections. Disconnect power and inspect impeller for obstructions. |
| Pump runs continuously | Float switch stuck or faulty; check valve failure; continuous water inflow. | Inspect float switch for obstructions. Check and replace faulty check valve. Identify and stop continuous water source. |
| Low or no water discharge | Clogged discharge pipe; clogged inlet screen; air lock; worn impeller. | Clear discharge pipe. Clean inlet screen. Bleed air from the system. Inspect and replace impeller if worn. |
| Pump is noisy | Debris in pump; cavitation (air in system); loose mounting. | Disconnect power and clear debris. Ensure pump is fully submerged and system is free of air. Secure pump mounting. |
8. Specifications
Technical specifications for the Generic WM266 Replacement Pump.
| Specification | Value |
|---|---|
| Model Number | WM266 |
| Horsepower | 0.5 HP |
| Voltage | 115 Volts |
| Phase | 1 PH |
| Discharge Size | 2 inch NPT |
| Maximum Flow Rate | 115 GPM |
| Maximum Lifting Height (Head) | 18 feet |
| Power Cord Length | 10 feet |
| Material | Cast Iron |
| Color | Grey |
| Power Source | Corded Electric |
| Style | Above Ground |
9. Warranty and Support
For warranty information or technical support, please contact the retailer or manufacturer directly. Keep your purchase receipt as proof of purchase.
No official product videos were provided in the product data for embedding in this manual.


