1. Introduction
The NUX DM-8 Digital Drum Kit offers an authentic acoustic-like feel and realistic expressive playing experience. Designed with innovative technologies, the DM-8 features a robust rack system and a versatile sound module, making it suitable for drummers of all levels. This manual provides detailed instructions for setting up, operating, maintaining, and troubleshooting your DM-8 kit.
2. Key Features
- The hi-hat is mounted on its own hat stand, providing a more realistic feel as opposed to a fixed pad.
- Features a 12-inch independent snare drum for enhanced playability.
- The newly designed 10-inch independent kick drum can fully support a double bass pedal.
- The new DM-8 sound module is loaded with innovation and eye-catching features, including the Group Faders for easy audio level assignment to individual pads.
- Ability to send stereo audio and MIDI data to a Mac or Windows computer via USB.
- Import your own WAV samples via a USB Flash Drive.
- Apply EQ, Compression, Overdrive, or Reverb to individual pads, or add Master Compression and/or EQ to your overall mix.
3. Setup Guide
Follow these steps to assemble and set up your NUX DM-8 Digital Drum Kit:
- Unpacking: Carefully remove all components from the packaging. Verify that all parts listed in the packing list are present.
- Assemble the Rack System: Connect the main frame tubes according to the included assembly diagram. Ensure all clamps and bolts are securely tightened.
- Mount Pads and Cymbals: Attach the snare, tom pads, and cymbal pads (hi-hat, crash, ride) to the rack system using the provided clamps and arms. Position them ergonomically for comfortable playing.
- Install Kick Drum and Hi-Hat Stand: Place the 10-inch independent kick drum pad and attach your bass drum pedal. Set up the hi-hat stand and mount the hi-hat cymbal pad.
- Connect the DM-8 Sound Module: Securely mount the DM-8 sound module to the rack. Connect each drum and cymbal pad to the corresponding trigger input on the module using the included cables. Ensure connections are firm.
- Power Connection: Connect the DC 9V power adapter to the DM-8 module and plug it into a power outlet.
- Audio Output: Connect headphones to the PHONES jack or connect the L/MONO and R OUTPUTs to an amplifier, mixer, or audio interface.

Image: The NUX DM-8 Digital Drum Kit fully assembled, showcasing its robust rack system and pad layout.
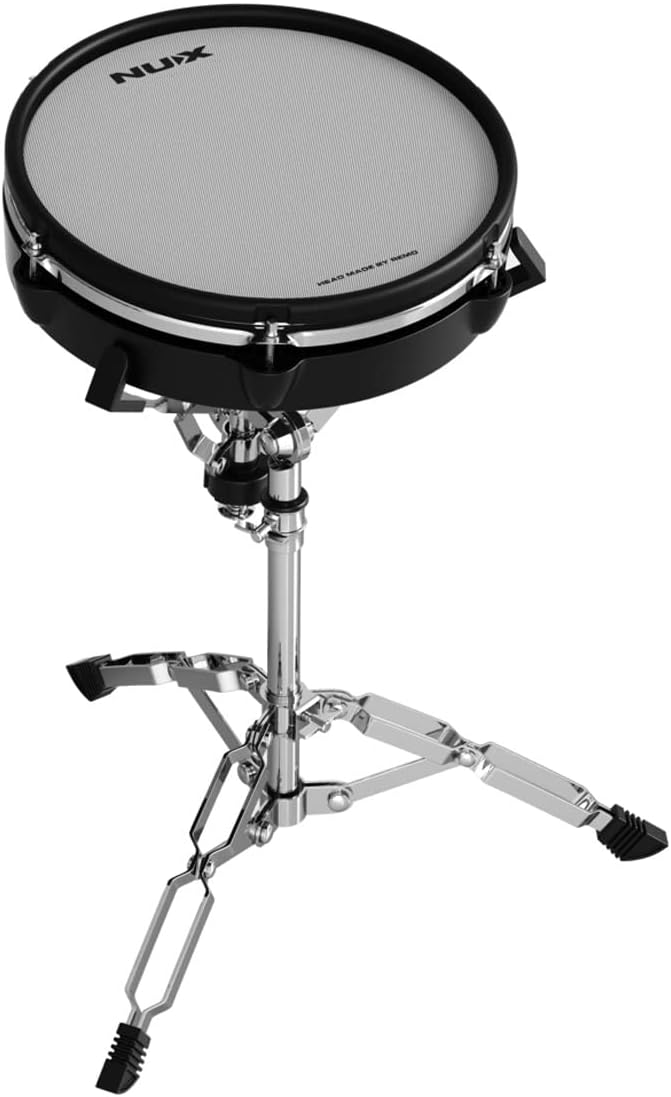
Image: Close-up of the 12-inch independent snare drum pad mounted on its dedicated stand.

Image: The 10-inch independent kick drum pad with a bass drum pedal attached, designed to support double bass pedals.

Image: The hi-hat cymbal pad mounted on its own dedicated hi-hat stand, providing a realistic feel.
4. Operating Instructions
The DM-8 sound module is the central control unit for your drum kit. Familiarize yourself with its functions for optimal performance.
4.1. DM-8 Sound Module Overview
The DM-8 module features an intuitive interface with various controls:
- Group Faders: Adjust the audio levels for individual pads (Kick, Snare, Toms, Hi-Hat, Crash, Ride) directly using the dedicated faders.
- Kit Selection: Use the main rotary knob to browse and select from 30 high-fidelity drum kits across different styles (Pop, Rock, Electronic, Metal, Percussion, Jazz).
- Sound Customization: Press the 'MENU' button to access sound editing features. You can assign any sound to the rim or head of a pad.
- Built-in Songs: The module includes a selection of built-in songs for jamming along. Use the 'SONG LIST' button to browse and 'PLAY/STOP' to control playback.
- Metronome: Activate the metronome using the 'CLICK' button to practice with a steady tempo.

Image: Close-up view of the NUX DM-8 Digital Drum Module, showing its display, knobs, buttons, and group faders.

Image: Detailed view of the DM-8 module's user interface, highlighting the various controls for sound selection and mixing.
4.2. USB Audio and MIDI
The DM-8 module can connect to a computer via USB for audio and MIDI data transfer:
- USB Audio: Send stereo audio directly to your Mac or Windows computer for recording or live streaming.
- MIDI Data: Transmit MIDI data to control virtual instruments in your Digital Audio Workstation (DAW) or use the DM-8 as a MIDI controller.

Image: Screenshot illustrating the DM-8's capability to send MIDI and audio data to a computer for recording.
4.3. WAV Sample Import
Expand your sound library by importing custom WAV samples:
- Insert a USB Flash Drive containing your WAV files into the 'USB DISK' port on the module.
- Navigate to the WAV import menu on the DM-8 module's display.
- Select and import individual WAV files or all files from the USB drive.

Image: The DM-8 module's screen displaying options for importing and managing WAV files from a USB disk.
4.4. Effects Processing
Enhance your drum sounds with built-in effects:
- Access the 'EFFECT' menu to apply various effects.
- Pad EQ/Comp: Apply equalization and compression to individual drum pads.
- Master EQ/Comp: Apply equalization and compression to the overall mix.
- Overdrive/Reverb: Add overdrive or reverb effects to individual pads or the master output for creative sound shaping.

Image: The DM-8 module's screen showing the available effects options, including Pad EQ, Pad Comp, Master EQ, Master Comp, Overdrive, and Reverb.
5. Maintenance
Proper maintenance ensures the longevity and optimal performance of your NUX DM-8 Digital Drum Kit:
- Cleaning: Use a soft, dry cloth to wipe down the pads, cymbals, module, and rack system. Avoid abrasive cleaners or solvents.
- Mesh Head Care: The mesh heads are durable but can be gently cleaned with a slightly damp cloth if necessary. Do not apply excessive force.
- Cable Management: Keep cables organized and untangled to prevent damage. Avoid sharp bends or pinching.
- Storage: When not in use for extended periods, store the kit in a cool, dry place away from direct sunlight and extreme temperatures.
- Tighten Connections: Periodically check and tighten all clamps, bolts, and cable connections to ensure stability and proper triggering.
6. Troubleshooting
If you encounter issues with your DM-8 kit, refer to the following common problems and solutions:
| Problem | Possible Cause | Solution |
|---|---|---|
| No sound from pads | Loose cable connection, low volume, incorrect kit selected. | Check all trigger cable connections. Increase master volume and individual pad faders. Select a different drum kit. |
| Pad not triggering consistently | Loose cable, pad sensitivity setting, damaged pad/cable. | Ensure cable is fully inserted. Adjust pad sensitivity in the module settings. Test with a different cable or pad if available. |
| Module not powering on | Power adapter not connected, faulty power outlet. | Verify power adapter is securely connected to module and outlet. Try a different power outlet. |
| Unwanted sounds or crosstalk | Pad sensitivity too high, vibration transfer through rack. | Reduce sensitivity for affected pads. Ensure rack is stable and pads are not touching each other or the rack excessively. |
| USB connection issues | Incorrect USB cable, driver issues, computer settings. | Use a standard USB A-to-B cable. Install necessary drivers if prompted by your computer. Check computer's audio/MIDI settings. |
7. Specifications
- Model Number:
- DM-8
- Item Weight:
- 66.9 pounds
- Package Dimensions:
- 46.9 x 20.3 x 15.9 inches
- Snare Drum:
- 12-inch Independent Snare Drum
- Kick Drum:
- 10-inch Independent Kick Drum (supports double bass pedal)
- Hi-Hat:
- Mounted on its own hi-hat stand
- Sound Module:
- DM-8 Module with Group Faders, 30 drum kits, sound customization, built-in songs, metronome
- Connectivity:
- USB (Audio/MIDI), USB Disk (WAV import), AUX IN, MIDI OUT, L/MONO & R Outputs, Trigger Inputs
- Effects:
- Pad EQ, Pad Compression, Master EQ, Master Compression, Overdrive, Reverb
8. Warranty and Support
NUX products are manufactured to high-quality standards. For warranty information, technical support, or service inquiries, please refer to the warranty card included with your product or visit the official NUX website. You can also contact NUX customer support directly for assistance with any issues not covered in this manual.


