
1. Introduction
The ORICO 4 Bay Daisy Chain Hard Drive Enclosure (Model 4Bay Daisy Chain-SV) is designed to provide high-capacity external storage for 2.5-inch and 3.5-inch SATA HDDs and SSDs. Featuring USB 3.1 Gen 2 Type-C connectivity, it offers data transfer speeds up to 10Gbps and supports daisy-chaining up to three devices for a total storage capacity of 192TB. This enclosure is suitable for professionals requiring extensive data storage and efficient data management.
2. Product Overview
This section details the key features and components of your ORICO 4 Bay Daisy Chain Hard Drive Enclosure.
- High Capacity: Supports up to 16TB per bay, with a total capacity of 64TB for a single enclosure. Daisy-chaining allows for expansion up to 192TB (three 64TB devices).
- Fast Data Transfer: Equipped with USB 3.1 Gen 2 Type-C ports, offering speeds up to 10Gbps. Actual transfer rates for SATA III drives adjust to 6Gbps.
- Wide Compatibility: Compatible with 2.5-inch and 3.5-inch SATA HDDs/SSDs.
- Operating System Support: Works with Windows, Mac OS, Linux, Android, and iOS systems.
- Efficient Heat Dissipation: Features a 4mm thick aluminum alloy shell, an 80x80mm silent fan, and honeycomb ventilation holes to maintain optimal operating temperatures.
- Enhanced Security: Drives are secured with screws to prevent vibration and displacement. Includes LED indicators for drive activity and a stable 150W power supply.

Figure 2.1: Front view of the ORICO 4 Bay Daisy Chain Hard Drive Enclosure, showing four drive bays.
3. Setup
3.1 Installing Hard Drives
- Gently pull the drive tray out from the enclosure.
- For 3.5-inch HDDs, align the drive with the screw holes on the tray and secure it with the provided screws.
- For 2.5-inch HDDs/SSDs, a separate bracket (not included with the enclosure) is required to fit them into the 3.5-inch trays. Secure the 2.5-inch drive to the bracket, then secure the bracket to the tray.
- Slide the loaded tray back into the enclosure until it clicks into place.

Figure 3.1: Compatibility with 2.5-inch and 3.5-inch SATA HDDs/SSDs. Note that 2.5-inch drives require a bracket for installation.
3.2 Connecting to Your Computer
- Connect the provided 150W power adapter to the enclosure's power input and then to a power outlet.
- Use the supplied USB 3.1 Gen 2 Type-C to Type-C cable (or Type-C to Type-A cable) to connect the enclosure's 'Main' USB-C port to your computer's USB-C or USB-A port.
- Ensure the power switch on the back of the enclosure is in the 'ON' position.

Figure 3.2: Connecting the USB-C cable to the enclosure's main port.

Figure 3.3: Connecting the 150W power adapter to the enclosure.
4. Operating Instructions
4.1 Power On/Off
To power on the enclosure, ensure all connections are secure and flip the power switch on the rear panel to the 'ON' position. To power off, flip the switch to 'OFF'. It is recommended to safely eject drives from your operating system before powering off the enclosure to prevent data loss.
4.2 Daisy Chain Functionality
The enclosure supports daisy-chaining up to three devices. Connect the 'Main' USB-C port of the first enclosure to your computer. Then, connect the 'HUB' USB-C port of the first enclosure to the 'Main' USB-C port of the second enclosure, and so on. This allows for expanded storage capacity up to 192TB.
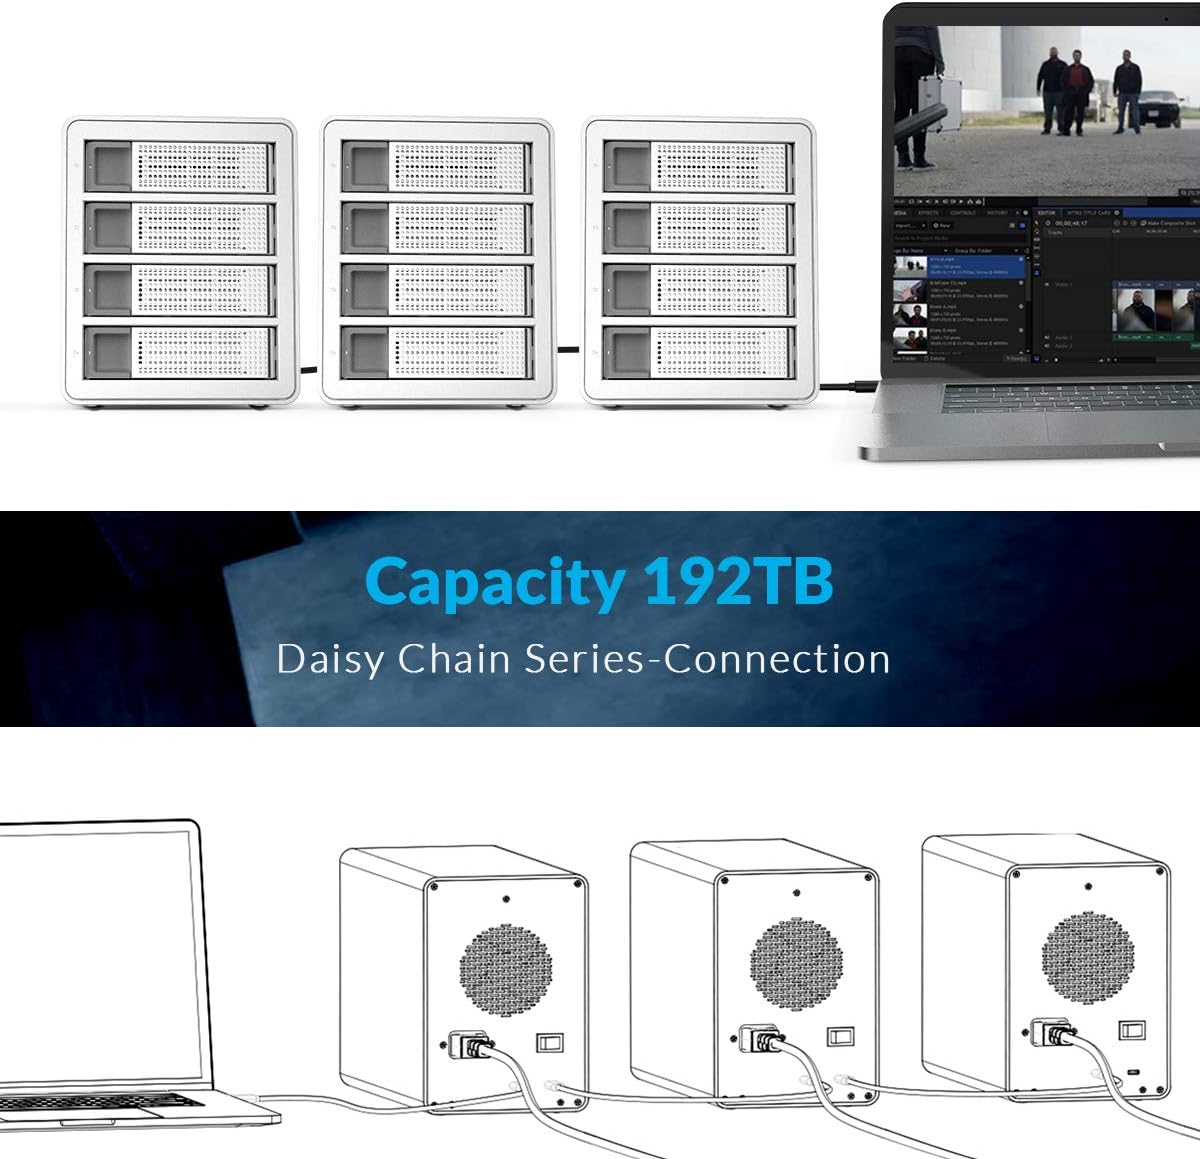
Figure 4.1: Multiple enclosures connected in a daisy chain configuration to a laptop.

Figure 4.2: Illustrative diagram of daisy-chain connection for storage expansion.
4.3 Drive Activity Indicators
Each drive bay has an LED indicator. A blue light indicates the drive is powered on and idle. A flashing blue light indicates drive activity (reading or writing data).

Figure 4.3: LED indicators on the drive bays.
4.4 Auto-Sleep Function
The enclosure is designed to enter an auto-sleep mode after approximately 10 minutes of inactivity to conserve power and extend drive lifespan. Drives will spin down and the LED indicators may change or turn off. Activity will resume upon data access.

Figure 4.4: Auto-sleep feature for power saving.
4.5 RAID Configuration (Advanced)
While the enclosure itself does not feature a built-in hardware RAID controller, some operating systems (e.g., macOS) offer software RAID capabilities that can be utilized with this enclosure. Refer to your operating system's documentation for instructions on configuring software RAID. The following video demonstrates potential RAID setup options, primarily for Mac systems.
Video 4.1: This video demonstrates the ORICO 4 Bay Type-C HDD enclosure, including installation of drives, connectivity, and a brief overview of RAID mode settings. Note that RAID mode support is primarily for Mac systems as shown in the demonstration.
5. Maintenance
5.1 Heat Dissipation
The enclosure is designed with an aluminum alloy casing and an internal fan to dissipate heat. Ensure adequate airflow around the enclosure and do not block the ventilation holes.

Figure 5.1: Internal fan and honeycomb heat dissipation design for optimal cooling.
5.2 Cleaning
To clean the enclosure, use a soft, dry cloth. Avoid using liquid cleaners or abrasive materials, as these can damage the finish or internal components. Periodically check the fan and ventilation holes for dust accumulation and clean gently with compressed air if necessary.
6. Troubleshooting
- Enclosure not recognized: Ensure all cables (USB and power) are securely connected. Try a different USB port on your computer or a different cable. Verify the power switch is ON.
- Drives not appearing: Check if the drives are properly installed in their trays and secured. For new drives, they may need to be initialized, partitioned, and formatted through your operating system's disk management utility.
- Slow transfer speeds: Ensure you are using a USB 3.1 Gen 2 compatible port on your computer. Older USB ports will result in slower speeds. Check the condition of your USB cable.
- Overheating: Ensure the enclosure is placed in a well-ventilated area and that the fan and ventilation holes are not obstructed.
- Intermittent disconnections: Verify the power adapter is securely connected and providing stable power. Check USB cable integrity.
7. Specifications
| Model Number | 4Bay Daisy Chain-SV |
| Brand | ORICO |
| Compatible Drives | 2.5-inch / 3.5-inch SATA HDD/SSD |
| Number of Bays | 4 |
| Max Single Bay Capacity | 16 TB |
| Max Total Capacity (Single Enclosure) | 64 TB |
| Max Total Capacity (Daisy Chain) | 192 TB (up to 3 devices) |
| Output Interface | USB 3.1 Gen 2 Type-C x 2 (Main, HUB) |
| Transmission Rate | 10 Gbps (USB 3.1 Gen 2) |
| Power Supply | 150W Built-in Power Adapter |
| Material | Aluminum Alloy (4mm thickness) |
| Cooling System | 80x80mm Silent Fan, Honeycomb Heat Dissipation Holes |
| Compatible Systems | Windows, Mac OS, Linux, Android, iOS |
| Dimensions | 13.3 x 10.5 x 8.6 inches (Package) |
| Item Weight | 8.08 pounds |
8. Package Contents
The package includes the following items:
- 1x ORICO 4 Bay Daisy Chain Hard Drive Enclosure (Model 4Bay Daisy Chain-SV)
- 1x USB 3.1 Gen2 Type-C Cable
- 1x 150W Power Adapter
- 1x User Manual

Figure 8.1: Contents included in the product package.
9. Warranty and Support
ORICO products come with a standard manufacturer's warranty. For detailed warranty information, technical support, or service inquiries, please refer to the official ORICO website or contact their customer service directly. Keep your purchase receipt for warranty claims.
