
1. Product Overview
The GUTINNEEN Large Catio Kitty House is a spacious outdoor enclosure designed to provide a safe and stimulating environment for multiple cats. It features a multi-level design with resting areas, platforms, and windows, all protected by a waterproof roof.
- Dimensions: 76.8” (L) x 35.8” (W) x 69.3” (H)
- Structure: 4-tier loft, 3 resting rooms, 3 platforms, 5 windows (4 acrylic, 1 sliding).
- Material: Solid fir wood frame with durable metal wire (1/2" x 1/2" opening).
- Features: Waterproof roof, oversized front door (65.8" with safety latch), option for connection to a main house.

Figure 1: Product Dimensions and Key Features. This image illustrates the overall dimensions of the catio, including length, width, and height, along with internal measurements for platforms and openings.
2. Safety Instructions
- Ensure all parts are securely fastened during assembly to prevent collapse or instability.
- Place the catio on a level, stable surface to avoid tipping.
- Regularly inspect the structure for any loose screws, damaged wood, or compromised wire mesh. Repair or replace as needed.
- Keep the catio clear of heavy objects or debris that could cause damage or injury.
- Do not allow children to climb on or play inside the catio unsupervised.
- Ensure the safety latch on the main door is always secured when cats are inside.
- Monitor weather conditions. While the roof is waterproof, extreme weather may require additional protection or temporary relocation of pets indoors.
3. Setup and Assembly
Assembly of the GUTINNEEN Catio requires careful attention to detail. It is recommended to have at least two people for assembly. All necessary hardware is included.
3.1 Unpacking and Part Identification
- Carefully unpack all components from the packaging.
- Verify that all parts listed in the included hardware and parts list are present and undamaged. Contact customer support immediately if any parts are missing or damaged.
- Organize parts by type to simplify the assembly process.
3.2 Assembly Steps (General Guidance)
Note: Refer to the detailed assembly manual included in your product packaging for step-by-step diagrams and specific hardware usage. The following is a general overview.
- Assemble the Base Frame: Connect the bottom wooden beams to form the base of the catio.
- Attach Side Panels: Secure the side panels, including the solid wood sections and wire mesh panels, to the base frame.
- Install Internal Platforms and Lofts: Position and secure the 3 resting rooms and 3 jumping platforms at their designated tiers. Ensure they are level and stable.
- Mount Windows and Doors: Install the acrylic windows, sliding window, and the main access doors. Ensure all latches operate smoothly and securely.
- Attach the Roof: Secure the waterproof roof panels to the top of the structure. Ensure proper alignment for weather protection.
- Final Inspection: Double-check all screws and connections to ensure the catio is stable and safe for use.

Figure 2: Front and Back Views of the Catio. This image highlights the locations of the doors and windows, crucial for assembly and understanding access points.

Figure 3: Internal Platform Design. This diagram illustrates the multi-level platforms and the inner hole for cats to move between levels.
Video 1: Overview of the Large Catio Kitty House. This video provides a visual demonstration of the assembled catio and its features.
4. Operating Instructions
4.1 Accessing the Catio
- The oversized front door (65.8" high) allows for easy walk-in access for cleaning and interacting with your cats. Ensure the safety latch is securely closed after entry or exit.
4.2 Connecting to Your House
- The upper back door of the catio can be moved to allow for attachment to your main house, providing your pets with free access between indoor and outdoor spaces. Customization may be required to align with your home's pet door or window.

Figure 4: Catio Connection Feature. This image demonstrates how the catio can be attached to a house for pet access.
5. Maintenance
5.1 Routine Cleaning
- Regularly sweep or vacuum the interior to remove cat hair, litter, and debris.
- Wipe down platforms and interior surfaces with a pet-safe cleaner.
- Clean windows with a mild glass cleaner.
- Inspect the wire mesh for any accumulated dirt or rust and clean as necessary.
5.2 Weather Protection
- The catio features a waterproof roof to protect against rain.
- During heavy rain, snow, or extreme cold, consider adding additional weather covers or moving sensitive items indoors.
- Periodically check the roof for any signs of wear or damage that could compromise its waterproof integrity.
5.3 Structural Integrity
- Annually inspect all wooden components for signs of rot, cracks, or insect damage. Apply wood sealant or paint as needed to prolong lifespan.
- Check all screws and bolts for tightness and re-tighten if loose.
- Examine the wire mesh for any breaks or sharp edges that could injure pets. Repair or replace damaged sections.
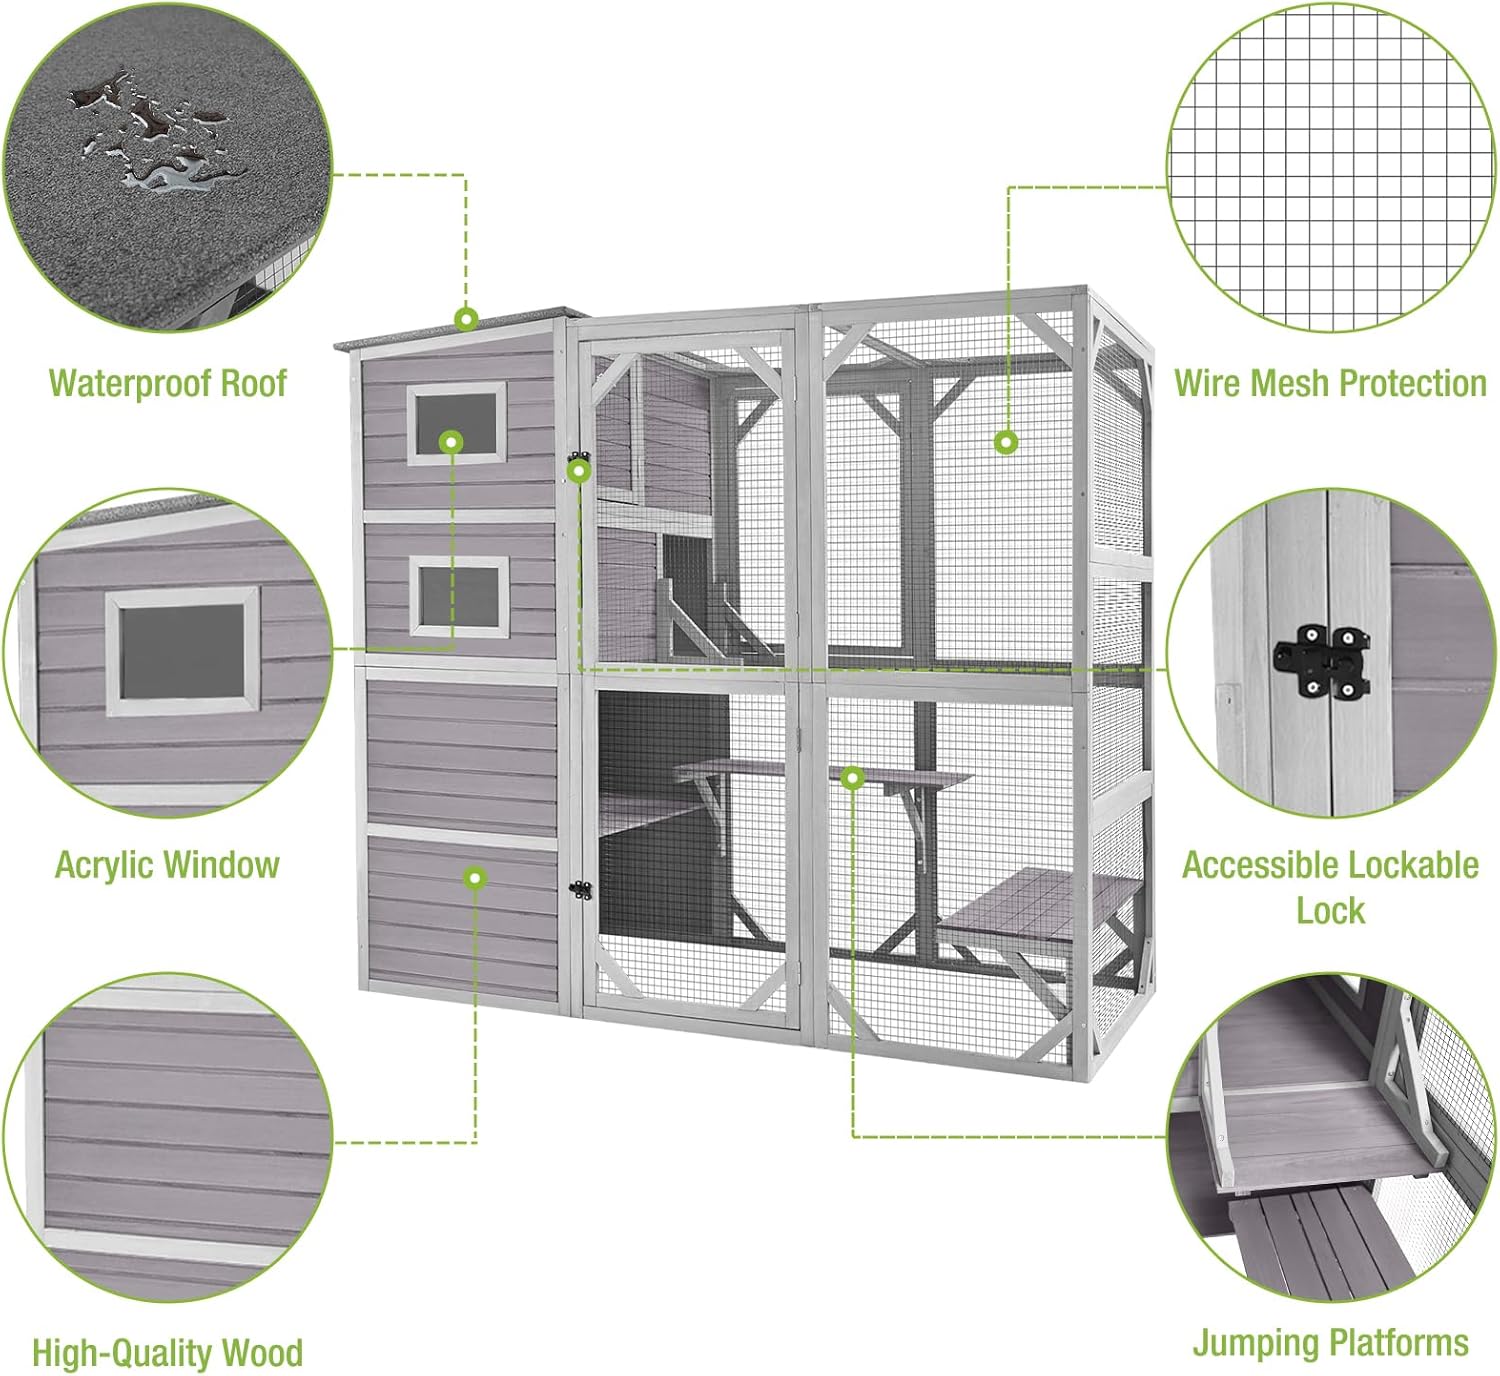
Figure 5: Key Construction Features. This image details the materials and protective elements of the catio, including the waterproof roof and wire mesh.
6. Troubleshooting
- Issue: Catio feels unstable after assembly.
- Solution: Re-check all connections and ensure all screws are fully tightened. Verify the catio is on a completely level surface.
- Issue: Water leakage from the roof.
- Solution: Inspect the roof panels for any gaps or damage. Ensure they are properly overlapped and sealed. Apply a suitable outdoor sealant if necessary.
- Issue: Door not closing securely.
- Solution: Check the alignment of the door and the latch mechanism. Adjust hinges or latch strike plate if needed. Ensure no debris is obstructing the closing path.
- Issue: Wire mesh is damaged.
- Solution: For small damages, use wire repair kits. For larger sections, contact customer support for replacement panels or professional repair advice.
7. Specifications
| Feature | Detail |
|---|---|
| Product Dimensions (L x W x H) | 76.8" x 35.8" x 69.3" |
| Item Model Number | AIR54-J |
| Material | Fir Wood, Metal Wire |
| Color | Grey |
| Number of Tiers | 4 |
| Windows | 4 Acrylic, 1 Sliding |
| Wire Opening | 1/2" x 1/2" |
| Assembly Required | Yes |
| Manufacturer | GUTINNEEN |
8. Warranty and Support
8.1 Warranty Information
This GUTINNEEN Catio Kitty House (Model AIR54-J) comes with a 1-year warranty from the date of purchase. The warranty covers manufacturing defects and material flaws under normal use. It does not cover damage caused by improper assembly, misuse, accidents, or natural disasters.
8.2 Customer Support
For any questions regarding assembly, missing parts, warranty claims, or general product inquiries, please contact GUTINNEEN customer support. Refer to your purchase documentation for specific contact details or visit the official GUTINNEEN store page on Amazon.
Online Support: GUTINNEEN Amazon Store