
Monstake 005
Monstake Automatic Foaming Soap Dispenser User Manual
Model: 005
Introduction
Thank you for choosing the Monstake Automatic Foaming Soap Dispenser. This user manual provides essential information for the safe and efficient operation, maintenance, and troubleshooting of your new device. Please read this manual thoroughly before use and retain it for future reference.

Image: The Monstake Automatic Foaming Soap Dispenser, showcasing its sleek design and touchless operation.
Product Features
- Touchless Operation: Infrared sensor for automatic foam dispensing.
- Adjustable Foam Volume: Three gear settings (0.6s, 1s, 1.5s) to meet different needs.
- Wide Compatibility: Suitable for hand soap, dish soap, and body wash (requires dilution).
- Full-Screen Display: Shows remaining battery and indoor temperature.
- Large Capacity: 300ml liquid reservoir, providing approximately 500 uses per fill.
- Long Battery Life: Built-in 2000mAh high-capacity battery, lasting up to 4 months on a single charge.
- USB-C Charging: Fast and safe charging.
- IPX5 Waterproof: Resistant to water splashes.
- Wall-Mounted Design: Space-saving and elegant.

Image: An overview of the dispenser's key features, including adjustable foam volume, waterproof rating, and charging method.
Setup Instructions
1. Wall Mounting
- Clean the Wall: Ensure the wall surface is clean and dry using a cloth.
- Apply Adhesive: Tear off the back adhesive from the mounting bracket and firmly stick it to the desired wall location. Allow it to stand for more than 24 hours for optimal adhesion.
- Install Dispenser: Fasten the soap dispenser onto the adhesive mounting bracket.
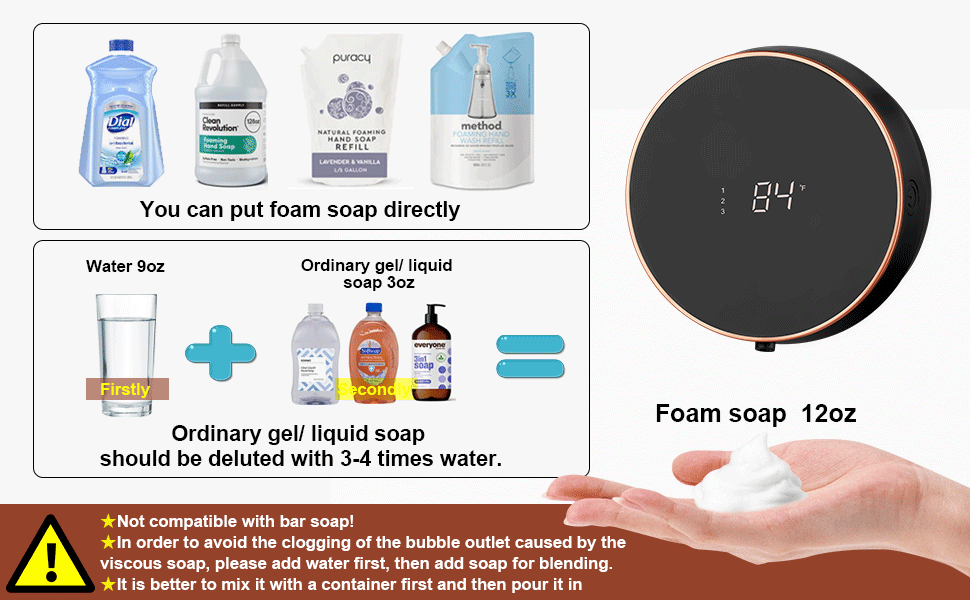
Image: Step-by-step guide for wall mounting the dispenser using the provided adhesive.
2. Filling the Dispenser
The dispenser is compatible with various liquid soaps. For optimal foaming, dilution is often required for non-foaming liquid soaps.
- Foam Soap: You can pour foam soap directly into the reservoir.
- Ordinary Gel/Liquid Soap: Dilute with 3-8 times water. A common ratio is 9oz water to 3oz liquid soap. Important: To prevent clogging, always add water first, then add soap for blending. It is recommended to mix it in a separate container first, then pour it into the dispenser.
- Note: Not compatible with bar soap.

Image: Illustrates the process of refilling the 300ml liquid reservoir.

Image: Visual guide for diluting liquid soap to achieve optimal foam consistency.
Operating Instructions
Power On/Off
Locate the power button on the side of the dispenser. Press and hold to turn the device on or off.
Dispensing Foam
Place your hand under the dispenser's nozzle. The infrared sensor will detect your hand and automatically dispense foam.
Adjusting Foam Volume (Gears)
The dispenser has three adjustable gear settings for foam volume. Press the power button briefly to cycle through the settings:
- Gear 1: 0.6 seconds of foam dispensing.
- Gear 2: 1.0 second of foam dispensing.
- Gear 3: 1.5 seconds of foam dispensing.

Image: Demonstrates the three adjustable foam volume settings, catering to different user preferences.
Display Information
The full-screen display shows:
- Remaining Battery Percentage: Indicates the current charge level.
- Indoor Temperature: Displays the ambient temperature in Fahrenheit or Celsius.
- Current Gear Setting: Shows which of the three foam volume settings is active.

Image: A clear view of the dispenser's full-screen display, showing battery level, temperature, and active gear setting.
Maintenance
Cleaning
- Wipe the exterior of the dispenser with a soft, damp cloth.
- Do not submerge the dispenser in water. While it is IPX5 waterproof, direct submersion can cause damage.
- Regularly clean the nozzle to prevent soap residue buildup. The 45-degree inclination of the nozzle helps prevent residual foam.

Image: Highlights the IPX5 waterproof feature, indicating resistance to water splashes for easy cleaning.

Image: Detail of the 45-degree inclined nozzle, designed to prevent soap residue buildup.
Charging
- When the battery indicator on the display shows low charge, connect the dispenser to a power source using the provided USB-C charging cable.
- A full charge provides approximately 4 months of use.

Image: Illustrates the internal 2000mAh battery and USB-C charging capability for long-lasting power.
Troubleshooting
| Problem | Possible Cause | Solution |
|---|---|---|
| Dispenser not turning on. | Low battery. | Charge the dispenser using the USB-C cable. |
| No foam dispensed. |
|
|
| Foam is too watery or too thick. | Incorrect soap-to-water ratio. | Adjust the dilution ratio. For thicker foam, use less water. For more liquid foam, add more water. Remember to add water first, then soap. |
| Dispenser falls off wall. |
|
|
Specifications
| Feature | Detail |
|---|---|
| Brand | Monstake |
| Model Number | 005 |
| Color | Pink |
| Material | Plastic (Plastic Free material type) |
| Liquid Volume Capacity | 300 Milliliters |
| Battery Capacity | 2000mAh |
| Charging Port | USB Type-C 3.0 |
| Product Dimensions | 5.5 x 5.5 x 2.9 inches |
| Item Weight | 13.4 ounces |
| Waterproof Rating | IPX5 |
| UPC | 659252830073 |

Image: Visual representation of the dispenser's dimensions.
Warranty and Support
For warranty information and customer support, please refer to the product packaging or contact Monstake customer service directly. You can also visit the official Monstake store on Amazon for more information and frequently asked questions:
Visit the Monstake Store on Amazon
MONSTAKE is committed to providing high-quality smart home products. We are here to make your home better.
Related documents005

Ask a question about this manual
Ask about setup, troubleshooting, compatibility, parts, safety, or missing instructions. Manuals+ will review the question and use this page’s manual context to help answer it.