
1. Introduction
Thank you for choosing the USHA Racer Chrome 1200mm Ceiling Fan. This manual provides essential information for the safe installation, operation, and maintenance of your new ceiling fan. Please read these instructions carefully before installation and retain them for future reference.
The USHA Racer Chrome ceiling fan is designed for efficient air circulation with a 1200mm blade length, 50 Watt energy consumption, and a high speed of 400 RPM. It features a durable 100% copper motor and a glossy powder-coated finish with chrome accents.
2. Safety Instructions
Always follow basic safety precautions when installing and operating electrical appliances to reduce the risk of fire, electric shock, and personal injury.
- Ensure the main power supply is switched off at the circuit breaker before installation, maintenance, or cleaning.
- All electrical wiring must be performed by a qualified electrician and comply with local electrical codes.
- The mounting structure must be capable of supporting the weight of the fan (approximately 3.6 kg) and its dynamic load during operation.
- Ensure the fan blades are at least 2.3 meters (7.5 feet) from the floor and have a minimum clearance of 0.5 meters (1.6 feet) from walls or other obstructions.
- Do not insert any objects into the path of the rotating blades.
- This fan is designed for indoor use only.
- Do not use the fan with a dimmer switch unless specifically designed for ceiling fans.
3. Package Contents
Carefully unpack all components and check against the list below. If any parts are missing or damaged, contact USHA customer support immediately.
- Fan Motor Assembly
- Fan Blades (3 units, Aluminium)
- Downrod
- Canopy (Upper and Lower)
- Mounting Bracket
- Hardware Pack (screws, washers, nuts)
- Cord (for electrical connection)
- Instruction Manual
4. Setup and Installation
Follow these steps for proper installation of your ceiling fan. Professional installation is recommended.
4.1. Pre-Installation Checks
- Ensure the power is OFF at the main circuit breaker.
- Verify that the ceiling joist or support structure can hold the fan's weight.
- Confirm you have all necessary tools (screwdriver, wire strippers, ladder, etc.).
4.2. Mounting the Bracket
- Attach the mounting bracket securely to the ceiling electrical box or support structure using appropriate screws and washers. Ensure it is firmly fixed and can support the fan.
4.3. Assembling the Fan
- Insert the downrod through the upper canopy and then through the motor housing.
- Secure the downrod to the motor assembly with the provided pin and screw.
- Attach the fan blades to the motor housing using the blade screws. Ensure all blades are securely fastened.

Figure 1: Assembled USHA Racer Chrome 1200mm Ceiling Fan.

Figure 2: Bottom view of the USHA Racer Chrome 1200mm Ceiling Fan, showing blade attachment.
4.4. Wiring Connections
- Carefully lift the fan assembly and hang it on the mounting bracket hook (if available) or have someone assist in holding it.
- Connect the electrical wires from the fan to the household wiring according to the wiring diagram provided in the fan's packaging. Typically, this involves connecting live to live, neutral to neutral, and ground to ground. Ensure all connections are secure with wire nuts.
4.5. Securing the Canopy
- Slide the upper canopy up against the ceiling and secure it to the mounting bracket with the provided screws. Ensure all wires are tucked neatly inside the canopy.
- Attach the lower canopy to cover the motor housing connection.
4.6. Determining Fan Size
Refer to the guide below to ensure your fan size is appropriate for your room area.
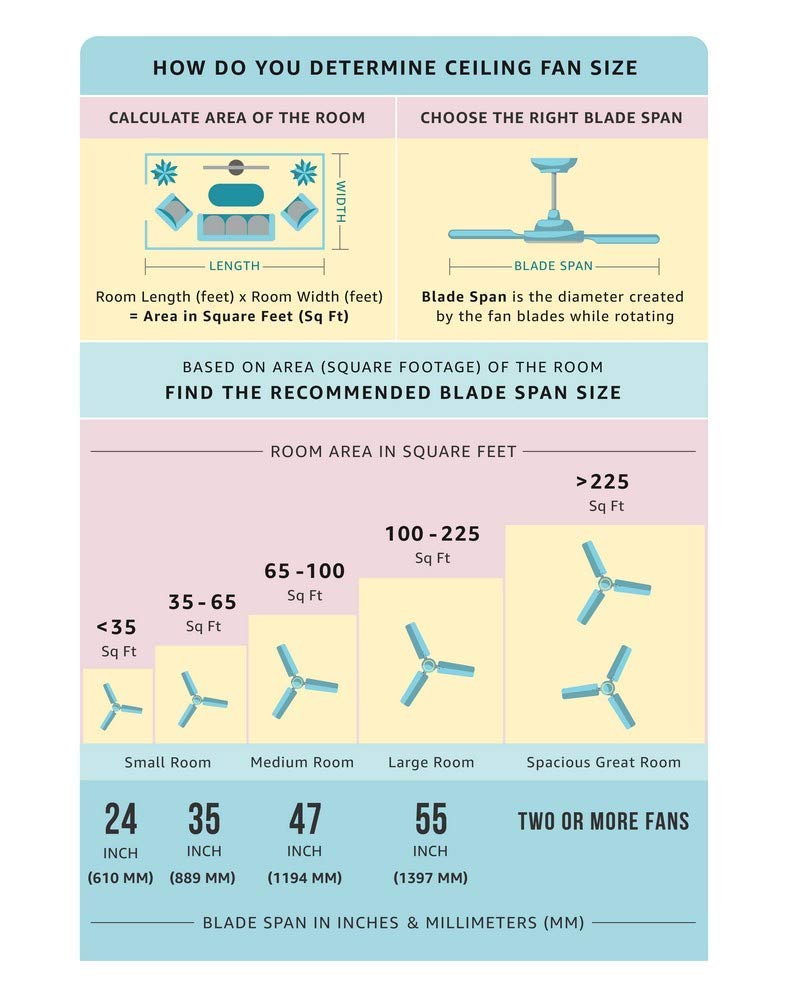
Figure 3: Guide for determining appropriate ceiling fan blade span based on room area.
5. Operating Instructions
Your USHA Racer Chrome ceiling fan is operated via a standard wall-mounted button control (regulator) or switch.
- Power On/Off: Use the wall switch to turn the fan on or off.
- Speed Control: Adjust the fan speed using the button control/regulator on your wall. The fan offers multiple speed settings, reaching an ultra-high speed of 400 RPM for maximum air delivery of 210 cubic meters per minute.
- The fan is designed to perform efficiently even at low voltage conditions.
6. Maintenance
Regular maintenance ensures optimal performance and extends the life of your ceiling fan.
- Cleaning: Dust the fan blades and motor housing regularly with a soft, damp cloth. Do not use abrasive cleaners or solvents, as these can damage the glossy powder-coated finish. Ensure the fan is switched off and stationary before cleaning.
- Tightness Check: Periodically check all screws on the motor housing, downrod, and blade attachments to ensure they are secure. Loose connections can cause noise or wobbling.
- Blade Condition: Inspect blades for any cracks or damage. Damaged blades should be replaced immediately to prevent imbalance and potential hazards.
- No Lubrication Required: This fan features a permanently lubricated motor and does not require additional oiling.
7. Troubleshooting
If you encounter issues with your fan, refer to the following common problems and solutions:
| Problem | Possible Cause | Solution |
|---|---|---|
| Fan does not start | No power supply; Loose wiring; Faulty switch/regulator | Check circuit breaker; Ensure all wire connections are secure; Test or replace switch/regulator. |
| Fan makes excessive noise | Loose screws; Unbalanced blades; Motor issue | Tighten all screws; Check blades for balance and damage; Contact customer support if motor noise persists. |
| Fan wobbles | Loose mounting bracket; Unbalanced blades; Loose downrod | Ensure mounting bracket is secure; Check blade balance and attachment; Tighten downrod screws. |
| Low air delivery | Incorrect speed setting; Obstructions; Fan size too small for room | Increase speed setting; Remove any obstructions; Refer to fan size guide (Figure 3). |
If the problem persists after attempting these solutions, please contact USHA customer support.
8. Specifications
Detailed technical specifications for the USHA Racer Chrome 1200mm Ceiling Fan:
| Brand | USHA |
| Model Name | CF Racer Chrome 1200MM 1ST |
| Model Number | 11RCHSSMB1DPWI4DAX |
| Colour | Smoke Brown |
| Electric Fan Design | Ceiling Fan |
| Power Source | Corded Electric |
| Wattage | 50 Watts |
| Energy Efficiency | 1 Star Rated, Energy Efficient |
| Number of Blades | 3 |
| Blade Material | Aluminium |
| Blade Length | 1200 Millimetres |
| Speed | 400 RPM |
| Air Flow Capacity | 210 Cubic Meters Per Minute |
| Control Method | Button Control / Push Button Switch |
| Mounting Type | Ceiling Mount |
| Product Dimensions (D x W x H) | 22D x 22W x 19H Centimeters |
| Item Weight | 3600 Grams |
| Finish Type | Powder Coated |
| Motor Type | 100% Copper Motor |
| Indoor/Outdoor Usage | Indoor |

Figure 4: Energy Efficiency Service Value Label (1 Star Rated).
9. Warranty and Support
Your USHA Racer Chrome 1200mm Ceiling Fan comes with a 2-year manufacturer's warranty from the date of purchase. This warranty covers manufacturing defects under normal use and service.
For warranty claims, technical assistance, or any other inquiries, please contact USHA customer support:
- Toll-Free Contact: 1800-1033-111
- Phone: +91 124 4583100
- Email: corporate@usha.com
- Manufacturer Address: Usha International Ltd, Road No. 3, Plot no. 15, Sector 32, Gurgaon, Haryana, India - 122001
Please have your purchase receipt and product model number (11RCHSSMB1DPWI4DAX) ready when contacting support.