1. Introduction
Thank you for choosing the ThreeH Digital LED Alarm Clock. This device combines a digital clock, alarm, temperature and humidity monitor, and a mirror display into one sleek unit. Please read this manual carefully to ensure proper use and maintenance of your new alarm clock.
Package Contents:
- 1 x ThreeH Digital LED Alarm Clock
- 1 x Acrylic Stand
- 1 x USB Power Cable
- 1 x CR2032 Battery (pre-installed for memory backup)
- 1 x User Manual
2. Safety Information
- Do not expose the device to extreme temperatures, direct sunlight, or high humidity.
- Avoid dropping or subjecting the device to strong impacts.
- Do not attempt to disassemble or modify the device. This will void the warranty.
- Use only the provided USB cable for power.
- Keep the CR2032 battery out of reach of children. If swallowed, seek immediate medical attention.
3. Product Overview
Familiarize yourself with the components and controls of your ThreeH Digital LED Alarm Clock.

Figure 3.1: Front view of the alarm clock with display elements and control buttons labeled.
Display Elements:
- Time Display: Shows current time in 12-hour or 24-hour format.
- Temperature Display: Shows current ambient temperature in Celsius (°C) or Fahrenheit (°F).
- Humidity Display: Shows current ambient relative humidity in percentage (%).
- Alarm Icon: Indicates when the alarm is active.
- Comfort Icons: Visual indicators for humidity levels (e.g., happy face for comfortable, sad face for uncomfortable).
Control Buttons (located on the front bottom):
- MODE Button: Used to switch between display modes (Time, Alarm) and enter setting modes.
- UP Button: Used to increase values during settings or adjust brightness.
- DOWN Button: Used to decrease values during settings or adjust brightness.
4. Setup
4.1 Powering On
- Connect the provided USB power cable to the USB port on the back of the alarm clock.
- Plug the other end of the USB cable into a standard USB power adapter (not included) or a powered USB port.
- The display will light up, indicating the clock is powered on. The pre-installed CR2032 battery serves as a memory backup in case of power loss, retaining your settings.
4.2 Placement Options
The alarm clock offers versatile placement options:
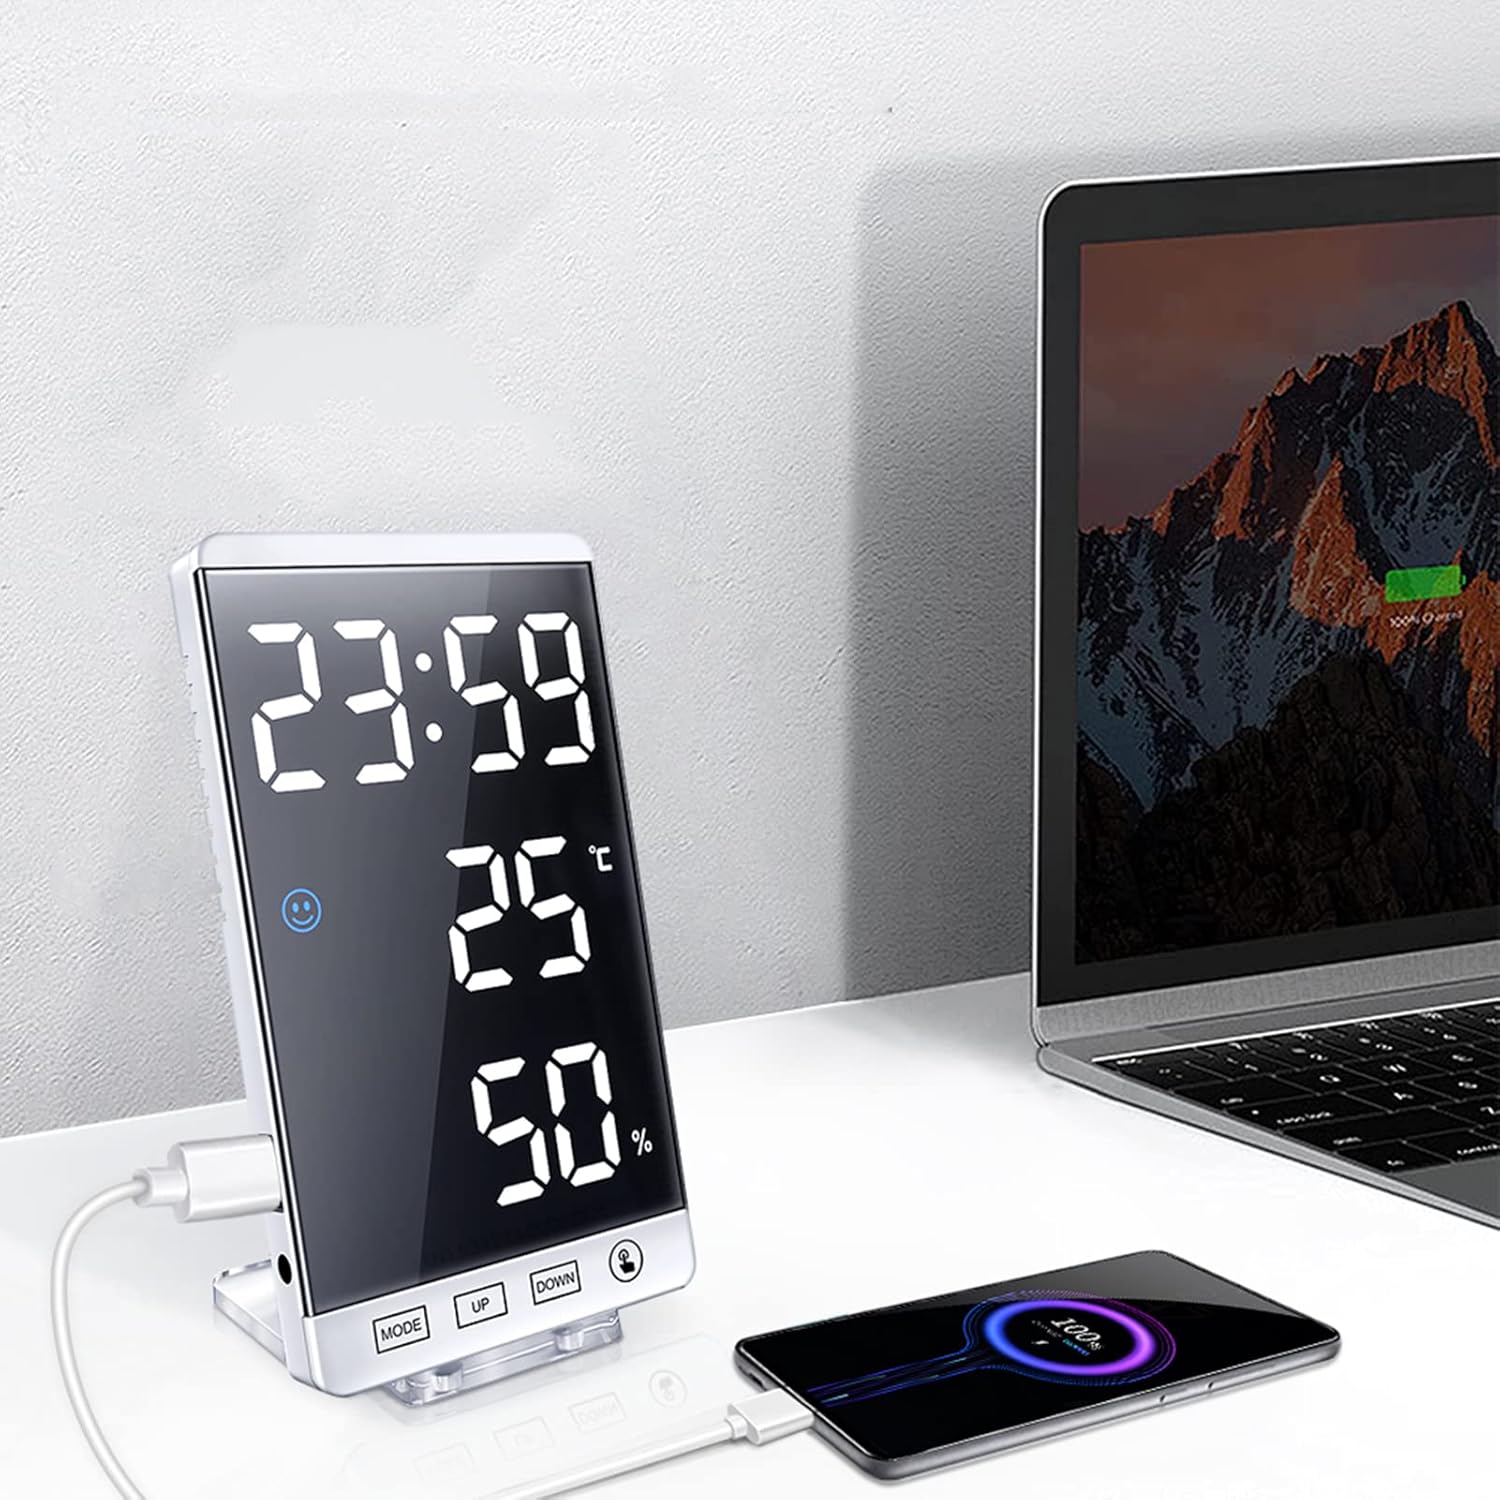
Figure 4.1: The alarm clock can be used on a desk with its stand or mounted on a wall.
- Desk Placement: Attach the acrylic stand to the back of the clock using the integrated magnets. Place it on any flat surface.
- Wall Mounting: Use the keyhole slot on the back of the clock to hang it on a wall hook or screw (not included).
5. Operating Instructions
5.1 Setting Time and 12/24 Hour Format
- In time display mode, press and hold the MODE button for 3 seconds to enter time setting. The hour digits will flash.
- Press UP or DOWN to adjust the hour.
- Press MODE again to switch to minute setting. The minute digits will flash.
- Press UP or DOWN to adjust the minute.
- Press MODE again to select 12-hour or 24-hour format. Press UP or DOWN to toggle.
- Press MODE again to confirm and exit time setting.
5.2 Setting the Alarm
- From time display mode, press the MODE button once to enter alarm display mode (AL will show on screen).
- Press and hold the MODE button for 3 seconds. The alarm hour digits will flash.
- Press UP or DOWN to adjust the alarm hour.
- Press MODE again to switch to alarm minute setting. The minute digits will flash.
- Press UP or DOWN to adjust the alarm minute.
- Press MODE again to confirm and exit alarm setting.
- To activate/deactivate the alarm, in alarm display mode, press UP. An alarm icon will appear/disappear on the display.
- When the alarm sounds, press any button to snooze for 5 minutes. To turn off the alarm for the day, press and hold the MODE button.
5.3 Adjusting Display Brightness
The clock offers 4 levels of brightness (Bright, Medium, Dim, Off) and an automatic adjustment mode.

Figure 5.1: The alarm clock display with various brightness settings.
- In time display mode, press the UP button to cycle through the 4 manual brightness levels.
- To activate automatic brightness adjustment, press and hold the UP button. The display will show 'AU' or a similar indicator. In this mode, the clock adjusts brightness based on ambient light, dimming at night to protect your eyes and save energy.
5.4 Temperature and Humidity Display
The clock continuously displays the current temperature and humidity. Comfort icons provide a quick visual reference for the environment.
- To switch between Celsius (°C) and Fahrenheit (°F), press the DOWN button in time display mode.
5.5 USB Charging Port
The alarm clock features a USB charging port on its side, allowing you to charge other electronic devices.

Figure 5.2: The integrated USB port can charge external devices.
- Connect your device's charging cable to the USB port on the alarm clock.
- Ensure the alarm clock is powered via its USB cable for this feature to function.
5.6 Mirror Function
The clock's display surface also functions as a mirror when the display is off or dimmed, offering practical utility.
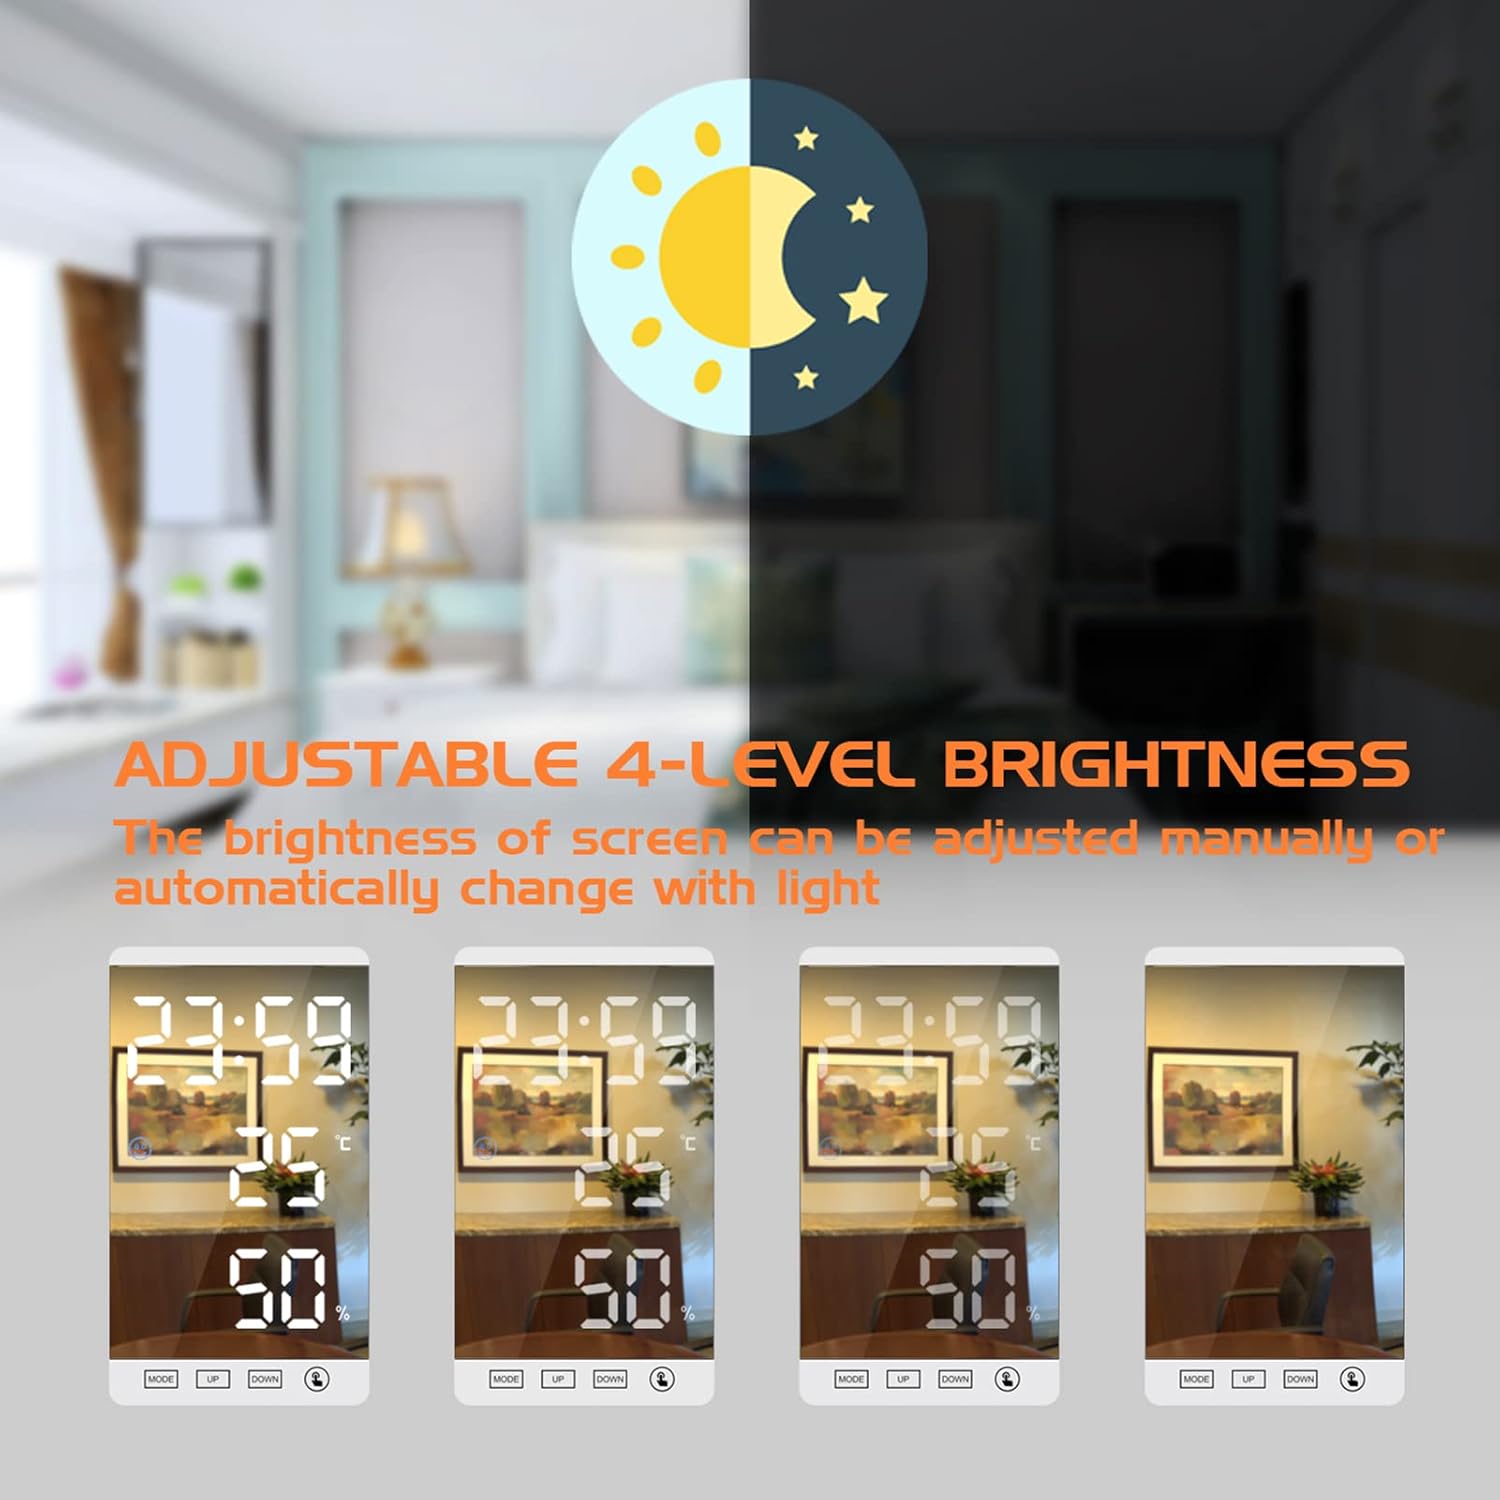
Figure 5.3: The clock's surface can be used as a mirror.
6. Maintenance
6.1 Cleaning
- Gently wipe the display and body with a soft, dry, lint-free cloth.
- Do not use abrasive cleaners, solvents, or chemical sprays, as these may damage the surface.
6.2 Battery Replacement (CR2032)
The CR2032 battery is for memory backup only. It is not required for the clock to function when connected to USB power. Replace it if settings are not retained after a power outage.
- Locate the battery compartment on the back of the clock.
- Open the compartment cover.
- Remove the old CR2032 battery and insert a new one, ensuring correct polarity (+ side up).
- Close the battery compartment cover.
7. Troubleshooting
| Problem | Possible Cause | Solution |
|---|---|---|
| Display is blank or not lighting up. | No power supply. | Ensure the USB cable is securely connected to both the clock and a powered USB adapter/port. |
| Time/settings are lost after power disconnection. | CR2032 backup battery is dead or missing. | Replace the CR2032 battery (see Section 6.2). |
| Alarm does not sound. | Alarm is not activated. | Ensure the alarm icon is visible on the display (see Section 5.2). |
| Display brightness is too low/high. | Manual brightness setting or automatic mode. | Press the UP button to adjust manual brightness. Press and hold UP to toggle automatic brightness mode. |
| Temperature/Humidity readings seem inaccurate. | Environmental factors or sensor obstruction. | Ensure the clock is not placed near heat sources, vents, or in direct sunlight. Allow time for readings to stabilize after moving. |
8. Specifications
| Feature | Specification |
|---|---|
| Brand | ThreeH |
| Model Number | H-AC66White_White |
| Color | White |
| Material | ABS + Acrylic Mirror Surface |
| Display Type | Digital LED |
| Screen Size | 6 inches (15.2 cm) |
| Product Dimensions (L x W x H) | 8.5 x 1.3 x 15 cm (3.3 x 0.5 x 5.9 inches) |
| Weight | 216g (0.4 lb) / 181g (0.4 lb) (as per different specifications) |
| Temperature Range | -20°C to 70°C (-4°F to 158°F) |
| Temperature Error | ±1°C |
| Humidity Range | 20% to 95% RH |
| Humidity Error | ±5% RH |
| Power Source | USB Cable (main power) |
| Backup Battery | 1 x CR2032 (included) |
| Special Features | Temperature Display, Alarm, Humidity Display, Adjustable Brightness, USB Charging Port, Mirror Surface |
9. Warranty and Support
For warranty information or technical support, please refer to the retailer's return policy or contact the seller directly through your purchase platform. Keep your proof of purchase for any warranty claims.


