
1. Introduction
This manual provides essential information for the proper installation, operation, and maintenance of the Hendrickson 60501-000 Height Control Valve. This component is crucial for maintaining optimal ride height in commercial vehicle air suspension systems.
The Hendrickson 60501-000 is an auto part designed for precise control, weighing approximately 0.5 pounds with package dimensions of 5.8L x 5.6W x 3.4H inches.
2. Product Overview
2.1 Product Visual
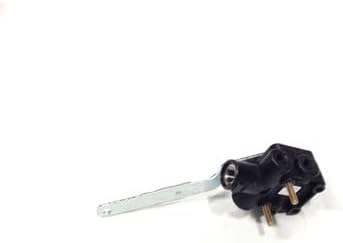
Image: The Hendrickson 60501-000 Height Control Valve, featuring its main body and lever arm, designed for integration into vehicle air suspension systems.
3. Installation Guide
Safety First: Always ensure the vehicle is properly supported and the air system is depressurized before beginning any installation work. Wear appropriate personal protective equipment.
Installation of the Height Control Valve should ideally be performed by a qualified technician due to the complexity of vehicle air suspension systems.
- Preparation: Disconnect the vehicle's battery. Depressurize the air suspension system completely.
- Remove Old Valve: Carefully disconnect air lines and linkage from the existing height control valve. Remove mounting bolts and detach the old valve.
- Mount New Valve: Position the new Hendrickson 60501-000 valve in the correct orientation. Secure it with appropriate mounting hardware, ensuring it is firmly attached.
- Connect Air Lines: Reconnect all air lines to their respective ports on the new valve. Ensure connections are tight and free of leaks.
- Connect Linkage: Attach the suspension linkage to the valve's lever arm. Verify that the linkage allows for full range of motion without binding.
- System Re-pressurization: Slowly re-pressurize the air suspension system. Check for any air leaks using a soapy water solution.
- Calibration/Adjustment: Follow vehicle manufacturer's guidelines for calibrating or adjusting the ride height after installation. This may involve specific procedures to ensure correct vehicle leveling.
Note: Incorrect installation can lead to improper vehicle handling or damage to the air suspension system.
4. Operating Principles
The Hendrickson 60501-000 Height Control Valve is an automatic component designed to maintain a consistent ride height in air-suspended vehicles, regardless of load changes. It operates by sensing the distance between the vehicle's chassis and axle (or suspension arm) via a mechanical linkage.
- When the vehicle's height drops (e.g., due to increased load), the valve opens to allow compressed air from the vehicle's air supply into the air springs, raising the vehicle back to its set ride height.
- When the vehicle's height rises (e.g., due to decreased load), the valve opens to exhaust air from the air springs, lowering the vehicle back to its set ride height.
- Once the correct ride height is achieved, the valve closes, maintaining the air pressure in the springs.
This continuous adjustment ensures stable handling, proper headlight aim, and optimal tire wear.
5. Maintenance
Regular inspection and maintenance can extend the life of your height control valve and ensure optimal performance of your air suspension system.
- Visual Inspection: Periodically check the valve, air lines, and linkage for signs of wear, damage, or corrosion. Look for cracks, kinks, or loose connections.
- Leak Detection: Use a soapy water solution to check all air line connections around the valve for air leaks. Bubbles indicate a leak that needs to be addressed.
- Linkage Check: Ensure the mechanical linkage connecting the valve to the suspension is free of debris, not bent, and moves smoothly without excessive play.
- Cleanliness: Keep the valve and surrounding area clean from dirt, road grime, and salt, which can accelerate wear and corrosion.
- Air System Quality: Ensure your vehicle's air system has proper air drying and filtration to prevent moisture and contaminants from reaching the valve.
6. Troubleshooting
If you experience issues with your air suspension system, the height control valve may be a contributing factor. Consult the table below for common symptoms and potential solutions.
| Symptom | Possible Cause | Solution |
|---|---|---|
| Vehicle constantly too high or too low | Valve stuck open or closed; linkage issues; incorrect adjustment | Inspect valve and linkage for binding or damage. Check for proper adjustment. Replace valve if faulty. |
| Air leaks around valve | Loose air line connections; damaged O-rings/seals; cracked valve body | Tighten connections. Replace O-rings/seals. Replace valve if body is cracked. |
| Slow height adjustment | Restricted air flow; partially clogged valve; worn valve components | Check air lines for kinks or blockages. Inspect valve for internal debris. Consider valve replacement. |
| Uneven ride height (side-to-side) | Faulty valve on one side; uneven load; suspension component issue | Check both height control valves. Verify vehicle loading. Inspect other suspension components. |
If troubleshooting steps do not resolve the issue, professional diagnosis and repair are recommended.
7. Technical Specifications
| Specification | Detail |
|---|---|
| Manufacturer | Hendrickson |
| Brand | Hendrickson |
| Model | Hendrickson 60501-000 |
| Item Weight | 8.4 ounces |
| Package Dimensions | 5.79 x 5.63 x 3.43 inches |
| Item Model Number | 60501-000 |
| Exterior Finish | Machined |
| Manufacturer Part Number | 60501-000 |
8. Warranty and Support
For specific warranty information regarding the Hendrickson 60501-000 Height Control Valve, please refer to the official Hendrickson warranty documentation provided with your purchase or visit the official Hendrickson website.
For technical support, installation assistance, or to inquire about replacement parts, please contact Hendrickson customer service directly. Contact details can typically be found on the manufacturer's official website or product packaging.