
Axis Communications 01991-001
AXIS F9114 Main Unit User Manual
Model: 01991-001
Introduction
This manual provides comprehensive instructions for the installation, operation, and maintenance of the Axis F9114 Main Unit. Please read this manual carefully before using the product to ensure proper functionality and safety.
Product Overview
The AXIS F9114 is a main unit designed for the F-Series surveillance system. It supports up to four F21 or F7 sensor units, providing a flexible and discreet surveillance solution. This unit acts as the central processing hub for connected camera sensors.
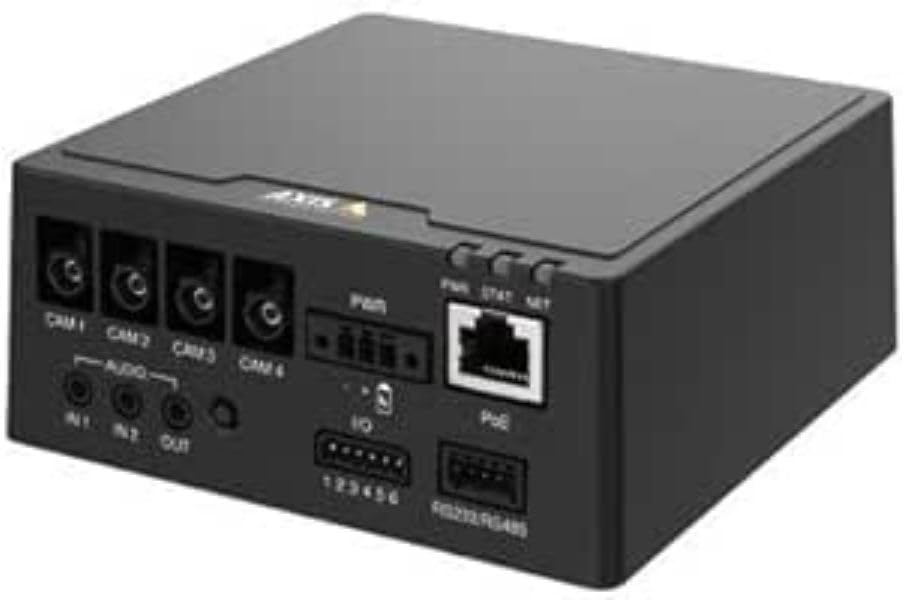
Figure 1: Front view of the AXIS F9114 Main Unit, showing camera input ports (CAM 1-4), audio input/output, power input, I/O ports, and an Ethernet port with PoE support.
Key Features:
- Supports up to 4 Axis F-Series sensor units (e.g., F21, F7).
- Central processing unit for video and audio streams.
- Compact design for flexible installation.
- Integrated Power over Ethernet (PoE) for simplified power and data connectivity.
- Multiple I/O ports for external device integration.
- Audio input/output capabilities.
Setup and Installation
Package Contents:
- AXIS F9114 Main Unit
- Installation Guide
- (Power supply and sensor units sold separately, unless specified)
Connecting Sensor Units:
- Ensure the main unit is powered off before connecting any sensor units.
- Connect the cables from your AXIS F-Series sensor units (e.g., F21, F7) to the designated "CAM 1", "CAM 2", "CAM 3", and "CAM 4" ports on the rear of the F9114 Main Unit. Ensure a secure connection.
- Each sensor unit requires a dedicated port.
Powering the Unit:
- Power over Ethernet (PoE): Connect an Ethernet cable from a PoE-enabled switch or injector to the "PoE" port on the F9114. This will provide both power and network connectivity.
- External Power Supply: If PoE is not used, connect a compatible DC power adapter (not included) to the "PWR" input terminal. Refer to specifications for voltage requirements.
Network Connection:
Connect an Ethernet cable from your network to the "PoE" port on the F9114. This provides network access for configuration and video streaming.
Audio and I/O Connections:
- Audio: Connect external microphones to "IN 1" or "IN 2" and speakers to "OUT" if audio functionality is required.
- I/O: Use the "IO" terminal block for connecting external devices such as alarm sensors or relays. Refer to the detailed wiring diagram in the full technical documentation for specific connections.
Operation
Initial Power-Up:
Once all connections are secure and power is supplied, the unit will begin its startup sequence. Observe the LED indicators for status.
LED Indicators:
- PWR (Power): Indicates power status. (e.g., Solid green for normal operation).
- STAT (Status): Indicates operational status. (e.g., Flashing for network activity, solid for ready).
- NET (Network): Indicates network connection and activity.
Accessing the Device:
- Use the AXIS IP Utility or a network scanner to discover the IP address of the F9114 on your network.
- Open a web browser and enter the IP address to access the device's web interface.
- Log in using the default credentials (refer to the installation guide or Axis website for current defaults).
- Follow the on-screen instructions to configure network settings, video streams, and other system parameters.
Video Management:
The F9114 integrates with various video management software (VMS) solutions. Refer to your VMS documentation for adding and managing the device.
Maintenance
- Cleaning: Use a soft, dry cloth to clean the exterior of the unit. Do not use harsh chemicals or abrasive cleaners.
- Firmware Updates: Regularly check the Axis Communications website for firmware updates. Keeping the firmware updated ensures optimal performance, security, and access to new features.
- Environmental Conditions: Ensure the unit is operated within its specified temperature and humidity ranges to prevent damage.
Troubleshooting
Common Issues and Solutions:
- No Power:
- Verify power cable connection (if using external power).
- Ensure PoE switch/injector is active and providing power (if using PoE).
- Check power source.
- No Network Connection:
- Check Ethernet cable connection.
- Verify network switch/router functionality.
- Confirm IP address settings are correct or DHCP is functioning.
- No Video from Sensor Unit:
- Ensure sensor unit cables are securely connected to the F9114.
- Verify the sensor unit is compatible with the F9114.
- Check the sensor unit's status indicators (if available).
- Access the F9114 web interface to confirm sensor unit detection and configuration.
- Forgot Password:
Refer to the Axis Communications support documentation for password reset procedures, which typically involve a factory reset button or specific software tools.
For more detailed troubleshooting, refer to the comprehensive support resources available on the Axis Communications website.
Specifications
| Feature | Detail |
|---|---|
| Brand | Axis Communications |
| Model Number | 01991-001 |
| Item Weight | 1.87 pounds |
| Product Dimensions (LxWxH) | 19.69 x 19.69 x 11.02 inches |
| Manufacturer | AXIS - CAMERA |
| ASIN | B0BWNS49VS |
| Date First Available | February 23, 2023 |
Note: Specifications are subject to change without notice. For the most current information, please refer to the official Axis Communications website.
Warranty and Support
Warranty Information:
For detailed warranty information, please refer to the warranty statement provided with your product or visit the official Axis Communications website. Keep your proof of purchase for warranty claims.
Technical Support:
If you encounter issues that cannot be resolved using this manual or the troubleshooting section, please contact Axis Communications technical support. Support resources, including FAQs, documentation, and contact information, are available on their official website.
Website: www.axis.com/support
Related documents01991-001


Ask a question about this manual
Ask about setup, troubleshooting, compatibility, parts, safety, or missing instructions. Manuals+ will review the question and use this page’s manual context to help answer it.