1. Introduction
The UDIAG CR800 is a versatile 2-in-1 diagnostic tool designed for automotive enthusiasts and professionals. It combines a comprehensive OBD2 scanner with a 6V/12V battery tester, enabling users to diagnose vehicle issues, check engine light codes, monitor battery health, and perform various system tests. This manual provides detailed instructions for the proper use and maintenance of your CR800 device.

Image 1.1: The UDIAG CR800 device and its packaging, highlighting its dual functionality as an OBD2 scanner and battery tester.
2. Key Features
- Full 10 OBDII Modes Supported: Read/erase fault codes, view freeze frame data, I/M readiness status (emissions), display live data stream by both text & graph, live data stream merge graph, O₂ sensor test, advanced on-board monitoring test, EVAP system test, retrieve vehicle information (VIN, CIN & CVN), etc.
- Wide Compatibility: Works on most vehicles sold in America/Europe/Asia with models produced after 1996, supporting almost all OBDII protocols - CAN (Controller Area Network), ISO14230-4 KWP200 (5BPS & FAST), ISO9141-2, J1850 PWM & VPW. Supports 8 languages.
- Three Popular Hot Keys Design: I/M Readiness Key for smog pre-inspection test, VIN Hotkey for quick protocol scan and VIN retrieval, and DTC Hotkey for immediate access to stored DTCs.
- Value-Added Battery Monitoring & Report Printing Function: Real-time voltage display to monitor vehicle battery condition and support for diagnosis report printing via PC.
- Convenient and Comfortable Handheld Design: Unique patented non-slip shell design with a 2.8-inch TFT true color screen. Green-Yellow-Red Lights and built-in speakers indicate readiness status.
- Lifetime Free Update: Software updates are free and easily performed via PC or laptop.

Image 2.1: Overview of the advanced OBDII functions supported by the CR800, including reading codes, erasing codes, I/M readiness, and live data stream.

Image 2.2: Illustration of the three dedicated hotkeys (I/M, VIN, DTC) for quick and convenient operation.
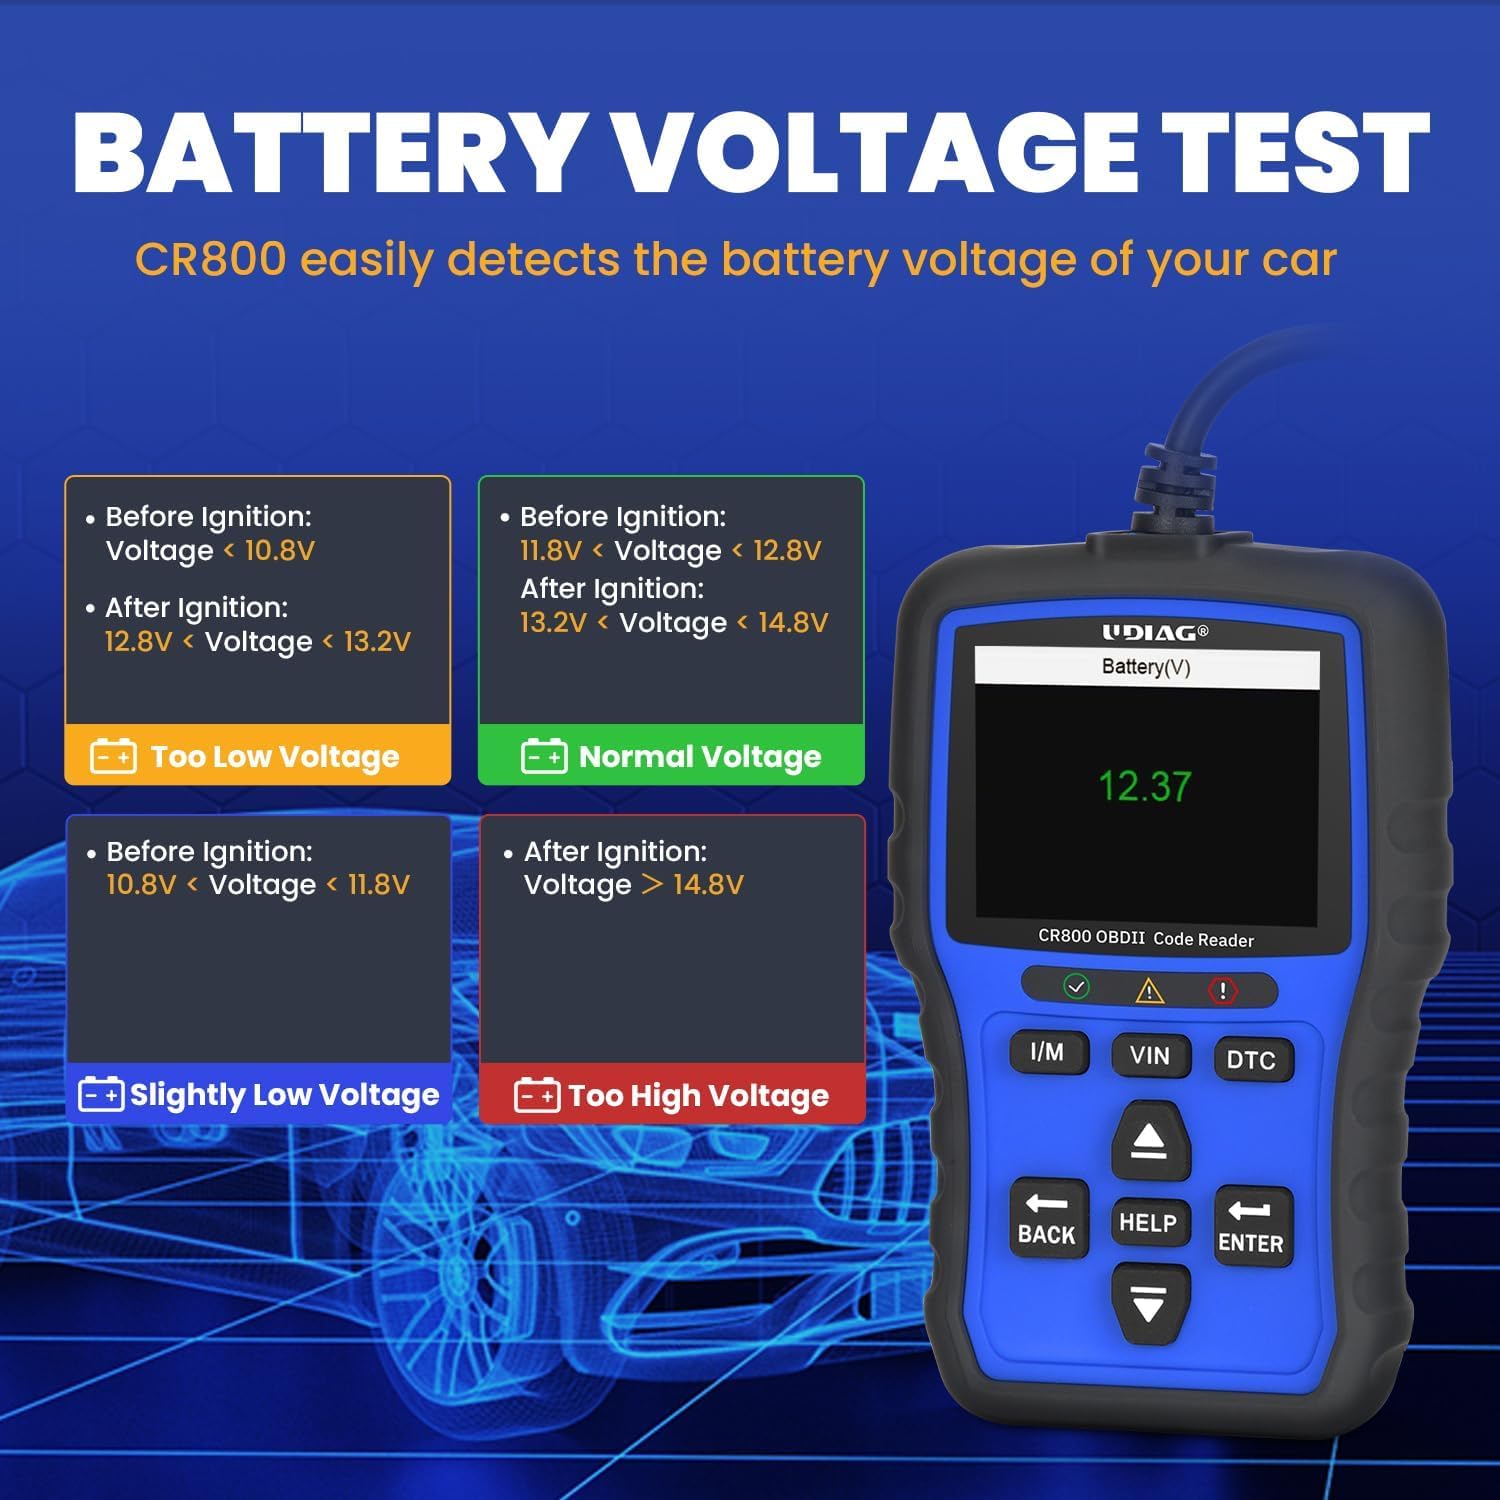
Image 2.3: Display showing the battery voltage test results and interpretation of different voltage levels.

Image 2.4: A map illustrating the wide range of car brands from USA, Europe, and Asia supported by the CR800 scanner.
3. Setup
3.1 Getting Started
Follow these steps to set up and begin using your UDIAG CR800:
- Connect to Vehicle: Locate your vehicle's 16-pin OBDII Data Link Connector (DLC). This is typically found under the dashboard on the driver's side. Connect the CR800's OBDII cable to the vehicle's DLC.
- Power On: The CR800 is powered directly from the vehicle's DLC, requiring no external battery. Once connected, ensure the vehicle's ignition is in the "ON" position (engine can be off). The device will automatically power on.
- Initial Communication: The device will automatically initiate communication with the vehicle's onboard computer. Allow a few moments for the connection to establish.

Image 3.1: The CR800 device with its 95cm cable, demonstrating its ample length for convenient connection to the vehicle's OBDII port.
4. Operating Instructions
4.1 OBDII Diagnostic Functions
The CR800 provides comprehensive OBDII diagnostic capabilities:
- Reading and Erasing Codes:
Navigate to the "OBDII/EOBD" menu. Select "Read Codes" to display current, pending, and permanent Diagnostic Trouble Codes (DTCs). To clear codes, select "Erase Codes" and confirm the action when prompted. This will turn off the Check Engine Light (MIL) after the underlying repairs have been completed.

Image 4.1: The process of clearing a warning light using the CR800 after a problem has been resolved.
- Live Data Stream:
Select "Live Data" to view real-time parameters from the vehicle's sensors. Data can be displayed in text or graph format, allowing for detailed analysis of engine performance, sensor readings, and other critical information. The device supports merging graphs for comparative analysis.

Image 4.2: Examples of live data stream and freeze frame data displays on the CR800, useful for pinpointing vehicle issues.
- I/M Readiness Status:
Use the dedicated "I/M" hotkey to quickly check the readiness status of emission-related monitors. Green indicates ready, yellow indicates pending, and red indicates not ready. This function is crucial for determining if the vehicle is ready for a smog test.

Image 4.3: The I/M Readiness key provides a quick and easy way to check emission monitor status for pre-inspection tests.
- VIN Hotkey:
Press the "VIN" hotkey for one-click retrieval of the vehicle's Vehicle Identification Number. This eliminates the need for manual navigation through menus.

Image 4.4: The VIN hotkey allows for quick retrieval of the vehicle's identification number.
- DTC Lookup:
Use the "DTC" hotkey to access the built-in DTC library. Enter a code to view its definition, providing immediate insight into the nature of the fault without needing external resources.

Image 4.5: The DTC Lookup feature allows users to quickly find definitions for diagnostic trouble codes.
4.2 Battery Test Function
The CR800 includes a dedicated battery testing feature:
- Real-time Voltage Display:
Select "Battery" from the main menu to monitor the vehicle's battery voltage in real-time. This function helps assess battery health and prevent unexpected starting issues by providing timely information on battery condition.
Image 4.6: The CR800's display showing real-time battery voltage, indicating the current state of the vehicle's battery.
4.3 Additional Functions
- Print Data:
The CR800 supports printing diagnostic reports via a PC connection. Connect the device to a computer using a USB cable and follow the instructions on the UDIAG website for software installation and printing. This allows for detailed record-keeping of diagnostic sessions.

Image 4.7: The CR800 connected to a laptop and printer, demonstrating its data upgrade and report printing capabilities.
- Software Update:
The CR800 offers lifetime free software updates to ensure compatibility with new vehicle models and diagnostic protocols. Visit the official UDIAG website (www.udiagtech.com) to download the latest firmware and update the device via your PC. This process keeps your scanner up-to-date with the latest diagnostic advancements.

Image 4.8: A comprehensive overview of the UDIAG CR800's enhanced features, including the lifetime free update option.
5. Maintenance
5.1 Care and Storage
To ensure the longevity and optimal performance of your UDIAG CR800, follow these maintenance guidelines:
- Cleaning: Keep the device clean by wiping it with a soft, dry cloth. Avoid using abrasive cleaners or solvents.
- Environmental Conditions: Avoid exposing the device to extreme temperatures, high humidity, or direct sunlight for prolonged periods.
- Storage: Store the device in a dry, safe place when not in use, preferably in its original packaging or a protective case.
- Screen Protector: The screen comes with a tightly-fitting screen protector. If any scratches are found on the screen, gently peel off the screen protector from the upper left or upper right corner.
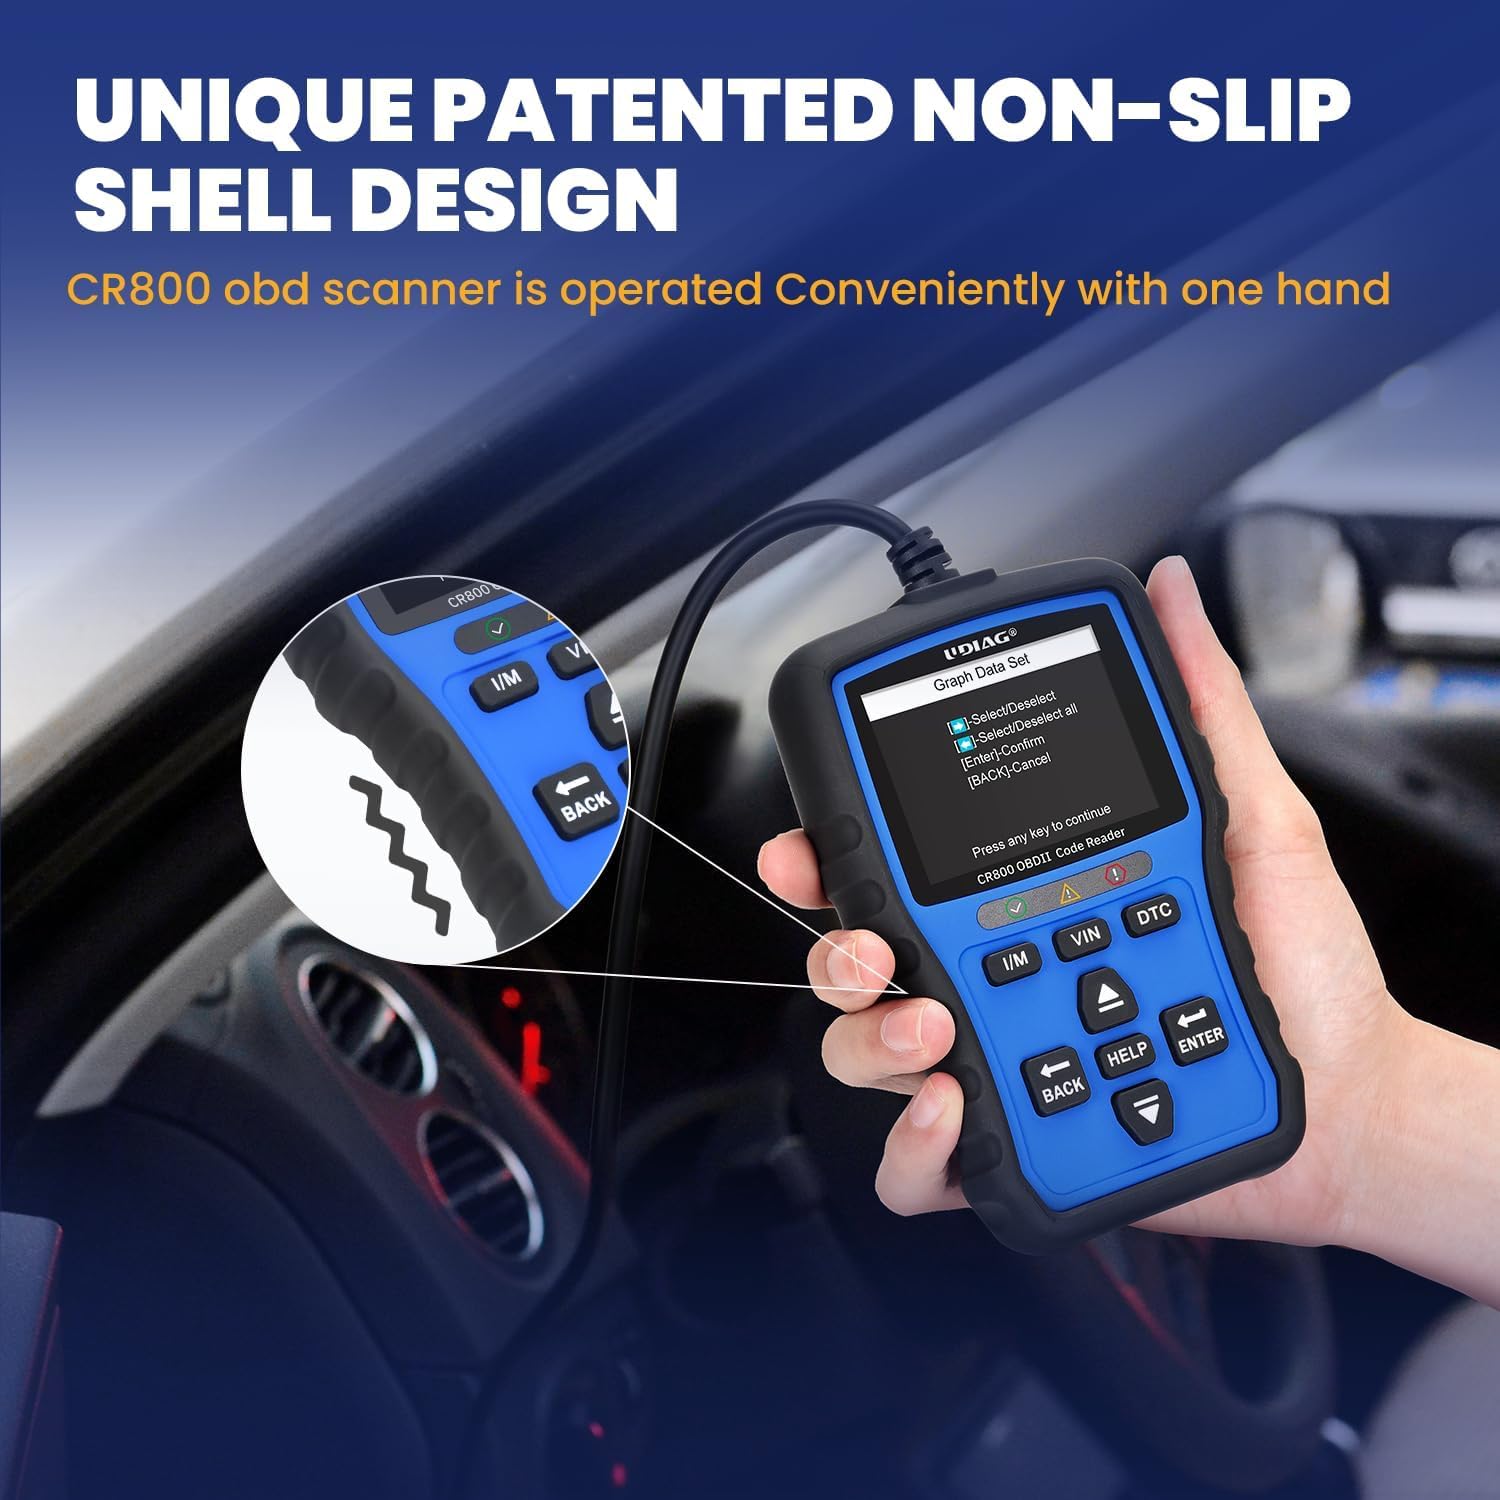
Image 5.1: The unique patented non-slip shell design of the CR800, which also contributes to its durability and ease of handling.
6. Troubleshooting
6.1 Common Issues and Solutions
If you encounter any issues while using your CR800, refer to the table below for common problems and their solutions:
| Problem | Possible Cause | Solution |
|---|---|---|
| Device does not power on | Not properly connected to vehicle's DLC; Vehicle battery too low | Ensure the OBDII cable is securely connected to the vehicle's DLC; Check vehicle battery voltage to ensure it is sufficient (8-18V). |
| Communication error with vehicle | Incorrect protocol; Vehicle not OBDII compliant; Faulty connection | Verify vehicle compatibility (most vehicles post-1996 are OBDII compliant); Check the cable connection for looseness or damage; Try the device on another OBDII-compliant vehicle to rule out device malfunction. |
| Cannot clear codes | Underlying fault still present; Ignition not ON | The Check Engine Light will remain on if the underlying vehicle fault has not been repaired. Address the vehicle issue first. Ensure the vehicle's ignition is in the "ON" position. |
| Screen appears scratched | Protective film still on | The screen is shipped with a protective film. Gently peel off the screen protector from one of the corners (upper left or upper right). |
7. Specifications
7.1 Technical Data
- Display: 2.8-inch TFT True Color Screen
- Display Resolution: 320x240 pixels
- Operating Voltage: 8-18V (provided by vehicle's DLC)
- Operating System: Embedded System
- Connectivity: Standard OBDII 16-pin connector, USB port for PC connection
- Product Dimensions: Approximately 14.48 x 9.19 x 3 cm (5.7 x 3.62 x 1.18 inches)
- Item Weight: Approximately 250 g (0.55 lbs)
- Supported Protocols: CAN (Controller Area Network), ISO14230-4 KWP2000 (5BPS & FAST), ISO9141-2, J1850 PWM & VPW
- Special Features: 2-in-1 OBD2 & 12V Battery Test, DTC Look Up Hot Key, I/M Readiness Hot Key, VIN Hot Key, Live Data Stream (text & graph), Data Record & Playback, Report Printing.
8. Warranty and Support
8.1 Product Support
UDIAG is committed to providing high-quality products and excellent customer service. Your satisfaction is our priority.
- For any questions, concerns, or technical assistance, please contact UDIAG customer service.
- Lifetime Free Software Updates: Ensure your CR800 is always up-to-date by visiting the official UDIAG website for free software downloads: www.udiagtech.com.
Manufacturer: UDIAG
Place of Business: www.udiagtech.com


