
1. Introduction
The GOLDCHAMP GC-770HC-APP is a versatile digital multimeter designed for accurate measurement of various electrical parameters. This device features automatic range selection, True RMS measurement, and non-contact AC voltage detection, making it suitable for both professional and DIY electrical tasks. It also includes Bluetooth connectivity for data logging and sharing via a dedicated application.
2. Safety Information
Always adhere to safety precautions when using any electrical testing equipment. Failure to do so may result in electric shock, injury, or damage to the meter or equipment under test.
- Do not exceed the maximum input limits for any measurement function. Refer to the specifications section for details.
- Ensure test leads are in good condition, free from cracks or damaged insulation.
- Do not use the meter if it appears damaged or if the case is open.
- Always disconnect power to the circuit before connecting or disconnecting test leads for current measurements.
- Use caution when working with voltages above 30V AC RMS, 42V peak, or 60V DC, as these pose a shock hazard.
- Replace batteries promptly when the low battery indicator appears to ensure accurate readings.
- Do not operate the meter in explosive gas, vapor, or dust environments.
3. Package Contents
Verify that all items listed below are present in your package:
- GOLDCHAMP GC-770HC-APP Digital Multimeter
- Test Leads (Red and Black)
- K-type Thermocouple
- Batteries
- User Manual
- Screwdriver
- Packing Box
- Travel Case

Image 3.1: The image displays the complete package contents for the GOLDCHAMP GC-770HC-APP Digital Multimeter, including the multimeter itself, test leads, K-type thermocouple, batteries, user manual, screwdriver, packing box, and a travel case.
4. Product Overview
The GOLDCHAMP GC-770HC-APP Digital Multimeter features a clear digital display, a rotary function switch, and multiple buttons for various operations. Its robust design includes ABS protection and a 180° support stand for convenient use.

Image 4.1: This image shows the front of the GOLDCHAMP GC-770HC-APP Digital Multimeter, highlighting its large digital display, rotary function dial, and control buttons. The display shows a reading of '16.88'. The image also indicates capabilities for Diode Test and hFE Test.
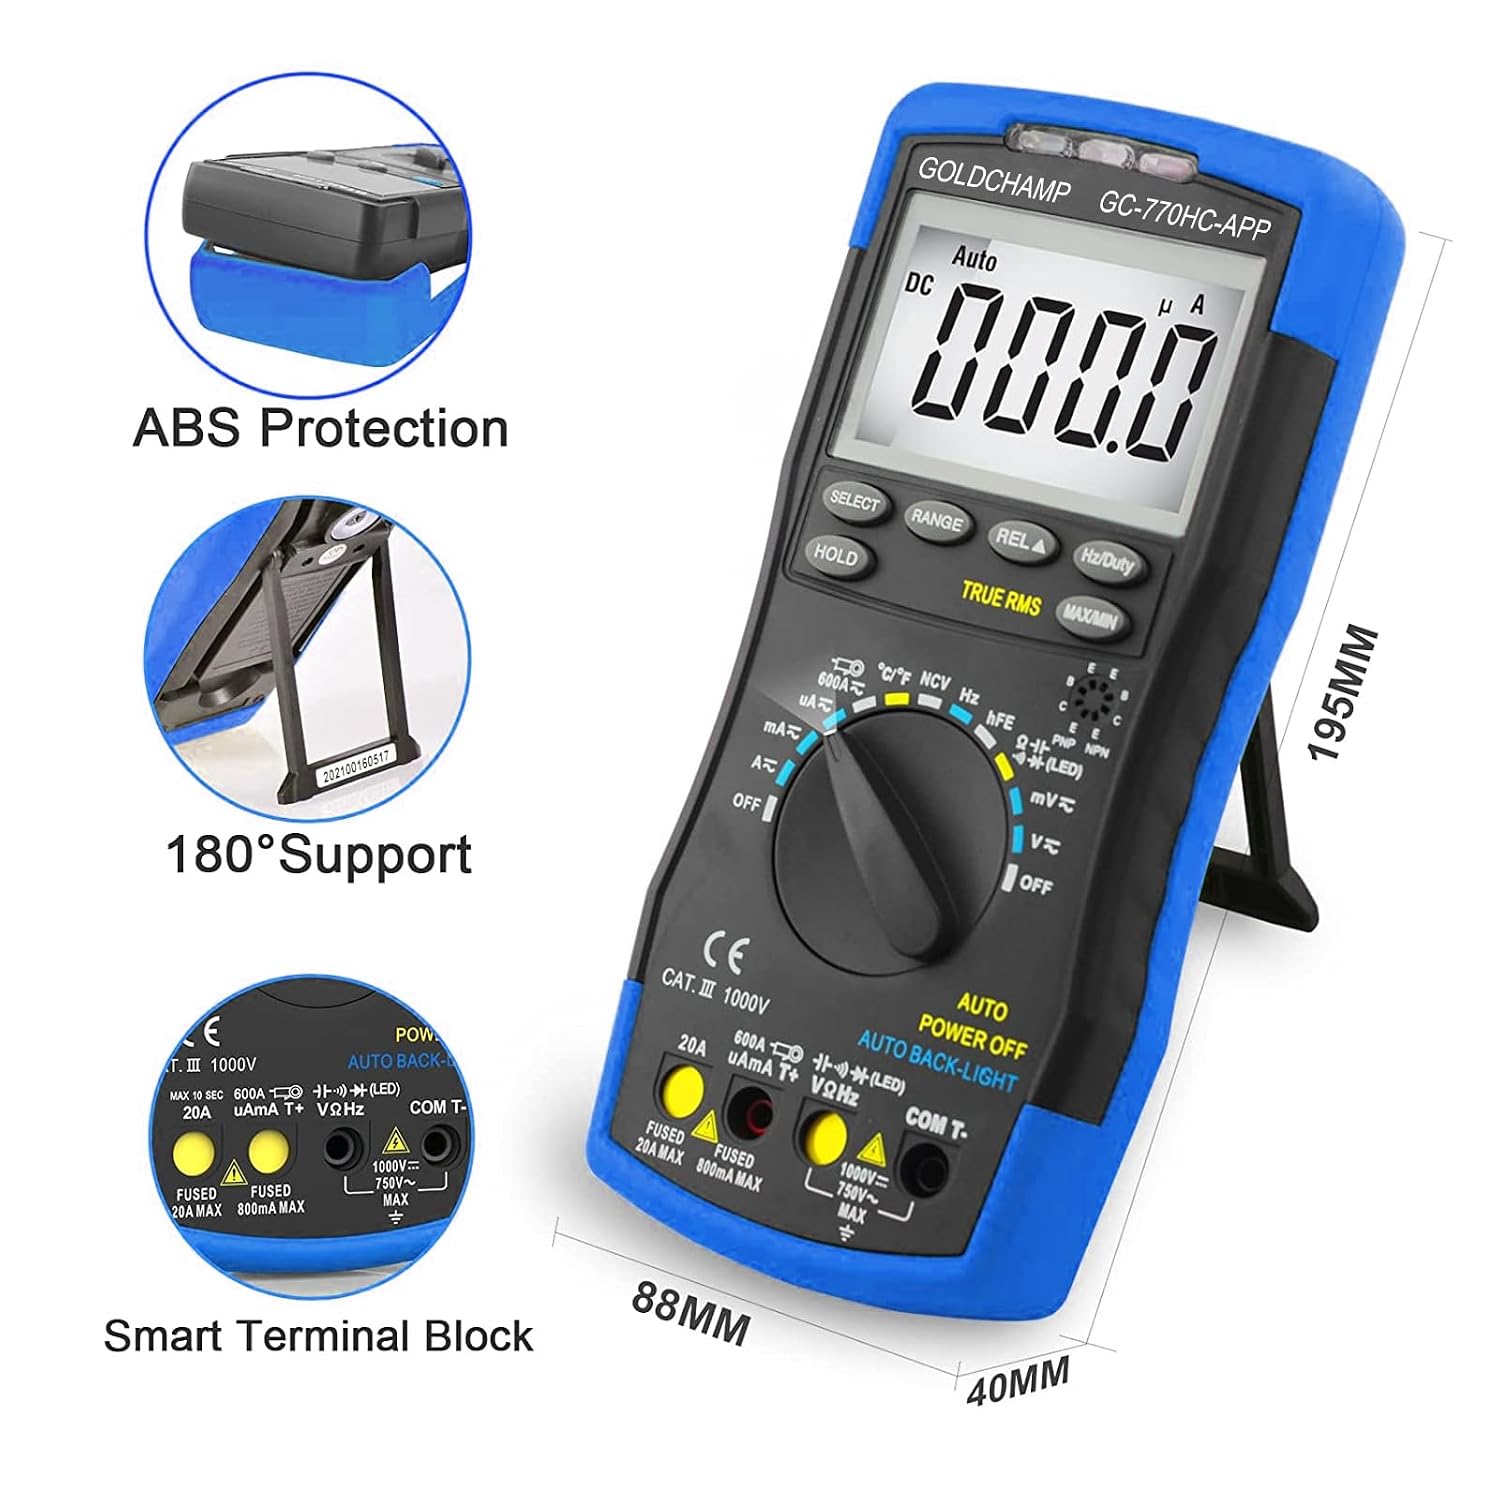
Image 4.2: This image illustrates the physical dimensions of the multimeter (195mm height, 88mm width, 40mm depth). It also highlights features such as ABS protection for durability, a 180° adjustable support stand for hands-free operation, and the smart terminal block for test lead connections.
4.1 Key Features and Functions
- Voltage Measurement (V=, V~): Measures both DC and AC voltage up to 1000V DC and 750V AC.
- Current Measurement (A=, A~): Measures DC and AC current from 600µA to 600A.
- Resistance Measurement (Ω): Measures electrical resistance.
- Temperature Measurement (°C/°F): Measures temperature using the included K-type thermocouple.
- Frequency Measurement (Hz): Measures the frequency of AC signals.
- True RMS: Provides accurate readings for non-sinusoidal AC waveforms.
- Capacitance Measurement: Measures capacitance.
- Non-Contact AC Voltage (NCV) Detection: Detects AC voltage without direct contact.
- Continuity Buzzer: Indicates continuity with an audible tone.
- Diode / hFE Test: Tests diodes and transistor hFE (DC current gain).
- Bluetooth Connectivity: Allows connection to a smartphone app for data logging and sharing.

Image 4.3: This image displays the multimeter's screen with various function icons including Voltage, Current, Resistance, Temperature, Frequency, True RMS, Capacitance, AC Volt Detect, Continuity Buzzer, and Diode/hFE Test. It also illustrates the Bluetooth connectivity feature, showing the multimeter wirelessly connected to a smartphone displaying a data logging application for data sharing and saving.
5. Setup
5.1 Battery Installation
- Ensure the multimeter is turned OFF.
- Locate the battery compartment cover on the back of the meter.
- Use the provided screwdriver to loosen the screw securing the battery cover.
- Remove the cover and insert the batteries, observing the correct polarity (+/-).
- Replace the battery cover and tighten the screw.
5.2 Connecting Test Leads
For most measurements, connect the black test lead to the COM jack and the red test lead to the VΩHz jack. For current measurements, refer to the specific instructions in the operating section.
6. Operating Instructions
6.1 Power On/Off
Rotate the function switch from the 'OFF' position to any desired measurement function to turn the meter ON. To turn OFF, rotate the switch back to the 'OFF' position. The meter features an auto power-off function to conserve battery life.
6.2 Automatic Range Selection
The meter automatically selects the appropriate measurement range for most functions. This is indicated by 'Auto' on the display. For manual range selection, press the RANGE button.
6.3 Measuring DC/AC Voltage (V=, V~)
- Set the rotary switch to the 'V=' (DC Voltage) or 'V~' (AC Voltage) position.
- Connect the black test lead to the COM jack and the red test lead to the VΩHz jack.
- Connect the test probes in parallel to the circuit or component you wish to measure.
- Read the voltage value on the display.
6.4 Measuring DC/AC Current (A=, A~)
Caution: Always connect the meter in series with the load. Disconnect power to the circuit before connecting the test leads.
- Set the rotary switch to the appropriate current range (e.g., 'µA~', 'mA~', 'A~').
- Connect the black test lead to the COM jack.
- Connect the red test lead to the uAmA jack for microampere/milliampere measurements or the 20A MAX jack for ampere measurements.
- Break the circuit and connect the test probes in series with the load.
- Apply power to the circuit and read the current value on the display.
6.5 Measuring Resistance (Ω)
- Set the rotary switch to the 'Ω' position.
- Connect the black test lead to the COM jack and the red test lead to the VΩHz jack.
- Ensure the circuit or component is de-energized before connecting the probes.
- Connect the test probes across the component to measure its resistance.
- Read the resistance value on the display.
6.6 Continuity Test
- Set the rotary switch to the continuity symbol (often shared with diode or resistance).
- Connect the black test lead to the COM jack and the red test lead to the VΩHz jack.
- Connect the test probes across the circuit or component.
- An audible beep indicates continuity (low resistance).

Image 6.1: This image demonstrates two functions: the top half shows the multimeter performing Non-Contact AC Voltage Detection near an electrical outlet, indicated by a signal icon. The bottom half shows the multimeter conducting a Continuity Test, with test probes connected and a 'BEEP' sound effect indicating continuity.
6.7 Diode Test
- Set the rotary switch to the diode symbol.
- Connect the black test lead to the COM jack and the red test lead to the VΩHz jack.
- Connect the red probe to the anode and the black probe to the cathode of the diode.
- Read the forward voltage drop on the display. Reverse the probes to check for open circuit (OL).
6.8 Non-Contact AC Voltage (NCV) Detection
- Set the rotary switch to the 'NCV' position.
- Move the top end of the multimeter near an AC voltage source (e.g., a live wire or outlet).
- The meter will emit an audible beep and the LED indicator will flash (red and green lights alternate) if AC voltage is detected.

Image 6.2: This image shows the multimeter's display indicating 'BEEP' and 'NCV - NON-CONTACT AC VOLTAGE TEST'. It illustrates that when AC voltage is detected without physical contact, the meter will produce an audible sound and its indicator lights will flash alternately (red and green).
6.9 Temperature Measurement (°C/°F)
- Set the rotary switch to the '°C/°F' position.
- Connect the K-type thermocouple to the appropriate input jacks (usually marked for temperature).
- Place the thermocouple probe on or near the object whose temperature you wish to measure.
- Read the temperature on the display. Press the SELECT button to switch between Celsius and Fahrenheit.
6.10 hFE Test
- Set the rotary switch to the 'hFE' position.
- Insert the transistor leads (Emitter, Base, Collector) into the corresponding holes in the hFE socket on the meter, ensuring correct NPN or PNP type.
- Read the hFE value on the display.
6.11 Bluetooth Connectivity and App Usage
The GC-770HC-APP can connect to a smartphone via Bluetooth for real-time data monitoring, logging, and sharing.
- Download the GOLDCHAMP application from your smartphone's app store.
- Ensure Bluetooth is enabled on your smartphone and the multimeter.
- Open the GOLDCHAMP app and follow the on-screen instructions to pair with your GC-770HC-APP multimeter.
- Once connected, you can view live readings, record data, and save measurements directly on your phone.

Image 6.3: This image shows the GOLDCHAMP GC-770HC-APP Digital Multimeter positioned next to a smartphone. A Bluetooth connection icon is visible, indicating that the multimeter is wirelessly connected to the smartphone, which displays the GOLDCHAMP measurement application. This setup allows for data sharing and saving.
7. Maintenance
7.1 Cleaning
Wipe the meter's case with a damp cloth and mild detergent. Do not use abrasives or solvents. Ensure the meter is completely dry before use.
7.2 Battery Replacement
When the low battery indicator appears on the display, replace the batteries as described in the 'Battery Installation' section (5.1).
7.3 Fuse Replacement
If the current measurement function stops working, the fuse may need replacement. Refer to the specifications for the correct fuse type and rating. Fuse replacement should only be performed by qualified personnel.
8. Troubleshooting
- Meter does not power on: Check battery installation and ensure batteries are not depleted.
- No reading or 'OL' displayed: Ensure test leads are correctly connected and making good contact with the circuit. For resistance, ensure the circuit is de-energized. 'OL' (Overload) indicates the measured value is outside the selected range or the circuit is open.
- Inaccurate readings: Check battery level. Ensure the correct function and range are selected. Verify test leads are not damaged.
- Current measurement not working: Check if the fuse is blown. Replace if necessary (refer to 7.3 Fuse Replacement).
- Bluetooth connection issues: Ensure Bluetooth is enabled on both the meter and your smartphone. Restart both devices and try pairing again. Ensure the app is up to date.
9. Specifications
| Parameter | Value |
|---|---|
| Model Number | GC-770HC-APP |
| Brand | GOLDCHAMP |
| Power Source | Battery Powered |
| Style | Digital |
| Color | Blue |
| Safety Compliance | CE |
| Upper Rated Temperature | 1000 Degrees Celsius |
| Measurement Type | Multimeter |
| Included Components | 1 Digital Multimeter |
| Package Dimensions | 10 x 10 x 5 cm |
| Item Weight | 450 grams |
10. Warranty and Support
For warranty information and technical support, please refer to the documentation provided with your purchase or contact GOLDCHAMP customer service. Keep your proof of purchase for any warranty claims.
