
Introduction
This manual provides detailed instructions for the installation, operation, and maintenance of your VIHELM 525E 5.25-inch Internal Card Reader Front Panel. Please read this manual thoroughly before installation and use to ensure proper functionality and to prevent damage to your device or computer system.
Product Overview
The VIHELM 525E is a versatile 5.25-inch internal media dashboard designed to fit into a standard optical drive bay of your PC. It expands your computer's connectivity with multiple card reader slots, USB 3.0 and USB 2.0 ports, eSATA, and front audio ports.

Image: Front view of the VIHELM 525E Media Dashboard with all ports clearly labeled. This includes TF (MicroSD), CF (CompactFlash), M2, SD (Secure Digital), MMC/MS (MultiMediaCard/Memory Stick) card slots, USB 2.0 ports, USB 3.0 ports, SATA, eSATA, power output (DC/12V/5V), microphone, and earphone jacks.
Key Features:
- Multi-card reader support (CF, TF, M2, SD, MMC/MS).
- High-speed USB 3.0 ports for fast data transfer.
- Additional USB 2.0 ports for broader compatibility.
- eSATA port for external SATA devices.
- Front panel audio ports (microphone and earphone).
- 4-pin power output (DC 12V/5V).
- Durable ABS material construction.
Package Contents
Please verify that all items listed below are included in your package:
- 1 x VIHELM 525E Media Dashboard Card Reader
- 1 x User Manual (this document)
- Necessary connecting cables (USB 3.0, USB 2.0, SATA, Audio, 4-pin power)
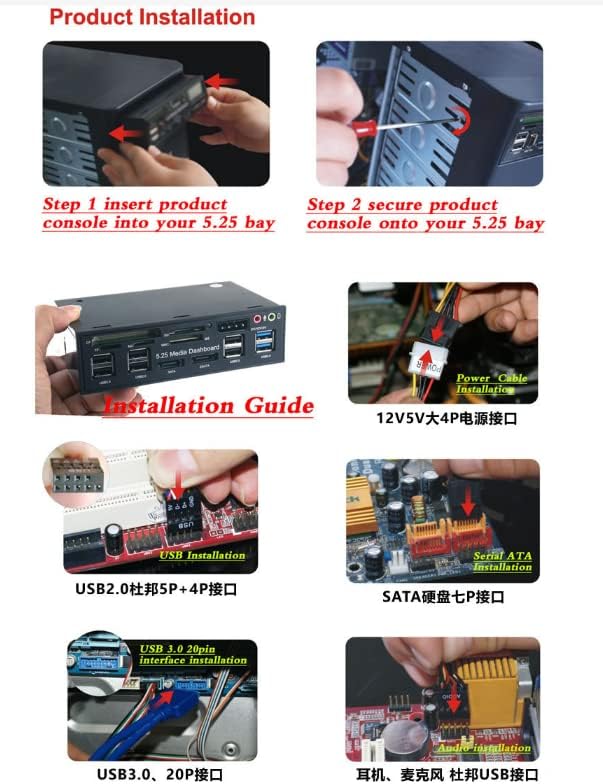
Image: The VIHELM 525E Media Dashboard shown with its various connecting cables, including a blue USB 3.0 cable, a white 4-pin power connector, a black USB 2.0 header cable, a black audio header cable, and two red SATA data cables.
Setup and Installation
Before beginning installation, ensure your computer is powered off and unplugged from the wall outlet. It is recommended to wear an anti-static wrist strap to prevent damage from electrostatic discharge.
Image: An overview of the installation process, showing the media dashboard and various connection points on a motherboard and power supply.
1. Physical Installation into 5.25-inch Bay
- Open your computer case. Refer to your computer's manual for instructions on how to safely open the case.
- Locate an available 5.25-inch drive bay.
- Carefully slide the VIHELM 525E Media Dashboard into the chosen 5.25-inch bay from the front of the computer case until it is flush with the front panel.
- Secure the media dashboard to the computer case using screws. Most cases require screws on both sides of the device.
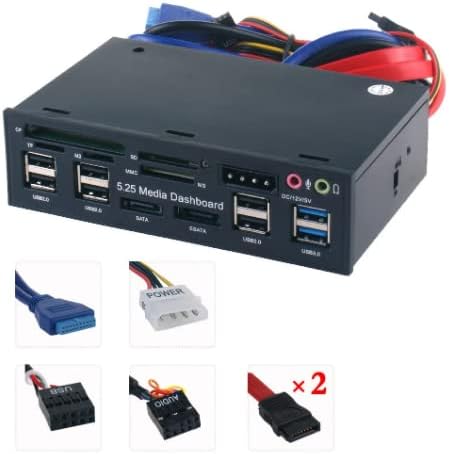
Image: A hand inserting the VIHELM 525E Media Dashboard into an empty 5.25-inch drive bay on a computer case.

Image: A screwdriver being used to secure the VIHELM 525E Media Dashboard to the computer case within the 5.25-inch bay.
2. Power Connection
- Locate an available 4-pin Molex power connector from your computer's power supply unit (PSU).
- Connect the 4-pin Molex power cable from the VIHELM 525E Media Dashboard to the available PSU connector. Ensure the connection is firm and correctly oriented.
- Refer to the diagram for correct pin orientation to avoid damage.

Image: A close-up of a 4-pin Molex power connector, which connects the media dashboard to the power supply.
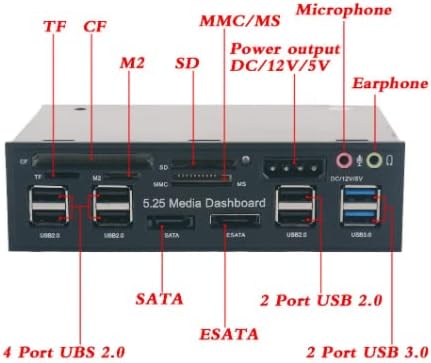
Image: Diagram illustrating the correct orientation for connecting a 4-pin Molex power connector, showing the alignment of +12V, +5V, and Ground pins, and an incorrect inverse connection.
3. USB 2.0 Header Connection
- Locate an available 9-pin USB 2.0 header on your motherboard. These are typically labeled "USB" or "F_USB".
- Connect the USB 2.0 header cable from the media dashboard to the motherboard header. Ensure the pinout matches and the cable is inserted correctly.

Image: A hand connecting the USB 2.0 header cable from the VIHELM 525E Media Dashboard to a 9-pin USB 2.0 header on a computer motherboard.
4. USB 3.0 Header Connection
- Locate an available 20-pin USB 3.0 header on your motherboard. These are typically blue and labeled "USB3" or "F_USB3".
- Connect the USB 3.0 header cable from the media dashboard to the motherboard header. This connector is keyed to prevent incorrect insertion.
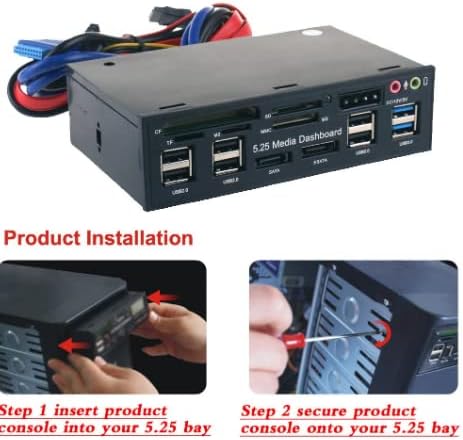
Image: A hand connecting the USB 3.0 20-pin header cable from the VIHELM 525E Media Dashboard to a blue USB 3.0 header on a computer motherboard.
5. SATA Connection
- Locate an available SATA port on your motherboard.
- Connect one end of the provided SATA data cable to the SATA port on the media dashboard and the other end to an available SATA port on your motherboard. This connection enables the eSATA functionality on the front panel.
6. Audio Header Connection
- Locate the front panel audio header on your motherboard, typically labeled "F_AUDIO" or "HD AUDIO".
- Connect the audio header cable from the media dashboard to the motherboard header. Ensure correct orientation.
After all connections are made, carefully close your computer case and reconnect the power cable. Power on your computer.
Operation
Once the VIHELM 525E Media Dashboard is installed and your computer is powered on, it should be automatically recognized by your operating system without the need for additional drivers.
Using Card Reader Slots:
- Insert your memory card (CF, TF/MicroSD, M2, SD, MMC/MS) into the corresponding slot on the front panel.
- The card will appear as a removable drive in your computer's file explorer.
- To safely remove a card, use the "Safely Remove Hardware and Eject Media" option in your operating system before physically pulling the card out.
Using USB Ports (USB 2.0 & USB 3.0):
- Connect your USB devices (e.g., flash drives, external hard drives, keyboards, mice) to the available USB 2.0 or USB 3.0 ports.
- USB 3.0 ports offer higher data transfer speeds for compatible devices.
Using eSATA Port:
- Connect an external SATA device (e.g., external hard drive enclosure) to the eSATA port using an eSATA cable.
- The device will be recognized by your operating system.
Using Audio Ports:
- Plug your headphones or speakers into the earphone jack.
- Plug your microphone into the microphone jack.
- Ensure your operating system's audio settings are configured to use the front panel audio output/input if necessary.
Using Power Output (DC 12V/5V):
- This port provides DC 12V and 5V power for compatible external devices. Use appropriate cables and ensure device compatibility before connecting.
Troubleshooting
| Problem | Possible Cause | Solution |
|---|---|---|
| Device not recognized / No power |
|
|
| Card reader not detecting cards |
|
|
| USB 3.0 ports not working at high speed |
|
|
| Audio ports not working |
|
|
Specifications
| Model | 525E |
| Installation Bay | 5.25-inch Optical Drive Bay |
| Card Reader Support | CF, TF (MicroSD), M2, SD, MMC/MS |
| USB Ports | 2 x USB 3.0, 4 x USB 2.0 |
| Data Ports | 1 x eSATA |
| Audio Ports | 1 x Microphone, 1 x Earphone |
| Power Output | DC 12V / 5V (via 4-pin Molex) |
| Material | ABS Plastic |
| Compatibility | Windows 2000/XP/Vista/7/8, Linux, Mac OS |
| Dimensions (Approx.) | 146mm x 90mm x 40mm |
Maintenance
- Keep the front panel clean and free of dust. Use a soft, dry cloth for cleaning.
- Avoid inserting foreign objects into the card slots or ports.
- Ensure proper airflow within your computer case to prevent overheating of internal components.
- Do not attempt to disassemble the unit. Refer to qualified technicians for any repairs.
Warranty and Support
VIHELM products are designed for reliability and performance. For warranty information and technical support, please refer to the retailer or manufacturer's official website where you purchased this product. Keep your proof of purchase for warranty claims.
For further assistance, you may contact VIHELM customer support through their official channels.