
LAUNCH LAUNCH SmartSafe CNC605A
LAUNCH SmartSafe CNC605A Ultrasonic GDI Fuel Injector Cleaner & Tester
Model: LAUNCH SmartSafe CNC605A
1. Introduction
The LAUNCH SmartSafe CNC605A is a professional ultrasonic fuel injector cleaner and tester designed for comprehensive maintenance of GDI, EFI, and SFI injector systems. This manual provides essential information for the safe and effective operation, maintenance, and troubleshooting of your device. Please read this manual thoroughly before operating the unit.
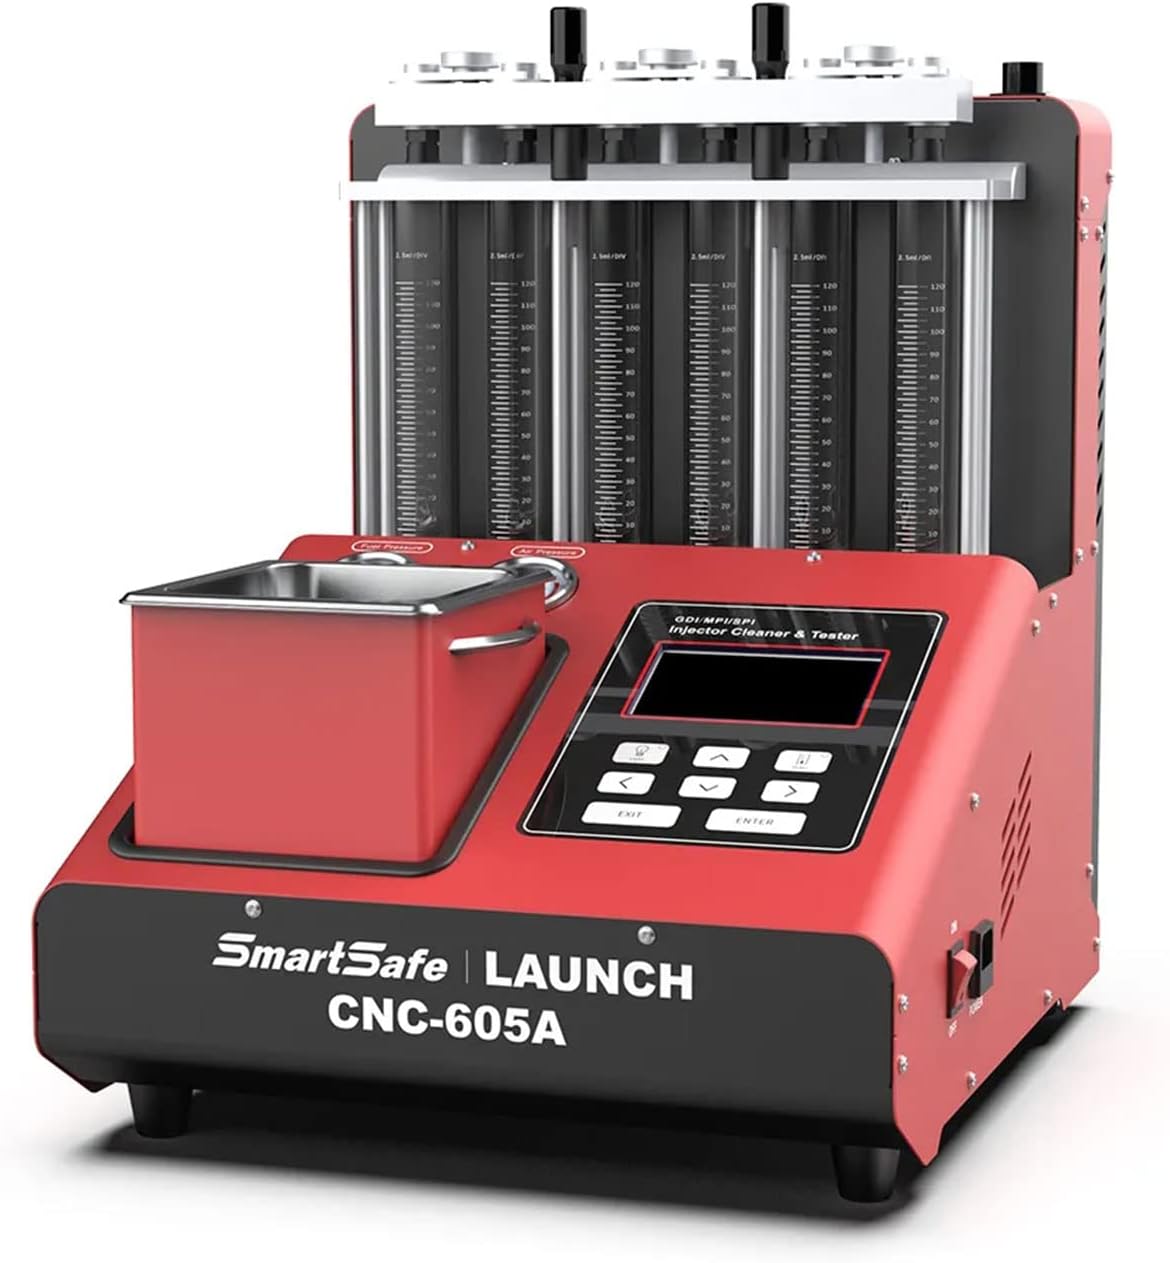
Image 1.1: Front view of the LAUNCH SmartSafe CNC605A unit, showcasing its compact design and control panel.
2. Key Features and Functions
The CNC605A offers a range of advanced features to ensure thorough cleaning and accurate testing of fuel injectors:
- Ultrasonic Cleaning: Utilizes powerful ultrasonic technology to completely remove carbon deposits from fuel injectors.
- Uniformity and Sprayability Test: Evaluates the injection quantity uniformity of each nozzle and observes the spray pattern with backlight assistance.
- Sealing Test: Checks for leaks and proper sealing of the fuel injection nozzle under specified pressure.
- Injection Volume Test: Measures the injection volume of the fuel injector over a set duration of continuous spraying.
- No Disassembly Needed (for EFI and SFI): Enables cleaning of EFI and SFI fuel injectors and the fuel supply system directly on the vehicle without removal.
- Automatic Mode: Features a preset program for automated testing of fuel injection nozzles.
- Automatic Liquid Discharge: Automatically discharges liquid from the glass tubes when a predetermined value is reached, enhancing efficiency and safety compared to manual discharge systems.

Image 2.1: Overview of the CNC605A's adaptable multiple fuel injectors, powerful ultrasonic cleaning, simulation condition test, and automatic oil discharge capabilities.

Image 2.2: Visual representation of the core functions: Ultrasonic Cleaning, Uniformity & Atomization Test, Sealing Test, Injection Volume Test, No Disassembly Needed, and Automatic Mode.
3. Product Components and Accessories
3.1 Main Unit Components
Familiarize yourself with the main components of the CNC605A unit:
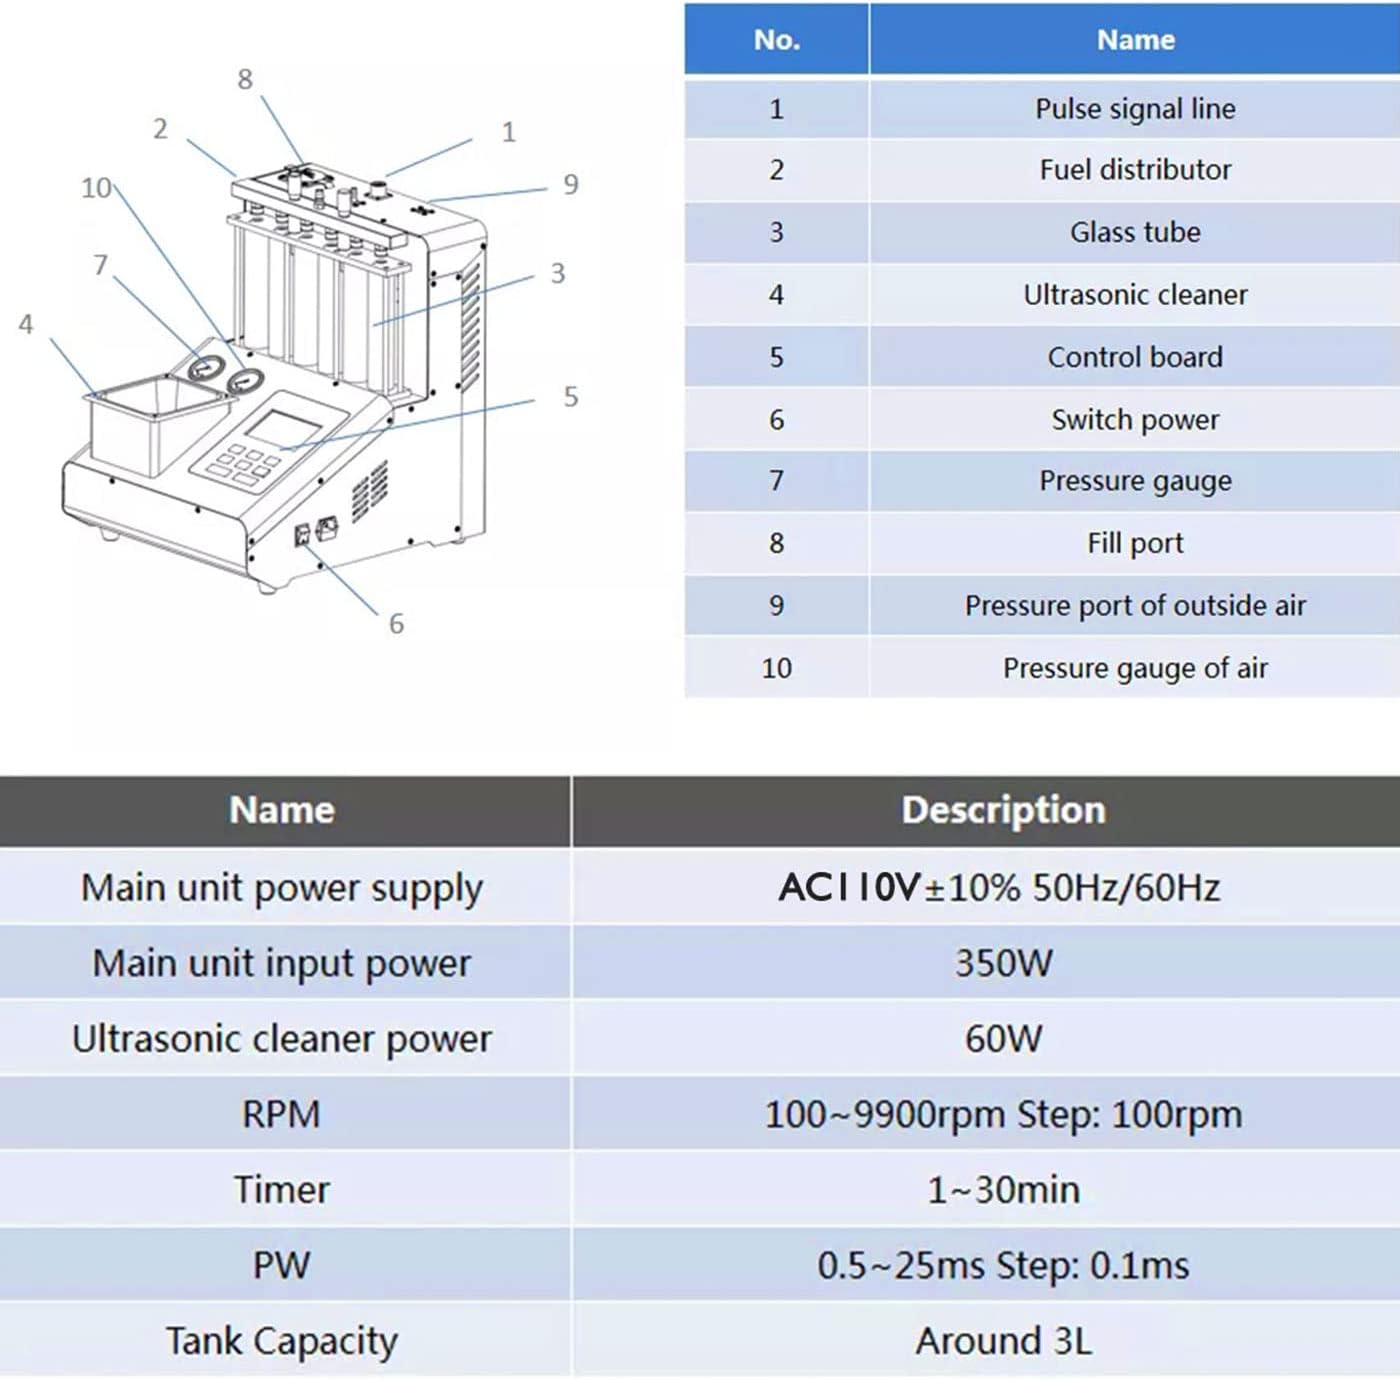
Image 3.1: Labeled diagram of the CNC605A main unit, indicating key parts such as pulse signal line, fuel distributor, glass tubes, ultrasonic cleaner, and control board.
| No. | Name |
|---|---|
| 1 | Pulse signal line |
| 2 | Fuel distributor |
| 3 | Glass tube |
| 4 | Ultrasonic cleaner |
| 5 | Control board |
| 6 | Switch power |
| 7 | Pressure gauge |
| 8 | Fill port |
| 9 | Pressure port of outside air |
| 10 | Pressure gauge of air |
3.2 Included Accessories
The CNC605A comes with a comprehensive set of accessories to support various injector types and cleaning procedures:
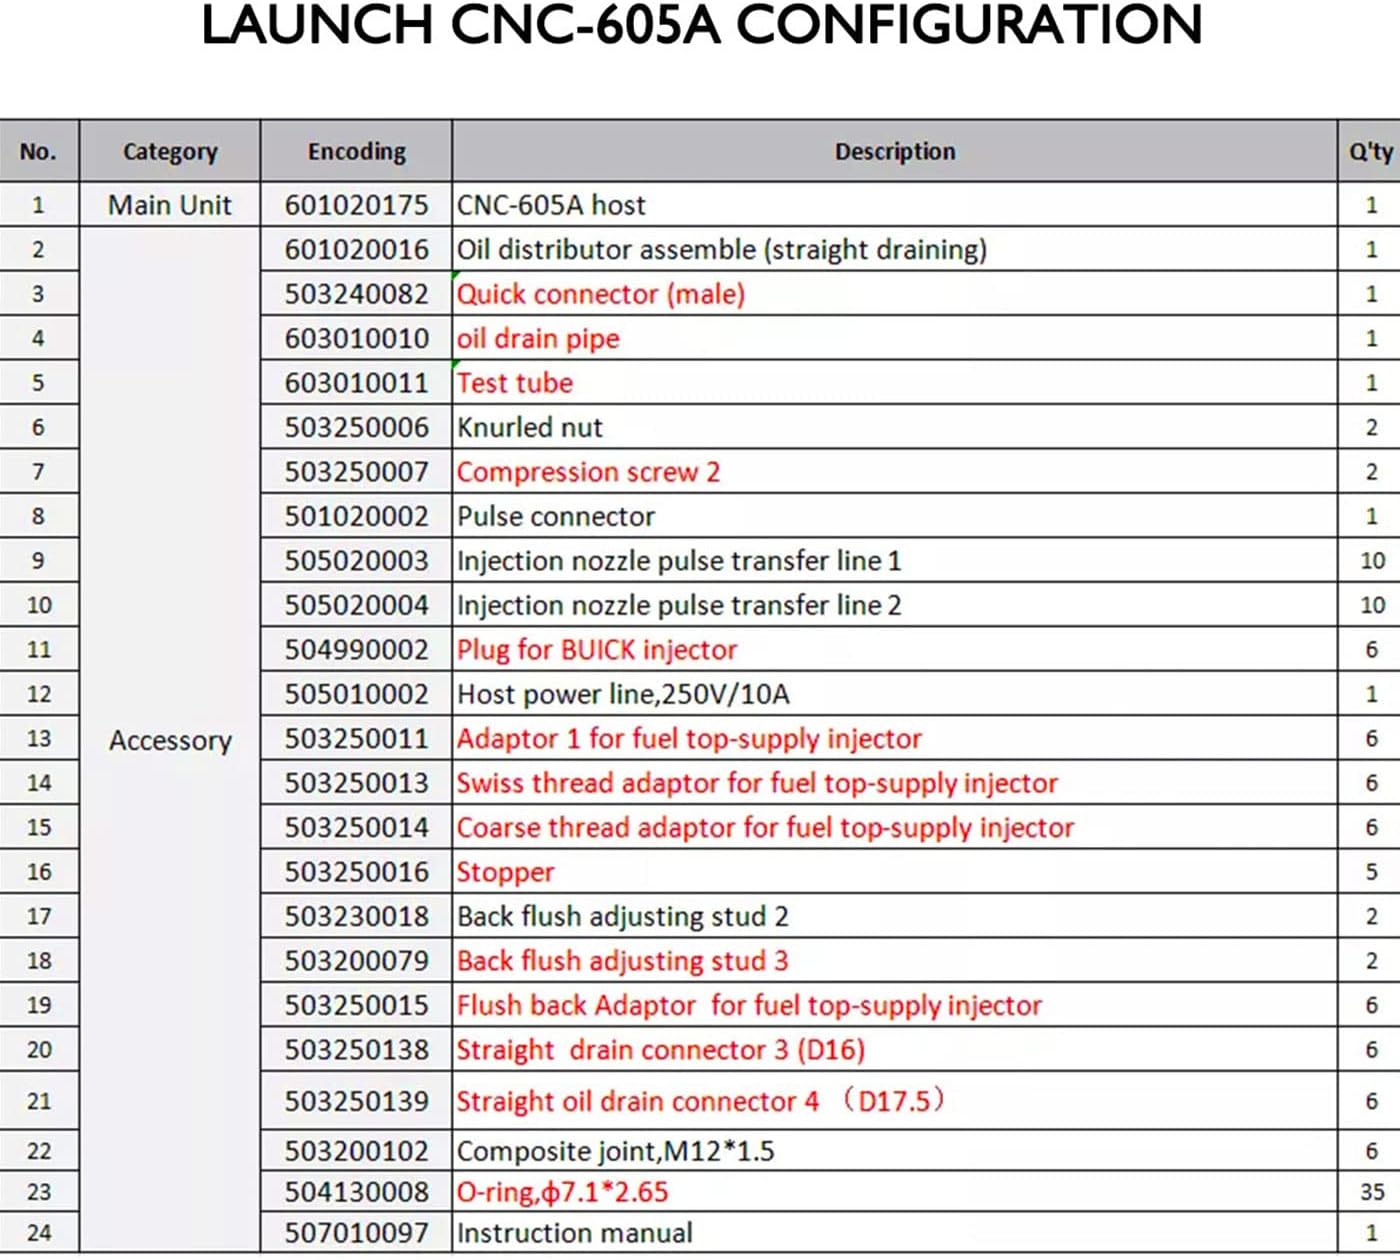
Image 3.2: Detailed list of the CNC605A's main unit and included accessories, such as oil distributor assembly, quick connectors, various adaptors, O-rings, and the instruction manual.
| No. | Category | Description | Quantity |
|---|---|---|---|
| 1 | Main Unit | CNC-605A host | 1 |
| 2 | Oil distributor assembly (straight draining) | 1 | |
| 3 | Quick connector (male) | 1 | |
| 4 | Oil drain pipe | 1 | |
| 5 | Test tube | 1 | |
| 6 | Knurled nut | 2 | |
| 7 | Compression screw 2 | 2 | |
| 8 | Pulse connector | 1 | |
| 9 | Injection nozzle pulse transfer line 1 | 10 | |
| 10 | Injection nozzle pulse transfer line 2 | 10 | |
| 11 | Plug for BUICK injector | 6 | |
| 12 | Host power line, 250V/10A | 1 | |
| 13 | Accessory | Adaptor 1 for fuel top-supply injector | 6 |
| 14 | Swiss thread adaptor for fuel top-supply injector | 6 | |
| 15 | Coarse thread adaptor for fuel top-supply injector | 6 | |
| 16 | Stopper | 5 | |
| 17 | Back flush adjusting stud 2 | 2 | |
| 18 | Back flush adjusting stud 3 | 2 | |
| 19 | Flush back Adaptor for fuel top-supply injector | 6 | |
| 20 | Straight drain connector 3 (D16) | 6 | |
| 21 | Straight oil drain connector 4 (D17.5) | 6 | |
| 22 | Composite joint, M12*1.5 | 6 | |
| 23 | O-ring, φ7.1*2.65 | 35 | |
| 24 | Instruction manual | 1 |
4. Technical Specifications
The following are the technical parameters for the LAUNCH SmartSafe CNC605A:
| Name | Description |
|---|---|
| Power Supply | AC110V 50Hz |
| Main Engine Power | 350W |
| Ultrasonic Power | 60W |
| Fuel Pressure | 0.1-10bar |
| Air Inlet Pressure | 5-8bar |
| RPM | 100-9900rpm (Step: 100rpm) |
| PW (Pulse Width) | 0.5-25.0ms (Step: 0.1ms) |
| Timer Range | 1-30min |
| Tank Capacity | ~3L |
| Body Material | Aluminum |
| Fit Type | Universal Fit |
5. Safety Information
Always adhere to safety precautions when operating the CNC605A to prevent injury or damage to the equipment.
- Ensure the unit is placed on a stable, level surface in a well-ventilated area.
- Do not operate the unit near open flames or sources of ignition due to the presence of flammable liquids.
- Wear appropriate personal protective equipment (PPE), including safety glasses and chemical-resistant gloves, when handling cleaning fluids and fuel.
- Always disconnect the power supply before performing any maintenance or cleaning on the unit.
- Use only recommended cleaning and testing fluids. Refer to the fluid manufacturer's safety data sheets (SDS).
- Avoid direct contact with ultrasonic cleaning fluid and fuel. In case of contact, wash thoroughly with soap and water.
- Do not immerse the main unit in water or other liquids.
- Keep children and unauthorized personnel away from the operating area.
6. Setup and Installation
Follow these steps for initial setup of your CNC605A unit:
- Unpacking: Carefully remove all components from the packaging. Verify that all items listed in Section 3.2 are present and undamaged.
- Placement: Position the unit on a sturdy workbench in a well-ventilated workshop. Ensure there is adequate space around the unit for operation and maintenance.
- Power Connection: Connect the provided power cable to the unit's power inlet (No. 12 in Image 3.1) and then to a grounded AC110V 50Hz power outlet.
- Air Supply Connection: Connect an external air compressor (5-8 bar) to the air inlet pressure port (No. 9 in Image 3.1) using appropriate fittings.
- Fluid Filling: Fill the ultrasonic cleaner tank (No. 4 in Image 3.1) with the recommended ultrasonic cleaning fluid. Fill the fuel tank (accessible via Fill port No. 8) with the appropriate testing fluid (e.g., calibration fluid or gasoline substitute). Note: Cleaning and testing liquids are not included and must be purchased separately.
- Injector Installation: Install the desired fuel injectors into the fuel distributor (No. 2 in Image 3.1) using the appropriate adaptors and O-rings from the accessory kit. Ensure secure connections to prevent leaks.
- Pulse Line Connection: Connect the pulse signal lines (No. 1 and No. 9/10) from the control board to each injector.
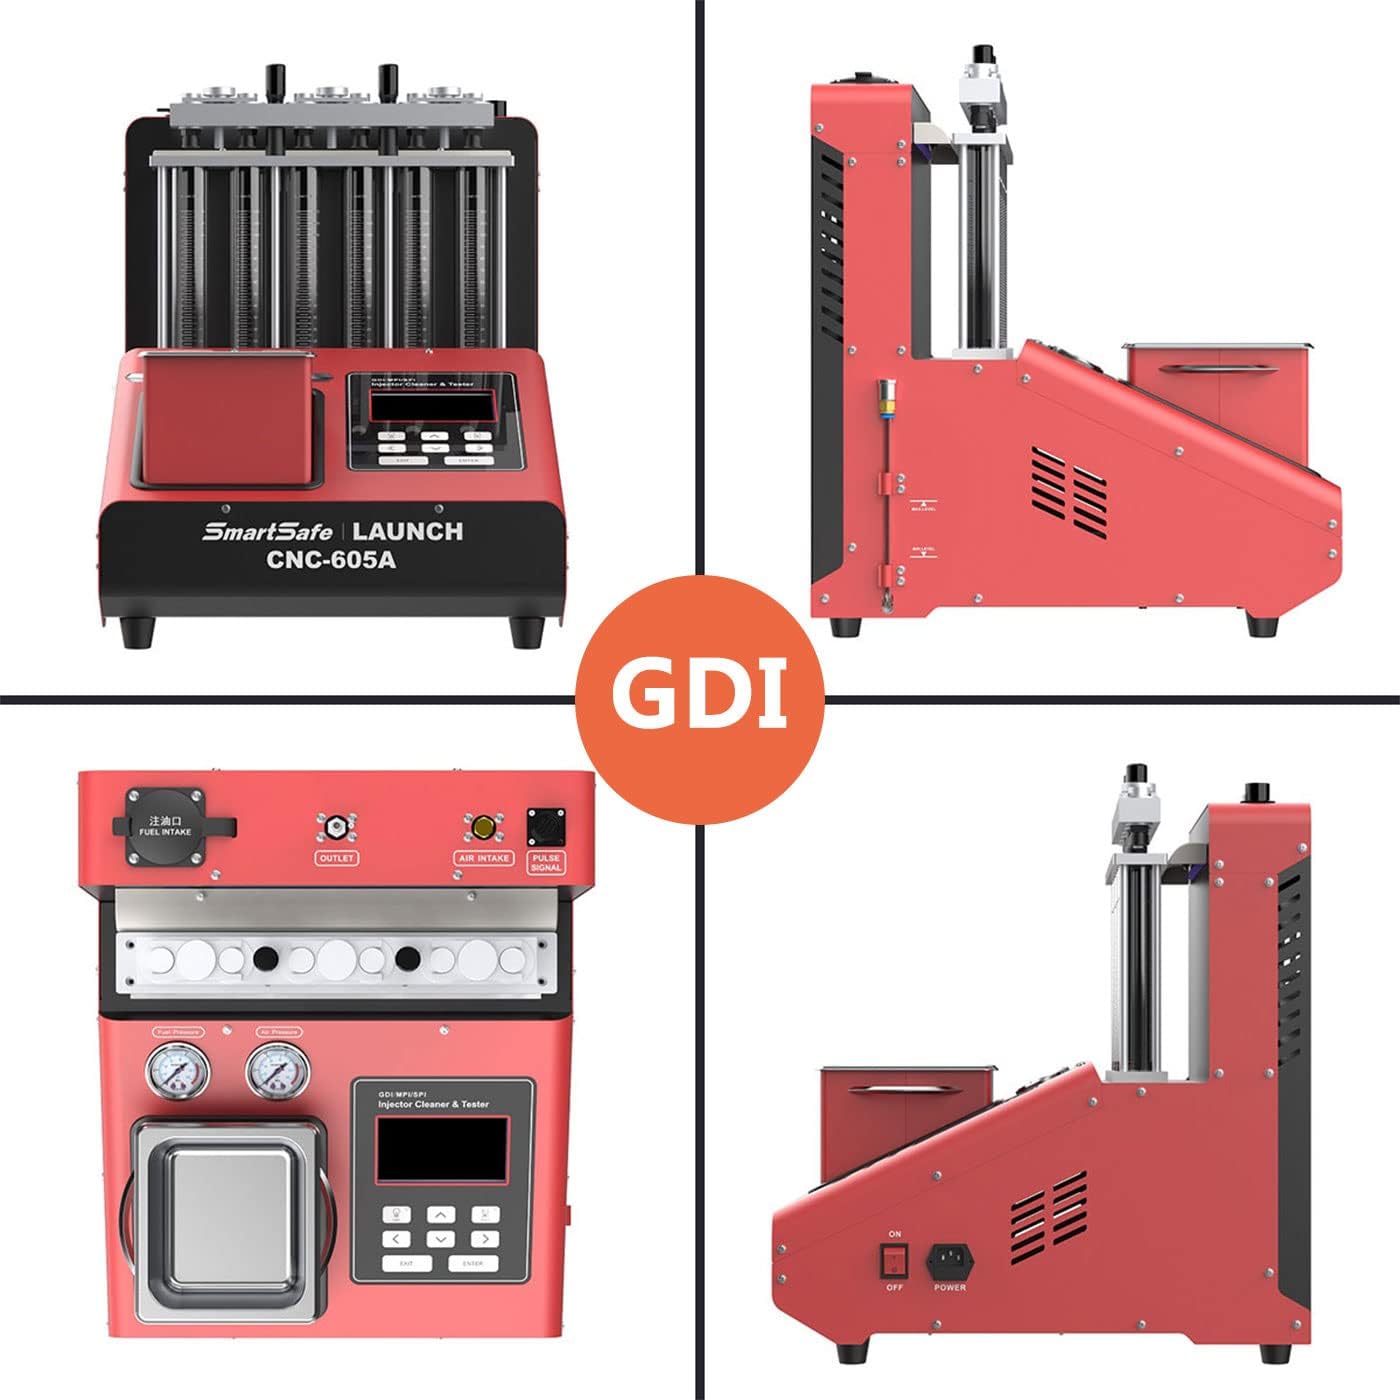
Image 6.1: Multiple views of the CNC605A, illustrating the layout of the GDI injector area, air intake, outlet, pulse signal connections, and power switch.
7. Operating Instructions
The CNC605A offers various modes for comprehensive injector testing and cleaning. Use the control board (No. 5 in Image 3.1) to navigate and select functions.
7.1 Ultrasonic Cleaning
- Place the injectors into the ultrasonic cleaning tank.
- Ensure the injectors are fully submerged in the ultrasonic cleaning fluid.
- Select the 'Ultrasonic Cleaning' mode on the control panel.
- Set the desired cleaning time (1-30 minutes).
- Start the cleaning process. The ultrasonic waves will dislodge carbon deposits.
7.2 Uniformity and Sprayability Test
- Install the injectors into the test tubes (No. 3 in Image 3.1).
- Select 'Uniformity & Sprayability Test' mode.
- Adjust parameters such as RPM and pulse width (PW) to simulate engine conditions.
- Observe the spray pattern and volume in each glass tube. Look for consistent spray cones and equal fluid levels.
7.3 Sealing Test
- With injectors installed in the test tubes, select 'Sealing Test' mode.
- The system will apply a specific pressure.
- Observe the injectors for any signs of leakage or dripping over a set period.
7.4 Injection Volume Test
- Select 'Injection Volume Test' mode.
- Set the duration for continuous spraying.
- After the test, compare the fluid levels in the glass tubes to determine the injection volume of each injector.
7.5 No Disassembly Needed (EFI & SFI)
This function allows for on-vehicle cleaning of EFI and SFI injectors and the fuel supply system. Refer to the specific instructions for connecting the unit to the vehicle's fuel system without removing the injectors.
7.6 Automatic Mode
For streamlined testing, select 'Automatic Mode'. The unit will execute a preset program covering various tests. This mode is ideal for quick diagnostics and batch testing.
8. Maintenance
Regular maintenance ensures the longevity and optimal performance of your CNC605A.
- Fluid Management: Regularly drain and replace old cleaning and testing fluids. Dispose of used fluids according to local environmental regulations.
- Cleaning the Unit: Wipe down the exterior of the unit with a soft, damp cloth. Avoid using abrasive cleaners or solvents.
- Glass Tubes: Clean the glass test tubes after each use to ensure accurate readings and prevent cross-contamination.
- Filter Inspection: Periodically inspect any inline filters for debris and replace them if necessary.
- Storage: When not in use, store the unit in a clean, dry environment, protected from dust and extreme temperatures.
9. Troubleshooting
This section addresses common issues you might encounter with the CNC605A.
| Problem | Possible Cause | Solution |
|---|---|---|
| Unit does not power on | Power cable disconnected; Power outlet fault; Unit fuse blown | Check power cable connection; Test power outlet; Inspect and replace fuse if necessary |
| No fluid spray from injectors | No testing fluid in tank; Air pressure too low; Injectors clogged; Pulse lines disconnected | Fill testing fluid; Check air compressor and connections; Perform ultrasonic cleaning; Reconnect pulse lines securely |
| Inconsistent spray pattern/volume | Injectors still dirty/clogged; Faulty injector; Incorrect test parameters | Repeat ultrasonic cleaning; Replace faulty injector; Verify test parameters (RPM, PW) |
| Fluid leakage during test | Loose injector connection; Damaged O-rings; Faulty injector | Tighten injector connections; Replace O-rings; Replace faulty injector |
If you encounter issues not covered in this section, please contact customer support.
10. Warranty and Support
LAUNCH provides comprehensive support for the SmartSafe CNC605A.
- Warranty: For damage caused by non-human factors, LAUNCH promises to resend parts for free within 1 year from the date of purchase.
- Supported Languages: The unit and documentation support English, Japanese, Russian, Korean, French, Portuguese, Italian, and Chinese.
- Cleaning Liquid: Please note that the packaging does not contain cleaning liquid. You can purchase compatible cleaning liquids from most automotive suppliers.
- Customer Service: For technical assistance, warranty claims, or further inquiries, please refer to the contact information provided with your purchase or visit the official LAUNCH website.
Related documentsLAUNCH SmartSafe CNC605A


Ask a question about this manual
Ask about setup, troubleshooting, compatibility, parts, safety, or missing instructions. Manuals+ will review the question and use this page’s manual context to help answer it.