
1. Introduction
This manual provides instructions for the safe and efficient operation, maintenance, and troubleshooting of your Tastyle Single Serve Coffee Maker. Please read all instructions carefully before first use and retain this manual for future reference.
2. Important Safeguards
When using electrical appliances, basic safety precautions should always be followed to reduce the risk of fire, electric shock, and/or injury to persons, including the following:
- Read all instructions.
- Do not touch hot surfaces. Use handles or knobs.
- To protect against electric shock, do not immerse cord, plugs, or coffee maker in water or other liquid.
- Close supervision is necessary when any appliance is used by or near children.
- Unplug from outlet when not in use and before cleaning. Allow to cool before putting on or taking off parts, and before cleaning the appliance.
- Do not operate any appliance with a damaged cord or plug or after the appliance malfunctions, or has been damaged in any manner.
- The use of accessory attachments not recommended by the appliance manufacturer may result in fire, electric shock, or injury to persons.
- Do not use outdoors.
- Do not let cord hang over edge of table or counter, or touch hot surfaces.
- Do not place on or near a hot gas or electric burner, or in a heated oven.
- Always attach plug to appliance first, then plug cord into the wall outlet. To disconnect, turn any control to “off,” then remove plug from wall outlet.
- Do not use appliance for other than intended use.
3. Product Components
Familiarize yourself with the parts of your Tastyle Single Serve Coffee Maker:

Image: Overview of the coffee maker showing the Coffee Capsule holder, Coffee Ground filter, Water Reservoir with stepped water gauge (6/8/10/14oz), Stainless Steel Panel, Fit 6.7" Travel Mug area, Descaling Reminder light, and Regular/Bold brew buttons.
- Coffee Capsule Holder: For use with K-Cup compatible capsules.
- Coffee Ground Filter: Reusable filter for brewing with ground coffee.
- Water Reservoir: Features a stepped water gauge for 6, 8, 10, or 14 oz brew sizes.
- Stainless Steel Panel: Decorative and functional element.
- Brew Buttons: Separate buttons for Regular and Bold brew strengths, and an I/O (Power) button.
- Descaling Reminder: An indicator light that blinks when descaling is recommended.
- Drip Tray: Removable tray to catch drips, accommodates travel mugs up to 6.7 inches.
4. Setup and First Use
4.1 Unpacking
- Remove all packaging materials and labels from the coffee maker.
- Wipe the exterior of the coffee maker with a damp cloth.
- Wash the removable parts (coffee capsule holder, ground coffee filter, drip tray, water reservoir) in warm, soapy water. Rinse thoroughly and dry.
4.2 Initial Rinse Cycle
Before brewing coffee for the first time, perform an initial rinse cycle to clean the internal components.
- Fill the water reservoir with fresh water up to the 14 oz mark.
- Place an empty mug or container on the drip tray.
- Ensure no coffee capsule or ground coffee filter is inserted.
- Close the lid securely.
- Press the power button (I/O) to turn on the machine.
- Press either the Regular or Bold brew button. The machine will dispense hot water.
- Discard the hot water. The coffee maker is now ready for use.
5. Operating Instructions
5.1 Brewing with K-Cup Capsules
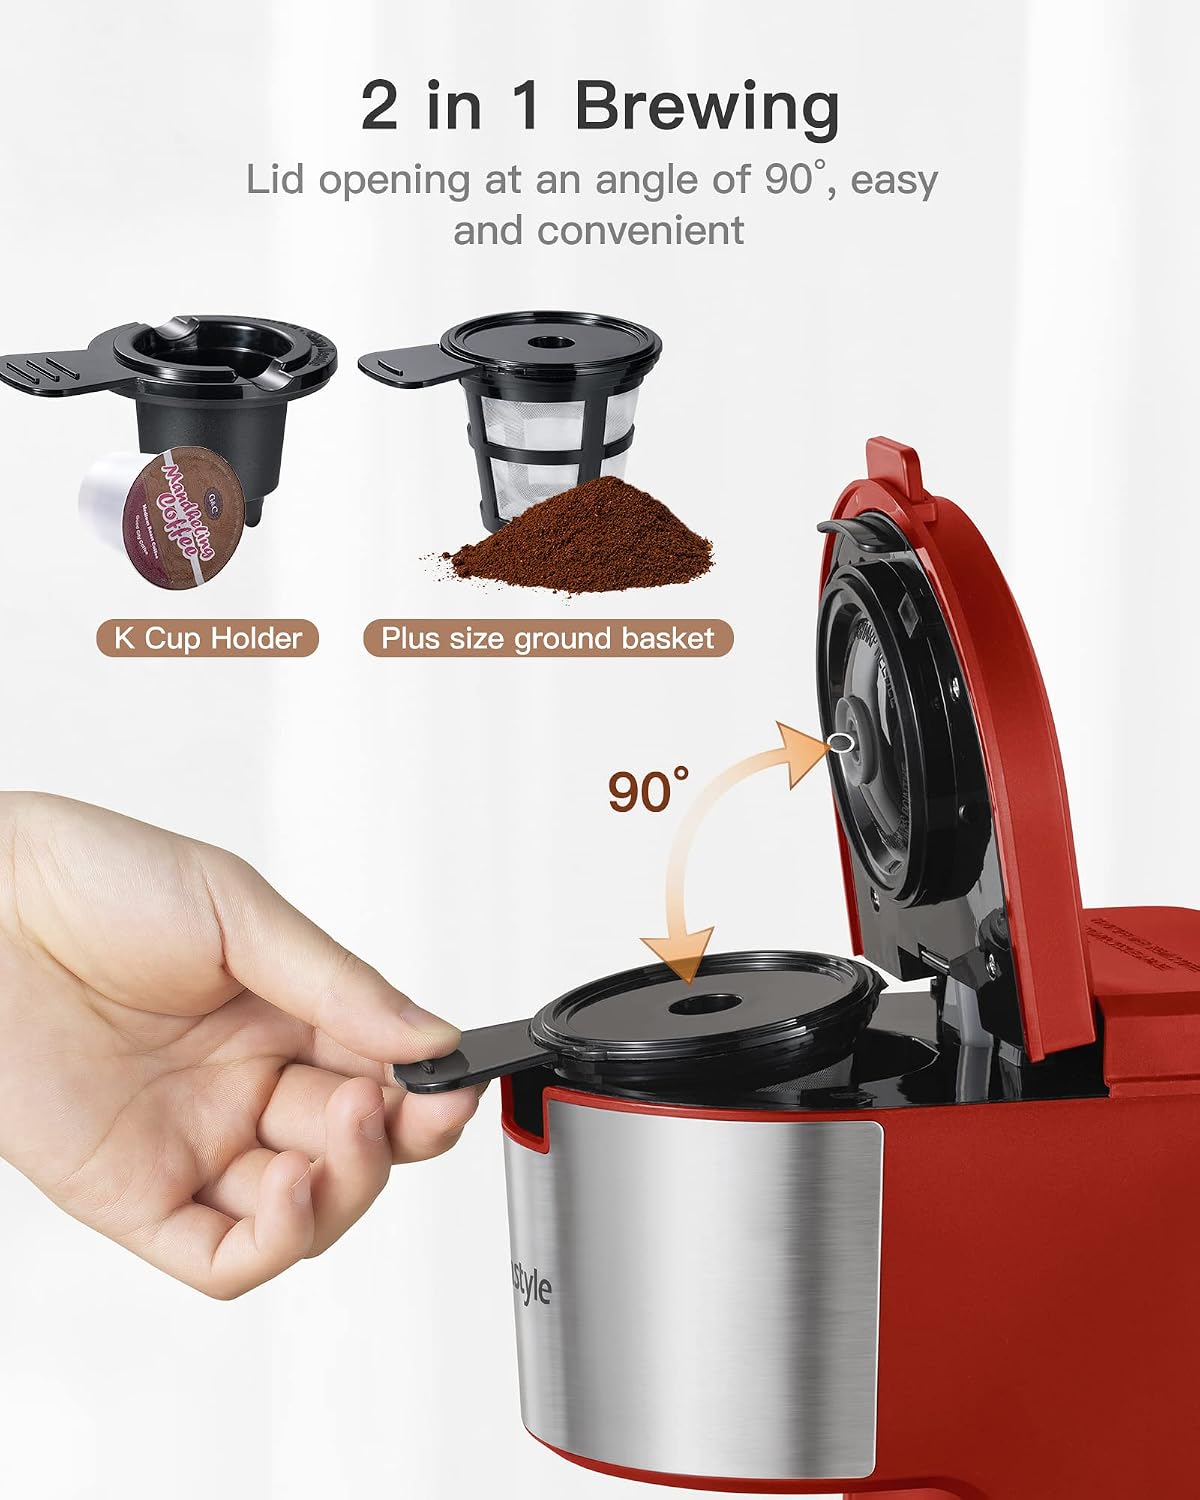
Image: A hand demonstrating the 90-degree lid opening and inserting a K-Cup capsule into the K-Cup holder.
- Ensure the coffee maker is plugged in and powered on.
- Lift the lid to open the brewing chamber. The lid opens at a 90-degree angle for easy access.
- Insert a K-Cup compatible capsule into the K-Cup holder.
- Close the lid firmly until it clicks into place.
- Fill the water reservoir with fresh water to your desired brew size (6, 8, 10, or 14 oz).
- Place your mug or travel mug (up to 6.7 inches tall) on the drip tray.
- Select your desired brew strength: Press the REGULAR button for a standard brew or the BOLD button for a stronger coffee.
- The coffee maker will begin brewing. Once brewing is complete, the machine will automatically turn off.
- Carefully remove your mug. Lift the lid to remove and discard the used K-Cup capsule.
5.2 Brewing with Ground Coffee

Image: A close-up comparison showing the larger capacity of the Tastyle Plus Size Brew Basket (2.5" diameter) compared to a smaller, standard basket (1.7" diameter), capable of holding up to 25g (0.88oz) of ground coffee.
- Ensure the coffee maker is plugged in and powered on.
- Lift the lid to open the brewing chamber.
- Insert the reusable ground coffee filter into the K-Cup holder.
- Add your desired amount of ground coffee (up to 25g or 0.88oz) into the reusable filter. Do not overfill.
- Close the lid firmly until it clicks into place.
- Fill the water reservoir with fresh water to your desired brew size (6, 8, 10, or 14 oz).
- Place your mug or travel mug on the drip tray.
- Select your desired brew strength: Press the REGULAR button for a standard brew or the BOLD button for a stronger coffee.
- The coffee maker will begin brewing. Once brewing is complete, the machine will automatically turn off.
- Carefully remove your mug. Lift the lid to remove and empty the reusable ground coffee filter.
5.3 Regular and Bold Brew Options

Image: An internal cutaway diagram of the coffee maker illustrating the flow path for the "BOLD" brewing option, which enhances coffee richness.
- Regular Brew: Provides a standard coffee strength.
- Bold Brew: This option adjusts the brewing process to extract more flavor, resulting in a richer coffee.
6. Maintenance
6.1 Cleaning
- Always unplug the coffee maker before cleaning.
- Wash the removable parts (K-Cup holder, ground coffee filter, drip tray, water reservoir) in warm, soapy water. Rinse thoroughly and dry. These parts are not dishwasher safe.
- Wipe the exterior of the coffee maker with a damp, non-abrasive cloth. Do not use harsh cleaners or abrasive pads.
- Do not immerse the coffee maker in water or any other liquid.
6.2 Descaling

Image: Close-up of the coffee maker's control panel showing the Descaling Reminder light (brew indicator lights blinking red alternately) and icons illustrating the benefits of descaling: Removes Mineral Build-Up, Extends Life of Machine, Improves Taste of Coffee.
Over time, mineral deposits (scale) can build up in your coffee maker, affecting its performance and the taste of your coffee. The Descaling Reminder light will blink red alternately when descaling is recommended.
To descale your coffee maker:
- Ensure the coffee maker is unplugged and cool.
- Empty the water reservoir.
- Fill the water reservoir with a descaling solution (e.g., white vinegar or a commercial descaling agent) according to the solution's instructions.
- Place a large mug or container on the drip tray.
- Plug in the coffee maker and power it on.
- Run several brew cycles with the descaling solution until the reservoir is empty. Do not insert any coffee capsules or ground coffee.
- After the descaling solution has been run through, rinse the reservoir thoroughly with fresh water.
- Fill the reservoir with fresh water and run at least two full brew cycles with fresh water to rinse out any remaining descaling solution.
- The descaling reminder light should reset after the process. If it continues to blink, repeat the fresh water rinse cycles.
7. Troubleshooting
| Problem | Possible Cause | Solution |
|---|---|---|
| Coffee maker does not turn on. | Not plugged in; power outlet issue. | Ensure the power cord is securely plugged into a working electrical outlet. |
| No water dispenses or very little coffee brews. | Water reservoir empty; lid not closed properly; machine needs descaling. | Fill water reservoir. Ensure lid is firmly closed. Perform a descaling cycle if the reminder light is on. |
| Coffee tastes weak. | Insufficient coffee grounds/capsule; incorrect brew strength selected; machine needs descaling. | Use more coffee grounds or a fresh capsule. Select the BOLD brew option. Descale the machine. |
| Coffee overflows from mug. | Mug is too small for selected brew size. | Use a larger mug or select a smaller brew size. |
| Descaling reminder light is blinking. | Mineral build-up in the machine. | Perform a descaling cycle as described in Section 6.2. |
8. Specifications

Image: Diagram showing the compact design and dimensions of the coffee maker: 14 Oz Water Reservoir, fits 6.7 inch Travel Mug, 0.7 inch Deep Drip Tray, overall dimensions approximately 12 inches high, 8.2 inches deep, and 5.6 inches wide.
- Brand: Tastyle
- Capacity: 14 ounces (water reservoir)
- Operation Mode: Fully Automatic
- Voltage: 120 volts
- Human Interface Input: Buttons
- Filter Type: Reusable (for ground coffee)
- Compatibility: K-Cup capsules and ground coffee
- Brew Sizes: 6, 8, 10, 14 oz
- Max Travel Mug Height: 6.7 inches
- Approximate Dimensions (H x D x W): 12 inches x 8.2 inches x 5.6 inches
9. Warranty and Support
For warranty information or technical support, please refer to the contact details provided with your purchase or visit the official Tastyle website. Keep your proof of purchase for warranty claims.
