Introduction
This manual provides detailed instructions for the safe and efficient use of your SINGER M3305 Motorised Automatic Zig-Zag Electric Sewing Machine. Please read all instructions carefully before operating the machine to ensure proper function and longevity.

Image: Front view of the SINGER M3305 Electric Sewing Machine, showcasing its white body with a teal accent and stitch selector dial.
Important Safety Instructions
When using an electrical appliance, basic safety precautions should always be followed, including the following:
- Read all instructions before using this sewing machine.
- Keep these instructions in a safe place.
- Always unplug the machine from the electrical outlet immediately after using and before cleaning, removing covers, lubricating, or making any other user servicing adjustments.
- Do not allow children to play with the machine.
- Use this product only for its intended use as described in this manual.
- Never operate this sewing machine if it has a damaged cord or plug, if it is not working properly, if it has been dropped or damaged, or dropped into water.
- Never drop or insert any object into any opening.
- Do not use outdoors.
- Do not operate where aerosol (spray) products are being used or where oxygen is being administered.
- To disconnect, turn all controls to the off position, then remove plug from outlet.
What's in the Box
The SINGER M3305 sewing machine comes with the following accessories:
- All-Purpose Foot
- Zipper Foot
- Button Sewing Foot
- Pico Foot
- Buttonhole Foot
- Darning Plate
- Bobbins
- Needles
- Seam Ripper/Lint Brush
- Spool Cap
- Edge / Quilting Guide
- L-Type Screw Driver

Image: Angled view of the SINGER M3305 Electric Sewing Machine, showing the main body and the accessory storage area.
Setup
1. Power Connection
Connect the power cord to the machine and then to a suitable electrical outlet. Ensure the machine is switched off before connecting.

Image: Rear view of the SINGER M3305 Electric Sewing Machine, highlighting the power input and foot pedal connection ports.
2. Threading the Machine
Proper threading is crucial for optimal stitch quality. Follow these steps:
- Place the spool of thread on the spool pin.
- Guide the thread through the upper thread guides.
- Pass the thread through the tension discs.
- Thread the take-up lever.
- Guide the thread down to the needle bar.
- Use the built-in needle threader for convenience, or manually thread the needle from front to back.

Image: Close-up of the SINGER M3305 showing the tension dial and the upper thread path, indicating where the thread should be guided.

Image: Close-up of the needle area on the SINGER M3305, showing the needle, presser foot, and the integrated needle threader mechanism.
3. Winding and Inserting the Bobbin
The SINGER M3305 features a front-loading bobbin for easy winding and insertion.
- Place an empty bobbin onto the bobbin winder spindle.
- Guide the thread from the spool through the bobbin winding tension disc.
- Wind the thread a few times manually around the bobbin.
- Push the bobbin winder spindle to the right.
- Press the foot pedal to start winding. Stop when the bobbin is full.
- Remove the bobbin and insert it into the bobbin case, ensuring the thread feeds correctly.

Image: Side view of the SINGER M3305 Electric Sewing Machine, illustrating the free arm feature for sewing cuffs and sleeves.
Operating Instructions
1. Selecting Stitches
The SINGER M3305 offers 23 essential and decorative stitches. Use the stitch selector dial to choose your desired stitch pattern.

Image: Close-up of the SINGER M3305 stitch selector dial, displaying various stitch patterns and settings.
2. Adjusting Stitch Length and Width
Stitch width and length can be adjusted to customize stitches. Refer to the markings on the machine for specific adjustments.
3. Using the 1-Step Buttonhole
The 1-step buttonhole feature provides convenience and consistent results. Attach the buttonhole foot and follow the machine's markings for precise buttonhole creation.
4. Changing Presser Feet
To change presser feet, raise the needle to its highest position and lift the presser foot lever. Press the release button on the back of the presser foot holder to detach the current foot. Snap the new foot into place.
Included presser feet:
- All-Purpose Foot: For general sewing on most fabrics.
- Zipper Foot: For inserting zippers and piping.
- Button Sewing Foot: For attaching two-hole and four-hole buttons.
- Pico Foot: For creating decorative edges.
- Buttonhole Foot: For creating buttonholes.
Maintenance
1. Cleaning
Regular cleaning ensures smooth operation. Always unplug the machine before cleaning.
- Use the lint brush (included with the seam ripper) to remove lint and dust from the bobbin area and feed dogs.
- Wipe the exterior of the machine with a soft, dry cloth.
- Do not use liquid cleaners or harsh chemicals.
2. Needle Replacement
Replace needles regularly, especially if they become bent, dull, or if you notice skipped stitches. Use SINGER brand needles appropriate for your fabric type.
- Loosen the needle clamp screw.
- Remove the old needle.
- Insert the new needle with the flat side facing the back of the machine.
- Tighten the needle clamp screw securely.
Troubleshooting
| Problem | Possible Cause | Solution |
|---|---|---|
| Skipped Stitches | Incorrect needle, bent needle, improper threading. | Replace needle, re-thread machine, ensure correct needle insertion. |
| Thread Breaking | Incorrect tension, poor quality thread, needle too small for thread. | Adjust tension, use good quality thread, use appropriate needle size. |
| Machine Not Starting | Power cord not connected, foot pedal not connected, machine switched off. | Check power connections, ensure foot pedal is plugged in, turn machine on. |
| Fabric Not Feeding | Feed dogs lowered, presser foot not down. | Raise feed dogs, lower presser foot. |
Specifications
| Feature | Detail |
|---|---|
| Model Number | M3305 |
| Stitch Programs | 23 (Essential & Decorative) |
| Buttonhole Type | 1-Step Automatic |
| Bobbin Type | Front Loading |
| Needle Threader | Integrated |
| Dimensions (LxWxH) | 42 x 24 x 36.5 Centimeters (Item Dimensions LxWxH) |
| Weight | 2 kg 500 g |
| Color | White |
| Manufacturer | Singer India Ltd |
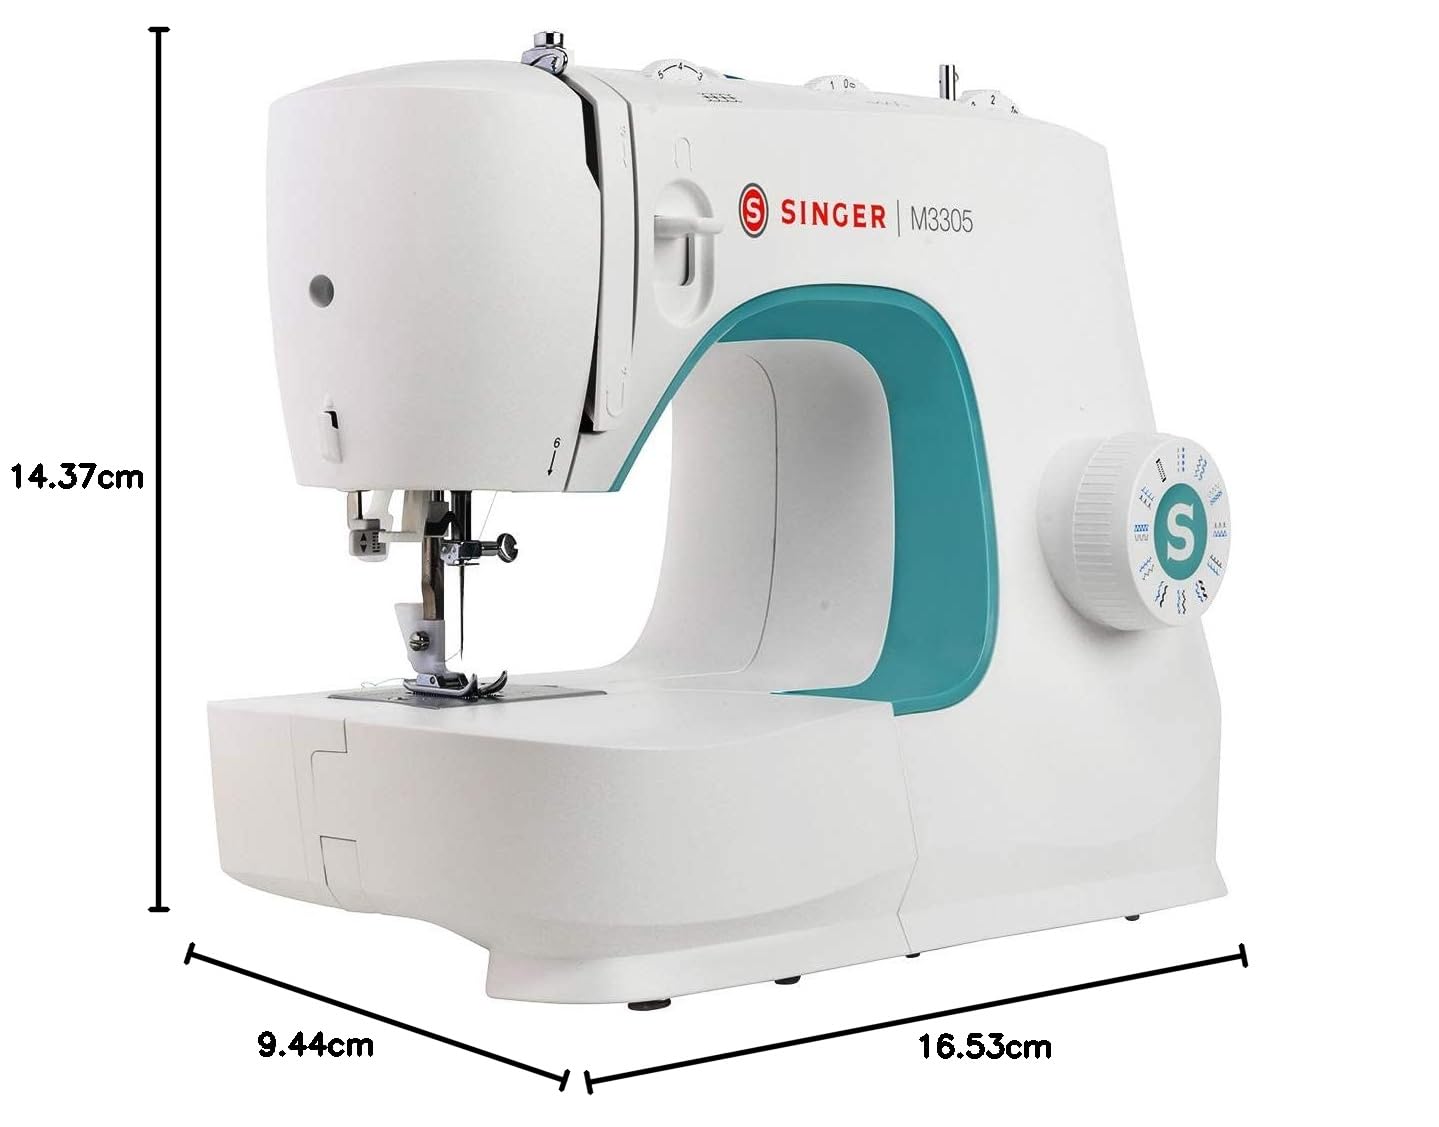
Image: The SINGER M3305 Electric Sewing Machine with key dimensions (length, width, height) indicated in centimeters.
Warranty and Support
For warranty information and customer support, please contact Singer India Ltd directly. Contact details are typically provided with your purchase documentation.
Manufacturer Contact Information:
- Customer Care Number: 1800 103 3474
- Email: MAIL@SINGERINDIA.NET
A full instruction manual is also available online to view or download anytime from the official SINGER website.


