
Lysee DRV8825 Kit
Lysee 3D Printer Parts & Accessories User Manual
Brand: Lysee | Model: DRV8825 Kit
1. Introduction
This manual provides comprehensive instructions for the Lysee Ramps 1.6 Kit, an upgrade based on Ramps 1.4 and 1.5, designed for RepRap 3D printer control systems. This kit includes the Mega2560 Board, 12864LCD, and DRV8825 stepper motor drivers, offering enhanced performance and ease of use for your 3D printing projects.
The Ramps 1.6 board features optimized design with new 2-pin connectors for simpler and more secure connections, reducing the risk of burnout. It also incorporates an improved heatsink for the MOS tube, enhancing heat dissipation. The power capacity of Ramps 1.6 is significantly increased, supporting up to 270W, compared to Ramps 1.5's 200W.
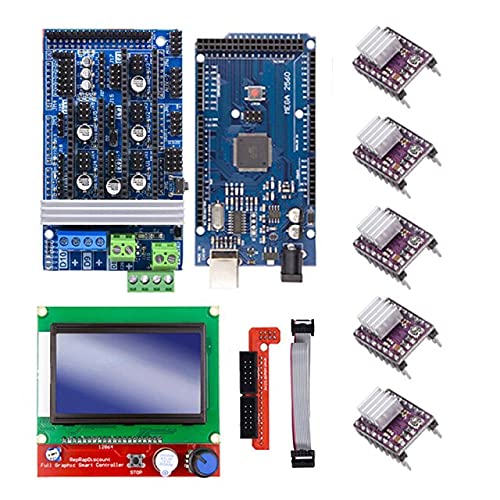
Figure 1: Overview of the Lysee Ramps 1.6 Kit components. This image displays the Ramps 1.6 control board, the Mega2560 microcontroller board, the 12864LCD graphic display, and five DRV8825 stepper motor drivers, along with connecting cables.
2. Kit Components
The DRV8825 Kit includes the following main components:
- 1x Ramps 1.6 Control Board: The main interface board for connecting various 3D printer components.
- 1x Mega2560 Board: The microcontroller board that processes commands and controls the printer.
- 1x 12864LCD Graphic Display: For user interface and real-time status display.
- 5x DRV8825 Stepper Motor Drivers: For controlling the stepper motors of the 3D printer.
2.1 Ramps 1.6 Control Board
The Ramps 1.6 board is an optimized version of its predecessors, offering improved connectivity and heat dissipation. It features heater and fan MOSFET outputs, 3 thermistor interfaces, and 5A additional security fuses for component protection. It also includes an 11A fuse for heated bed control.

Figure 2: Detailed view of the Ramps 1.6 control board. This image highlights the various connectors, fuses, and components on the Ramps 1.6 board, including the power inputs, motor driver slots, and thermistor ports.
- Connects to LCD and other peripherals.
- Heater and fan MOSFET outputs.
- 3 thermistor interfaces.
- 5A additional security and component protection fusion.
- Heated bed controls with additional 11A fuses.
- Supports 5 Pololu stepper drive boards.
- Pololu plate pin sockets for easy replacement.
- I2C and SPI pins for future expansion.
- Gold-plated servo connectors for limit stops, motors, and LEDs (rated current 3A).
- LED indicator for heater output.
- Supports two motors for Z-axis control.
2.2 Mega2560 Board
The Mega2560 board serves as the brain of the 3D printer control system. This version addresses compatibility issues with Windows 7 and 8 systems, ensuring stable operation. It retains the ATMEGA2560-16AU master chip and uses ATMEGA8U2/ATMEGA16U2 for USB communication.
2.3 12864LCD Graphic Display
The 12864LCD provides a visual interface for controlling your 3D printer without a computer. It displays print status, temperature, and allows navigation through menus using its integrated rotary encoder and push button.
2.4 DRV8825 Stepper Motor Drivers
The DRV8825 drivers are high-performance stepper motor drivers capable of driving up to 2.5A per coil with appropriate cooling. They offer microstepping resolutions up to 1/32 step, providing smoother motion and quieter operation compared to older drivers.
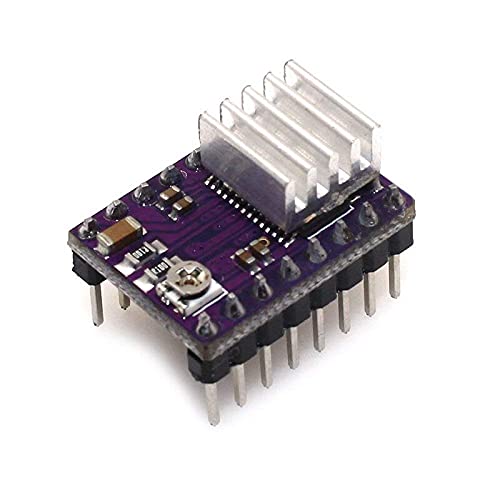
Figure 3: Individual DRV8825 stepper motor driver. This image shows a single DRV8825 driver module, highlighting its compact size and the heatsink attached for thermal management.
3. Setup and Connection
Before beginning assembly, ensure all components are present and undamaged. It is recommended to work on an anti-static surface.
- Mounting the Mega2560 Board: Secure the Mega2560 board to your printer's frame or an appropriate mounting plate.
- Connecting Ramps 1.6 to Mega2560: Carefully align the pins of the Ramps 1.6 board with the corresponding headers on the Mega2560 board. Press firmly but gently to ensure a secure connection.
- Installing Stepper Motor Drivers: Insert the DRV8825 drivers into the designated slots on the Ramps 1.6 board. Pay close attention to the orientation of the drivers; typically, the potentiometer faces away from the power connectors. Ensure heatsinks are properly attached to the driver chips.
- Connecting Stepper Motors: Connect your 3D printer's stepper motors (X, Y, Z, E0, E1) to the corresponding motor driver headers on the Ramps 1.6 board. Refer to your printer's wiring diagram for correct pin assignments.
- Connecting Endstops: Connect the limit switches (endstops) for X, Y, and Z axes to the designated endstop pins on the Ramps 1.6 board.
- Connecting Thermistors: Connect the thermistors for the hotend and heated bed to the T0, T1, and T2 pins. T0 is typically for the hotend, T1 for the heated bed.
- Connecting Heaters: Connect the hotend heater cartridge to the D10 output and the heated bed to the D8 output. Ensure correct polarity.
- Connecting Fan: Connect the cooling fan to the D9 output.
- Connecting 12864LCD: Use the provided ribbon cables to connect the 12864LCD to the EXP1 and EXP2 headers on the Ramps 1.6 board.
- Power Supply Connection: Connect a 12V power supply to the Ramps 1.6 board's power input terminals (D10+ and D9+). Ensure the power supply is off before connecting. The Ramps 1.6 can handle up to 270W.
Important: Double-check all connections before applying power to prevent damage to the components.
4. Basic Operation
Once the hardware is connected, the next step is to upload firmware to the Mega2560 board. Marlin firmware is commonly used for RepRap 3D printers.
- Firmware Installation:
- Download the Arduino IDE and the latest stable version of Marlin firmware.
- Configure the
Configuration.hfile in Marlin to match your printer's specific setup (e.g., thermistor types, stepper motor steps per mm, endstop logic, heated bed presence). - Select "Arduino Mega 2560" as the board in the Arduino IDE.
- Connect the Mega2560 board to your computer via USB.
- Upload the configured Marlin firmware to the Mega2560 board.
- Initial Testing:
- After firmware upload, disconnect USB and connect the main power supply.
- Verify the 12864LCD displays information correctly.
- Test motor movements (X, Y, Z, Extruder) using the LCD menu or a host software like Pronterface.
- Check thermistor readings for hotend and heated bed.
- Test heater functionality for hotend and heated bed.
- Stepper Driver Current Adjustment:
The DRV8825 drivers have a potentiometer to adjust the Vref (voltage reference) which controls the motor current. Refer to the DRV8825 datasheet or online guides for calculating the correct Vref for your specific stepper motors. Adjust this carefully with a small screwdriver while measuring Vref with a multimeter, ensuring power is applied but motors are not actively moving.
5. Maintenance
Proper maintenance ensures the longevity and reliable operation of your Ramps 1.6 kit.
- Dust Removal: Periodically clean the boards and components to remove dust buildup, which can hinder heat dissipation and cause short circuits. Use compressed air or a soft brush.
- Connection Checks: Regularly inspect all wiring connections to ensure they are secure and free from corrosion or damage. Loose connections can lead to intermittent issues or component failure.
- Heatsink Integrity: Ensure that the heatsinks on the stepper motor drivers and the MOS tube on the Ramps board are firmly attached and free of obstructions.
- Firmware Updates: Keep your printer's firmware updated to the latest stable version to benefit from bug fixes and new features.
- Environmental Conditions: Operate the kit in a dry, stable environment, away from excessive heat, humidity, and direct sunlight.
6. Troubleshooting
This section addresses common issues you might encounter.
| Problem | Possible Cause | Solution |
|---|---|---|
| LCD not displaying anything or showing garbled text. | Incorrect wiring of EXP1/EXP2 cables; contrast adjustment needed; firmware not configured for 12864LCD. | Check ribbon cable connections and orientation. Adjust the potentiometer on the back of the LCD. Ensure #define REPRAP_DISCOUNT_FULL_GRAPHIC_SMART_CONTROLLER is uncommented in Marlin's Configuration.h. |
| Stepper motors not moving or moving erratically. | Incorrect driver orientation; insufficient Vref; motor wiring incorrect; faulty driver. | Verify driver orientation (potentiometer away from power). Adjust Vref. Check motor wiring (AABB or ABAB). Replace driver if necessary. |
| Heaters not heating or overheating. | Incorrect thermistor wiring; faulty thermistor; MOSFET failure; incorrect firmware settings. | Check thermistor connections and type in firmware. Verify heater wiring polarity. Inspect MOSFETs for damage. Ensure correct PID settings in firmware. |
| Board not recognized by computer via USB. | Missing USB drivers; faulty USB cable; issue with Mega2560's USB chip. | Install CH340G or FTDI drivers if needed. Try a different USB cable. Ensure the Mega2560 board is powered. |
7. Specifications
7.1 Ramps 1.6 Board
- Maximum Power: Up to 270W
- Fuses: 5A (general), 11A (heated bed)
- Stepper Driver Support: 5 Pololu A4988/DRV8825 compatible sockets
- Thermistor Inputs: 3
- MOSFET Outputs: Heater (D10), Heated Bed (D8), Fan (D9)
- Expansion Ports: I2C, SPI, Servo connectors
7.2 Mega2560 Board
- Microcontroller: ATmega2560
- Operating Voltage: 5V
- Input Voltage (recommended): 7-12V
- Digital I/O Pins: 54 (15 provide PWM output)
- Analog Input Pins: 16
- Flash Memory: 256 KB (8 KB used by bootloader)
- SRAM: 8 KB
- EEPROM: 4 KB
- Clock Speed: 16 MHz
7.3 DRV8825 Stepper Motor Driver
- Maximum Current: 2.5A per coil (with sufficient cooling)
- Microstep Resolutions: 1, 1/2, 1/4, 1/8, 1/16, 1/32
- Voltage Range: 8.2V to 45V
- Protection: Overcurrent, thermal shutdown, undervoltage lockout
8. Warranty and Support
For warranty information and technical support, please refer to the seller's policy on the platform where the product was purchased. For general troubleshooting and community support, online forums and communities dedicated to RepRap and 3D printing are valuable resources.
Seller: Boicus (as per product information)
Date First Available: February 10, 2023
Ask a question about this manual
Ask about setup, troubleshooting, compatibility, parts, safety, or missing instructions. Manuals+ will review the question and use this page’s manual context to help answer it.