
1. Introduction
Thank you for choosing the ODK LED Gaming Desk. This L-shaped gaming desk is designed to provide a robust and functional workspace for gaming, studying, or working. It features integrated LED lighting with multiple color and mode options, convenient power outlets, and USB ports to keep your devices charged and organized. The elevated monitor stand promotes ergonomic posture, and the sturdy construction ensures durability. This manual provides detailed instructions for assembly, operation, maintenance, and troubleshooting to help you get the most out of your new desk.

Figure 1: ODK LED Gaming Desk in a typical setup.
2. Safety Information
- Read all instructions carefully before assembly and use.
- Keep all small parts and packaging materials away from children and pets to prevent choking hazards.
- Assemble the desk on a soft, clean surface to prevent scratches.
- Ensure all screws and fasteners are securely tightened before use. Periodically check and re-tighten as needed.
- Do not overload the desk. Refer to the specifications for weight capacity.
- Keep liquids away from electrical components (power outlets, USB ports, LED strip) to prevent electric shock.
- Use only the provided power cable and ensure it is properly connected to a grounded outlet.
3. Package Contents
Please verify that all components are present before beginning assembly. If any parts are missing or damaged, contact ODK customer support.
- Desk Panels (L-shaped main desktop, monitor stand sections)
- Metal Frame Components (legs, support bars)
- LED Light Strip with Controller
- Integrated Power Strip (2 AC outlets, 2 USB ports)
- Power Cable (200cm)
- Cup Holder
- Headphone Hooks (x2)
- Assembly Hardware (screws, bolts, washers, nuts)
- Assembly Tools (screwdriver, Allen keys)
- User Manual

Figure 2: Included accessories: robust cup holder, double headphone hooks, and 200cm power cable.
4. Setup & Assembly
Assembly is designed to be straightforward. It is recommended to have two people for easier and faster assembly. Lay out all parts on a soft, clean surface to prevent damage.
- Unpack and Identify Parts: Carefully remove all components from the packaging. Refer to the parts list in this manual and the included assembly diagram to identify each piece.
- Assemble the Main Frame: Begin by connecting the metal leg frames and support bars according to the numbered steps in the assembly diagram. Use the provided screws and Allen keys. Do not fully tighten screws until all parts are loosely assembled.
- Attach Desktop Panels: Carefully place the L-shaped desktop panels onto the assembled metal frame. Align the pre-drilled holes with the frame. Secure the desktop panels using the appropriate screws. Once all panels are in place, gradually tighten all screws on the entire frame until secure.
- Install Monitor Stand: Attach the elevated monitor stand sections to the main desktop. Ensure they are securely fastened to provide a stable platform for your monitors.
- Integrate Power Unit: Insert the integrated power strip (with AC outlets and USB ports) into its designated slot on the desktop. Connect the power cable to the unit and route it neatly.
- Attach LED Strip: Adhere the LED light strip to the underside of the monitor stand or desired location using its adhesive backing. Connect the LED strip to its controller and then to a power source (often integrated with the main power unit or a separate USB connection).
- Install Accessories: Attach the cup holder and headphone hooks to the designated points on the desk frame.
- Final Check: Ensure all connections are tight and the desk is stable. Adjust the leveling feet at the bottom of the legs if necessary to prevent wobbling.
5. Operating Instructions
5.1 LED Lighting System
The integrated LED lighting system offers customizable ambiance for your gaming or work environment.
- Power On/Off: Use the power button on the LED controller to turn the lights on or off.
- Color Selection: Cycle through 7 different static color options using the 'Color' button on the controller.
- Dynamic Modes: Select from 13 dynamic lighting modes (e.g., flashing, fading, pulsing) using the 'Mode' button.
- Brightness Adjustment: Adjust the brightness level (8 levels available) using the '+' and '-' buttons on the controller.

Figure 3: Detail of the LED lighting and integrated power unit.
5.2 Integrated Power Outlets and USB Ports
The desk includes a built-in power strip for convenient access to power.
- AC Outlets: Two standard AC power outlets (220-250V/15A) are available for powering monitors, computers, or other electronics.
- USB Ports: Two USB ports (5V/2.1A) are provided for charging mobile devices, headphones, or other USB-powered accessories.
- Usage: Simply plug your devices into the appropriate outlets. Ensure the desk's main power cable is connected to a wall outlet.
5.3 Monitor Stand
The elevated monitor stand helps maintain an ergonomic viewing angle.
- Place your monitor(s) directly on the stand.
- The elevated position helps reduce neck and back strain by promoting a correct sitting posture.
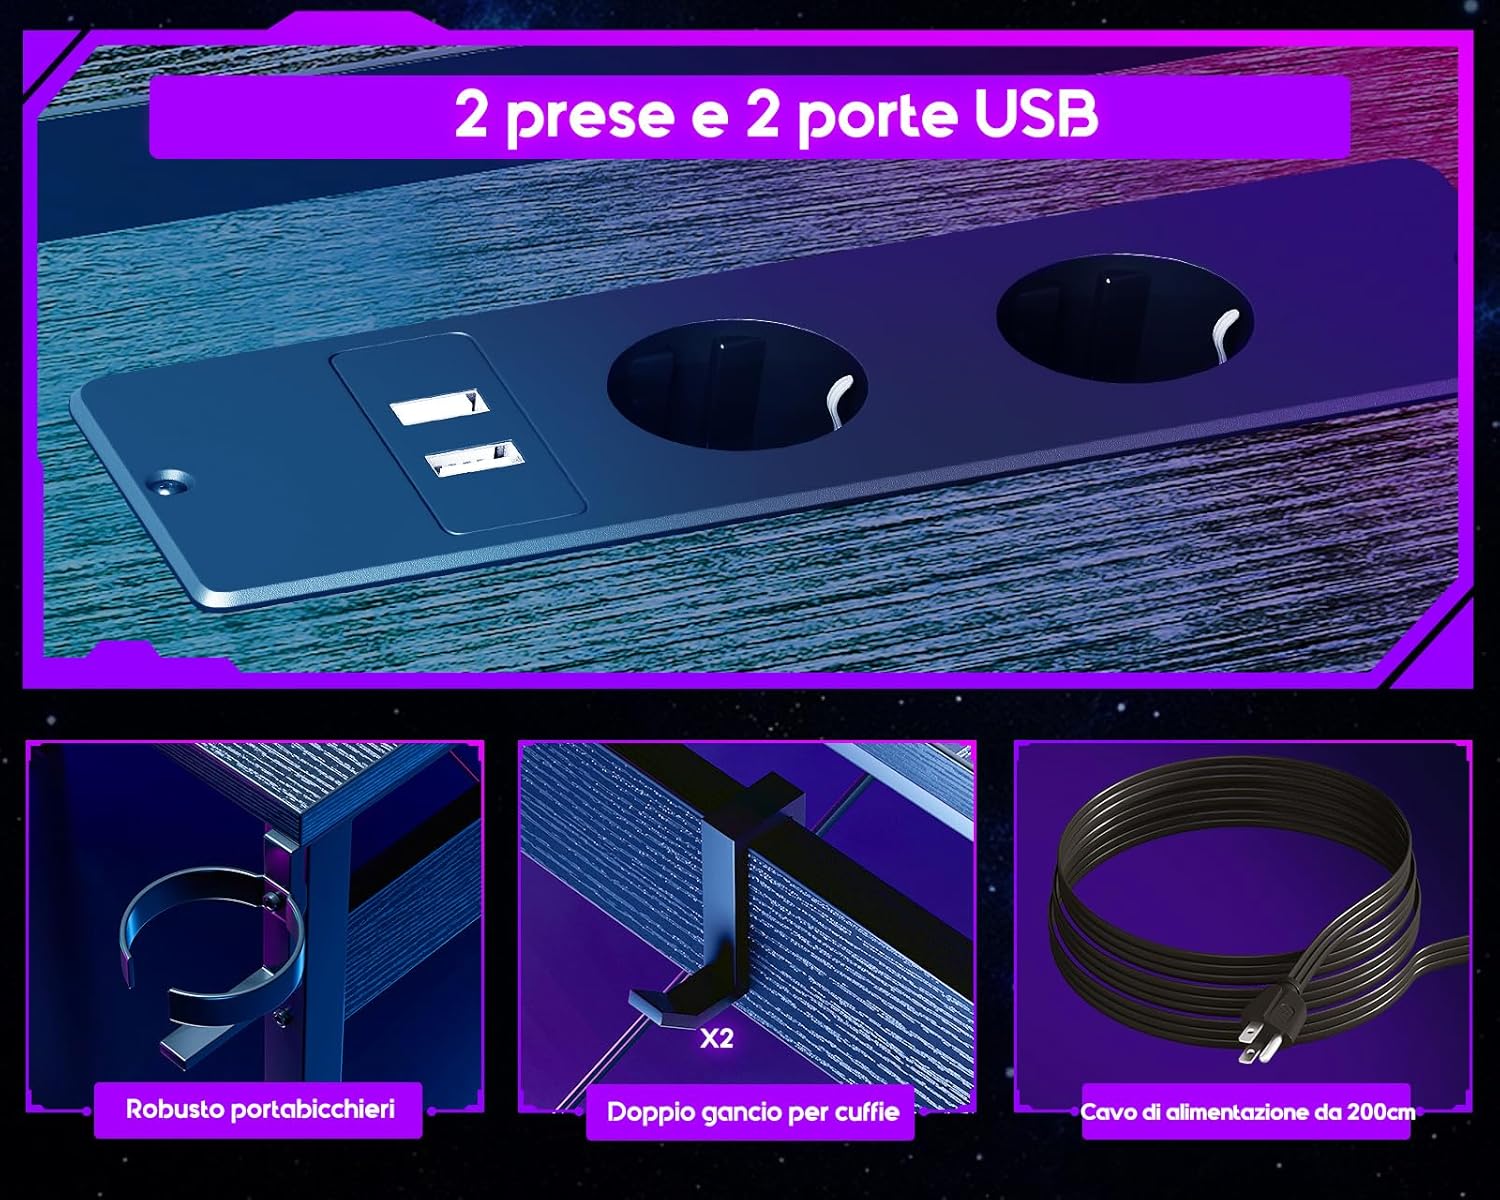
Figure 4: Proper ergonomic posture facilitated by the monitor stand.
6. Maintenance
- Cleaning: Wipe the desk surfaces with a soft, damp cloth. Avoid abrasive cleaners or harsh chemicals that could damage the finish. For the desktop, a microfiber cloth is recommended to prevent smudges.
- Dusting: Regularly dust the desk, especially around the LED strip and power outlets, to prevent dust buildup.
- Tightening Screws: Periodically check all screws and fasteners to ensure they remain tight. Re-tighten as necessary to maintain desk stability.
- Cable Management: Keep cables organized and secured to prevent tripping hazards and maintain a tidy workspace.
7. Troubleshooting
| Problem | Possible Cause | Solution |
|---|---|---|
| Desk is wobbly/unstable. | Loose screws; uneven floor. | Ensure all assembly screws are tightened. Adjust the leveling feet at the bottom of the desk legs. |
| LED lights are not working. | LED strip not connected; power issue; controller malfunction. | Check if the LED strip is properly connected to the controller and the power source. Ensure the main power cable is plugged in. Try pressing the power button on the controller. |
| Power outlets/USB ports not working. | Main power cable unplugged; circuit breaker tripped; faulty unit. | Verify the desk's main power cable is securely plugged into a working wall outlet. Check your household circuit breaker. If the issue persists, contact customer support. |
| Desk surface gets dirty easily. | Material type (e.g., carbon fiber texture) may show fingerprints/dust more. | Regularly wipe with a clean, dry microfiber cloth. Avoid touching the surface unnecessarily. |
8. Specifications
- Brand: ODK
- Model: ZJZ-QTMDCZ
- Color: Black
- Product Dimensions: 129 cm (Depth) x 129 cm (Width) x 89 cm (Height)
- Material: Wood (Desktop), Metal (Base Frame)
- Item Weight: 21 Kilograms
- Special Features: Integrated USB Socket, LED Lighting, Monitor Stand, Cup Holder, Headphone Hooks
- Power Outlets: 2 x AC (220-250V/15A)
- USB Ports: 2 x USB (5V/2.1A)
- LED Lighting: 7 Colors, 13 Dynamic Modes, 8 Brightness Levels
- Mounting Type: Floor Mount
- Recommended Use: Gaming, Home Office, Study

Figure 5: Detailed dimensions of the ODK LED Gaming Desk.
9. Warranty & Support
ODK is committed to providing high-quality products. While specific warranty details are not provided in this manual, please retain your proof of purchase for any warranty claims. For assistance with assembly, missing parts, or any operational issues, please contact ODK customer support through the retailer where you purchased the product. Our specialized customer support team is ready to assist you.
For returns, please refer to the retailer's return policy. Typically, products are returnable within 30 days of receipt.


