1. Product Overview
The sb components Zero Barcode HAT is a compact and robust barcode scanner board designed for Raspberry Pi Zero form factor devices. It integrates a DE2120 scanner module, a 1.14-inch LCD screen, and a buzzer, enabling the scanning of 20 distinct 1D and 2D barcode symbologies, including UPC codes and QR codes. The module utilizes an onboard camera and image processing for efficient recognition and decoding. It features two LEDs, one for illumination and another for projecting a red scanning line. Data transfer is supported via a micro USB port or UART line, accommodating keyboard, HID, and serial data.

This image illustrates the key features of the Zero Barcode HAT, including its DE2120 barcode scanner, 1.14-inch LCD, support for 20 barcode types, Micro-USB and UART connectivity, buzzer, and QR code scanning capability.
2. Features
- Integrated 1.14-inch LCD screen for displaying scan results and status.
- DE2120 scanner module capable of decoding 20 different 1D/2D barcode symbologies.
- Onboard micro USB and UART serial connector for flexible connectivity to computers or embedded devices.
- Includes a buzzer for audible feedback and a push-button tactile switch for user interaction.
- Designed for easy integration with Raspberry Pi 4B/3B+/3B/2B/B+/A, Zero & Zero 2 W.
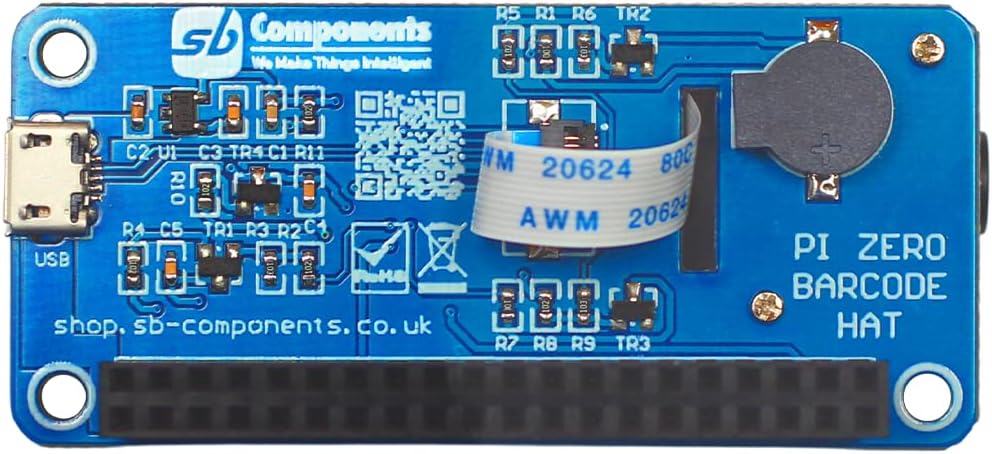
This image displays the reverse side of the Zero Barcode HAT, highlighting its circuit board and various electronic components.
3. Setup Instructions
3.1 Hardware Connection
- Ensure your Raspberry Pi is powered off before connecting the HAT.
- Carefully align the 40-pin header of the Zero Barcode HAT with the GPIO pins on your Raspberry Pi.
- Gently press the HAT down until it is securely seated on the Raspberry Pi's GPIO header.
- Verify that all pins are correctly aligned and connected.

This image demonstrates the Zero Barcode HAT correctly installed onto a Raspberry Pi Zero, illustrating the physical connection.
3.2 Software Configuration
The Zero Barcode HAT can be configured via its serial interface or by scanning specific command barcodes. Refer to the official sb components documentation or GitHub repository for detailed software setup, driver installation, and example code for your specific Raspberry Pi operating system.
- UART Communication: For serial data transfer, ensure the UART interface is enabled on your Raspberry Pi and configure your application to communicate with the HAT via the appropriate serial port.
- Micro USB: The micro USB port can be used for data transfer, often emulating a keyboard (HID) or serial device, depending on the HAT's configuration.
4. Operating Instructions
4.1 Barcode Scanning
- Power on your Raspberry Pi with the Zero Barcode HAT connected.
- Ensure your software application is running and configured to receive data from the HAT.
- Position the barcode or QR code within the scanning area of the HAT's camera. The red scanning line will assist in alignment.
- Press the 'SCAN' button on the HAT (if configured for manual trigger) or initiate scanning via software command.
- Upon successful scan, the 1.14-inch LCD will display 'TAG SCANNED' or similar feedback, and the buzzer may sound. The decoded data will be sent to your Raspberry Pi via the configured interface (UART or Micro USB).

This image shows the Zero Barcode HAT's LCD screen indicating a successful scan with the text 'TAG SCANNED' and a red line.
4.2 LCD Display and Buzzer
- The 1.14-inch LCD provides visual feedback on scanning status, configuration settings, or decoded data, depending on your software implementation.
- The onboard buzzer provides audible alerts for successful scans, errors, or other programmed events.
5. Maintenance
- Cleaning: Use a soft, dry cloth to clean the HAT. Avoid using liquid cleaners or solvents, which can damage electronic components.
- Handling: Handle the HAT by its edges to avoid touching the electronic components directly. Static electricity can damage sensitive electronics.
- Storage: Store the HAT in a dry, dust-free environment when not in use.
6. Troubleshooting
- HAT not recognized by Raspberry Pi: Ensure the HAT is correctly seated on the GPIO pins. Check for any bent or misaligned pins. Verify that the Raspberry Pi's operating system is properly configured for HAT detection and necessary drivers are installed.
- Barcode not scanning: Ensure the barcode is clean, undamaged, and well-lit. Position the barcode correctly within the scanner's field of view. Check software configuration for scanner activation and data reception.
- LCD not displaying: Verify power supply to the Raspberry Pi and HAT. Check software configuration for LCD initialization and display commands.
- No data output: Confirm the correct data transfer method (UART or Micro USB) is selected and configured in your software. Check serial port settings (baud rate, parity, stop bits) if using UART.
7. Specifications
| Feature | Detail |
|---|---|
| Item Model Number | 5055652924889 |
| Package Dimensions | 3.43 x 2.91 x 1.46 inches |
| Item Weight | 1.41 ounces |
| Compatible Devices | Personal Computer (Raspberry Pi) |
| Power Source | Corded Electric (via Raspberry Pi) |
| Connectivity Technology | USB Cable (Micro USB), UART |
| Barcode Symbologies | 20 types (1D and 2D, including QR codes) |
| Display | 1.14-inch LCD |
8. Warranty Information
This product is covered by the standard manufacturer's warranty provided by sb components. For specific details regarding warranty duration, coverage, and claims, please refer to the documentation included with your purchase or visit the official sb components website. Keep your proof of purchase for warranty purposes.
9. Support
For technical assistance, support, or further inquiries regarding the Zero Barcode HAT, please contact sb components directly:
- Manufacturer: sb components
- Website: shop.sb-components.co.uk
- Seller (on Amazon): SB Components
Please have your product model number (5055652924889) and purchase details ready when contacting support.


