
1. Introduction
This manual provides essential instructions for the safe and efficient operation, installation, and maintenance of your Yale Electronic Safe Mini YSV/170/DB2/P. Please read this manual thoroughly before using the product and retain it for future reference. The Yale Electronic Safe Mini is designed to provide a basic level of security for small important items such as passports, credit cards, and keys.

Figure 1: Yale Electronic Safe Mini YSV/170/DB2/P, front view showing keypad and handle.
2. Safety Information
Always follow basic safety precautions to reduce the risk of injury or damage to the safe and its contents.
- Do not store the mechanical emergency keys inside the safe. Keep them in a secure, separate location accessible only to authorized individuals.
- Ensure the safe is securely mounted to a wall or floor to prevent unauthorized removal.
- Do not expose the safe to extreme temperatures, high humidity, or direct water contact. This safe is not water resistant.
- Replace batteries promptly when the low battery indicator appears to avoid being locked out.
- Avoid using abrasive cleaners or solvents on the safe's surface or electronic components.
3. Package Contents
Verify that all items are present in the package upon unboxing:
- 1 x Yale Electronic Safe Mini YSV/170/DB2/P
- 2 x Mechanical Emergency Keys
- 4 x AA Batteries
- 1 x Pack of Fixing Bolts (for wall or floor mounting)
- 1 x User Manual / Fitting Instructions

Figure 2: Included components: safe, batteries, mechanical keys, and fixing bolts.
4. Setup
4.1 Battery Installation
- Open the safe using one of the mechanical emergency keys. Insert the key into the keyhole, turn it, and rotate the handle to open the door.
- Locate the battery compartment on the inside of the safe door.
- Insert the 4 AA batteries, ensuring correct polarity (+/-) as indicated within the compartment.
- Close the battery compartment cover securely.
4.2 Setting Your Personal Identification Number (PIN)
The safe comes with a factory default PIN (refer to the included physical manual for the exact default, typically 1-2-3-4). It is crucial to change this immediately for security.
- With the safe door open, press the red reset button located on the inside of the door, near the hinge. You will hear a beep, and the yellow indicator light on the keypad will illuminate.
- Within 5 seconds, enter your desired 3 to 8 digit PIN code on the keypad.
- Press the 'A' or '#' button to confirm your new PIN. You will hear a confirmation beep, and the yellow light will turn off.
- Test your new PIN with the door open before closing it. Enter your new PIN and press 'A' or '#'. The green light should illuminate, and the handle should be free to turn.
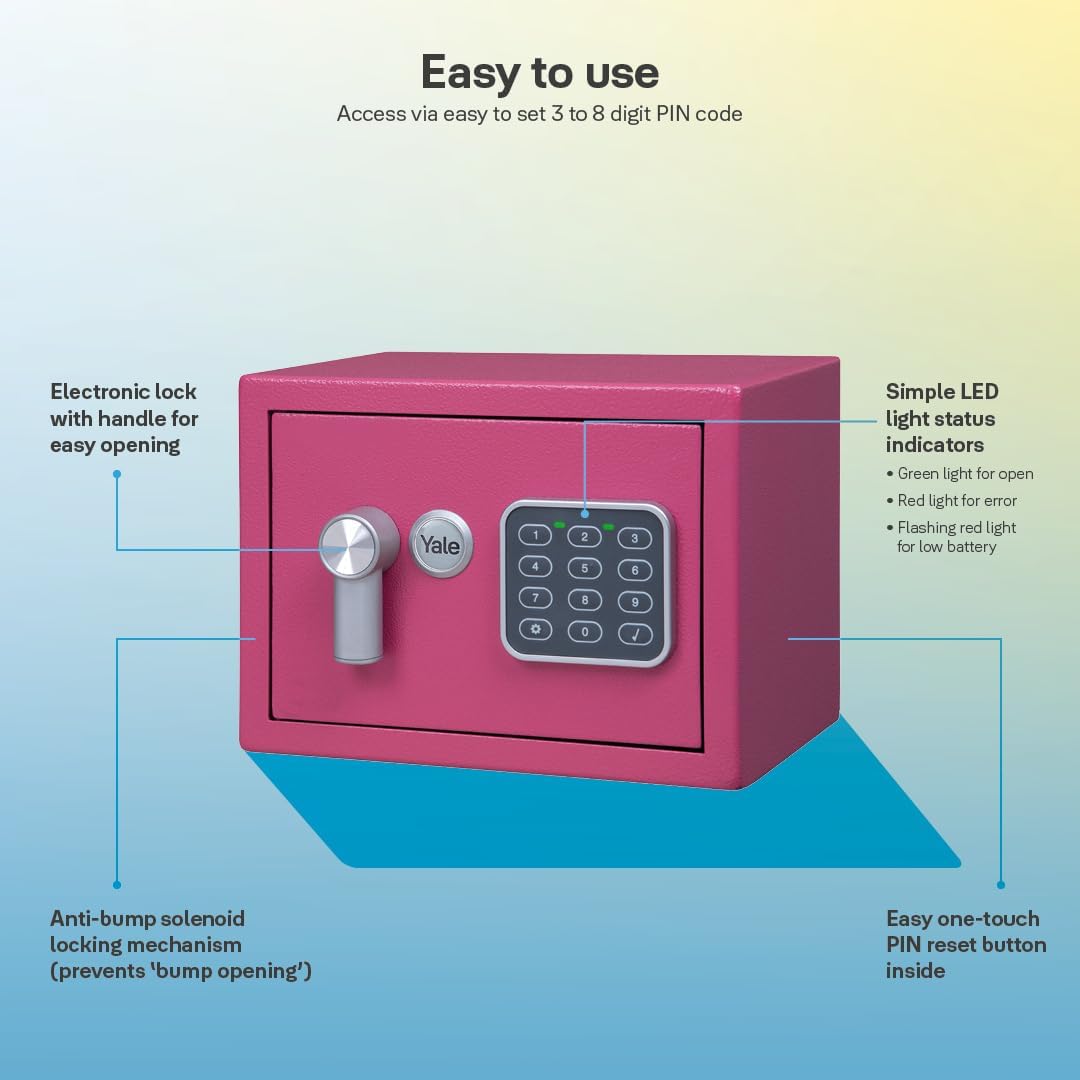
Figure 3: Key features including electronic lock, LED indicators, anti-bump solenoid, and one-touch PIN reset button.
4.3 Mounting the Safe
For enhanced security, it is recommended to fix the safe to a wall or floor using the provided fixing bolts.
- Choose a suitable location that is discreet and structurally sound.
- Open the safe door and locate the pre-drilled holes on the back or bottom panel.
- Mark the drilling points on the wall or floor through these holes.
- Drill pilot holes using an appropriate drill bit for your wall/floor material.
- Position the safe and secure it using the provided fixing bolts. Ensure they are tightened firmly.
5. Operating the Safe
5.1 Opening with Your PIN
- Enter your 3 to 8 digit PIN code on the keypad.
- Press the 'A' or '#' button.
- If the PIN is correct, the green light will illuminate, and you will hear a beep. Rotate the handle clockwise within 5 seconds to open the door.
- To lock, simply close the door and turn the handle counter-clockwise. The safe will automatically lock.
5.2 Opening with Emergency Key
In case of battery failure or a forgotten PIN, the safe can be opened using the mechanical emergency key.
- Locate the keyhole cover (usually a small removable cap near the handle or keypad). Remove it carefully.
- Insert one of the emergency keys into the keyhole and turn it.
- While holding the key turned, rotate the safe handle to open the door.
- Once open, you can replace the batteries or reset the PIN as needed.
5.3 Auto-Lockdown Mechanism
The safe features a two-stage lockdown mechanism for enhanced security against unauthorized access attempts:
- After 3 incorrect PIN entries, the keypad will lock down for 20 seconds, preventing further input.
- After 3 additional incorrect PIN entries (a total of 6 incorrect attempts), the keypad will lock down for 5 minutes.

Figure 4: Explanation of the safe's auto-lockdown feature.
6. Maintenance
6.1 Battery Replacement
When the red LED on the keypad flashes during operation, it indicates low battery power. Replace all 4 AA batteries promptly to ensure continued functionality and prevent lockout.
- Open the safe door using your PIN or the emergency key.
- Remove the battery compartment cover on the inside of the door.
- Replace all old batteries with new, high-quality AA alkaline batteries, observing correct polarity.
- Close the battery compartment cover securely.
- Note: Your programmed PIN code will be retained during battery replacement.
6.2 Cleaning
Clean the exterior of the safe with a soft, slightly damp cloth. Do not use abrasive cleaners, harsh chemicals, or solvents, as these can damage the finish or electronic components.
7. Troubleshooting
| Problem | Possible Cause | Solution |
|---|---|---|
| Safe does not open with PIN. | Incorrect PIN entered; batteries are low or dead; keypad is locked down due to multiple incorrect attempts. | Re-enter PIN carefully. Replace batteries. Wait for the lockdown period to expire. Use the mechanical emergency key to open. |
| Keypad does not respond. | Dead batteries; electronic malfunction. | Replace all 4 AA batteries. If the issue persists after battery replacement, use the emergency key and contact Yale customer support. |
| Red light flashes during operation. | Low battery power. | Replace all 4 AA batteries immediately to ensure continued operation. |
| Cannot set new PIN. | New PIN not entered within 5 seconds after pressing the reset button; PIN is not 3-8 digits long. | Ensure the new PIN is between 3 and 8 digits. Press the reset button and enter the new PIN within 5 seconds, then confirm with 'A' or '#'. |
8. Specifications
- Model: YSV/170/DB2/P
- Brand: Yale
- Lock Type: Electronic Keypad, Mechanical Emergency Key
- Exterior Dimensions (H x W x D): 9.06" x 6.69" x 6.69" (230mm x 170mm x 170mm)
- Interior Dimensions (H x W x D): Approximately 6.3" x 8.66" x 4.33" (160mm x 220mm x 110mm)
- Capacity: 3.8 Liters
- Material: Alloy Steel
- Item Weight: 5.06 pounds (2.3 Kilograms)
- Power Source: 4 x AA Batteries (included)
- PIN Code Length: 3-8 digits
- Special Features: Portable, Anti-bump solenoid, Visual alarm (LED indicators)
- Mounting Type: Wall Mount / Floor Mount (fixing bolts included)

Figure 5: Detailed dimensions, net weight, and volume of the safe.
9. Warranty and Support
For specific warranty information and customer support, please refer to the warranty card included with your product or visit the official Yale website. It is recommended to keep your purchase receipt as proof of purchase for any warranty claims.
For further assistance or technical inquiries, contact Yale customer service through their official channels.


