
Introduction
This manual provides comprehensive instructions for the safe and effective use of your Dreyoo 50W Submersible Aquarium Fish Tank Heater. Please read this manual thoroughly before installation and operation to ensure optimal performance and safety for your aquatic environment.
Safety Instructions
- Always unplug the heater from the power outlet before performing any maintenance, cleaning, or when removing it from the aquarium.
- Ensure the heater is fully submerged in water before plugging it in. Operating the heater out of water can cause damage to the unit and pose a fire hazard.
- Do not operate the heater if the glass tube is cracked or damaged.
- Keep the power cord away from sharp edges and hot surfaces.
- Ensure the power outlet has a ground fault circuit interrupter (GFCI) for added safety.
- This appliance is not intended for use by persons (including children) with reduced physical, sensory, or mental capabilities, or lack of experience and knowledge, unless they have been given supervision or instruction concerning use of the appliance by a person responsible for their safety.
- The thermometer display should not be immersed in water; only the probe tip is submersible.
Package Contents
Your package should contain the following items:
- 2 x Dreyoo 50W Submersible Aquarium Heaters
- 4 x Suction Cups for heater mounting
- 2 x Digital Thermometers (with probes and suckers)
- 4 x Thermometer Stickers (for external temperature reference)

Figure 1: Package Contents and Product Dimensions

Figure 2: Detailed Package Contents and Specifications
Product Features
- Adjustable Temperature: Easily set desired water temperature between 68-93°F (20-34°C) using the top knob.
- Built-in Thermostat: Automatically maintains the set temperature, turning off when the target temperature is reached and on when it drops.
- Durable Construction: Features 2mm thick quartz glass for electricity protection and resistance to breakage.
- Heating Indicator: An 'ON' indicator light illuminates when the heater is actively heating.
- Fully Submersible: Designed for complete submersion in aquarium water.
- External Thermometer: Includes a separate digital thermometer for accurate temperature monitoring.
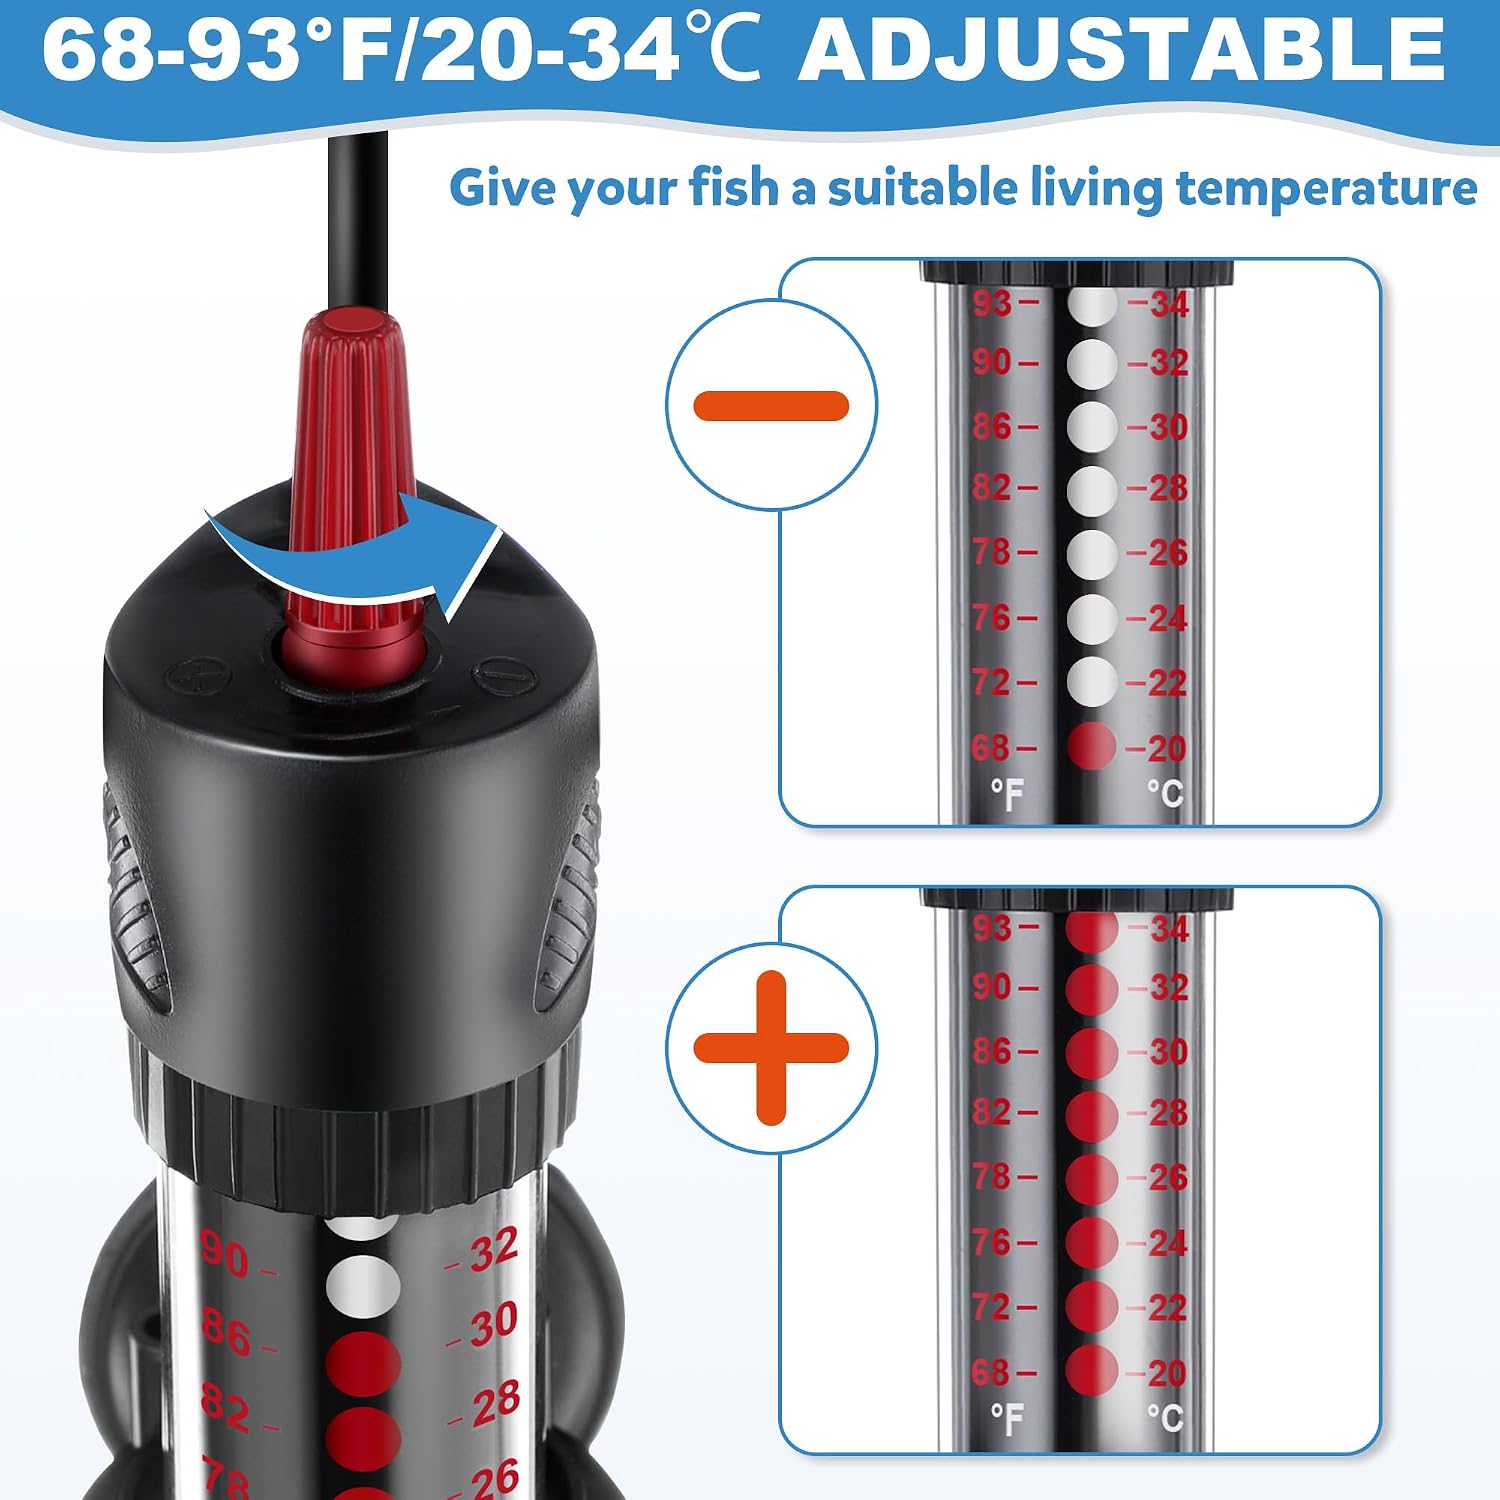
Figure 3: Temperature Adjustment Knob

Figure 4: Quartz Glass and Heating Elements

Figure 5: Key Product Features and Tank Capacity Guide
Setup Instructions
- Attach Suction Cups: Securely attach the provided suction cups to the heater body.
- Adjust Temperature: Before placing the heater in the aquarium, rotate the red knob at the top of the heater to set your desired temperature. The temperature scale is visible through the glass.
- Install Heater: Place the heater inside the aquarium, ensuring it is fully submerged in water. Use the suction cups to fix it firmly to the aquarium glass. Ensure the heater is positioned horizontally or vertically in an area with good water circulation.
- Install Thermometer: Place the digital thermometer probe inside the aquarium, away from the heater, to get an accurate reading of the overall water temperature. Use its suction cup to secure it. The thermometer display unit should remain outside the water.
- Power On: Once the heater is fully submerged and the temperature is set, plug the heater into a suitable power outlet. The 'ON' indicator light will illuminate when heating.
- Monitor Temperature: Use the external digital thermometer to monitor the actual water temperature and compare it with the heater's setting. Allow a few hours for the water temperature to stabilize.

Figure 6: Correct Heater Placement

Figure 7: Visual Guide for Heater Setup

Figure 8: Thermometer Placement Guidance
Operating Instructions
Once installed and powered on, the Dreyoo aquarium heater will automatically work to maintain the set temperature. The built-in thermostat will cycle the heating element on and off as needed.
- Temperature Adjustment: To change the desired temperature, unplug the heater, rotate the red knob at the top to the new setting, and then plug it back in. Always allow the heater to cool down for at least 15 minutes before handling or adjusting.
- Monitoring: Regularly check the external digital thermometer to ensure the water temperature is stable and within the desired range for your aquatic inhabitants.
Maintenance
- Cleaning: Periodically, unplug the heater and remove it from the aquarium. Gently wipe the glass tube with a soft cloth to remove any algae or mineral deposits. Do not use harsh chemicals or abrasive materials.
- Inspection: Regularly inspect the heater for any signs of damage, such as cracks in the glass, frayed cords, or loose connections. If any damage is observed, discontinue use immediately and replace the unit.
- Thermometer Batteries: If the digital thermometer display becomes dim or stops working, replace its battery (typically a button cell battery).
Troubleshooting
- Heater Not Turning On:
- Check if the power cord is securely plugged into a working outlet.
- Verify that the heater is fully submerged.
- Ensure the set temperature is higher than the current water temperature. The heater will not activate if the water is already at or above the set point.
- Water Temperature Too Low/High:
- Confirm the heater's set temperature matches your desired range.
- Ensure the heater is appropriately sized for your aquarium volume (refer to specifications).
- Check for proper water circulation around the heater.
- Verify the accuracy of your external thermometer.
- Heater Indicator Light Not On:
- The light only illuminates when the heater is actively heating. If the water is at the set temperature, the light will be off.
- If the water temperature is below the set point and the light is still off, check power connection and heater functionality.
Specifications
| Feature | Detail |
|---|---|
| Power | 50W (per heater) |
| Voltage | 110-120V |
| Temperature Range | 68-93°F / 20-34°C |
| Suitable Tank Capacity | 5-15 Gallons (for 50W heater) |
| Heater Length | Approx. 7.4 inches / 19 cm |
| Cord Length | Approx. 4.9 ft / 1.5 m |
| Material | 2mm Quartz Glass |
| Waterproof Rating | IPX8 |
Product Overview Videos
Video 1: Overview of the Dreyoo Submersible Aquarium Heater, demonstrating its components and basic handling.
Video 2: Another perspective on the Dreyoo Submersible Aquarium Heater, showcasing its design and features.