
Introduction
Thank you for choosing BITPOTT Solar Pathway Lights. These lights are designed to provide efficient and aesthetically pleasing illumination for your outdoor spaces, utilizing solar power for automatic operation. This manual provides detailed instructions for installation, operation, maintenance, and troubleshooting to ensure optimal performance and longevity of your product.

Image: BITPOTT Solar Pathway Lights installed along a garden path, providing warm white illumination.
Package Contents
Please verify that all components are present in your package:
- 8 x Solar Pathway Lights
- 16 x Extension Stakes
- 8 x Ground Spikes
- 1 x Instruction Manual
Specifications
| Feature | Detail |
|---|---|
| Brand | BITPOTT |
| Model Name | PW-T-006 |
| Color | Warm White |
| Material | Plastic |
| Style | Modern |
| Light Fixture Form | Path |
| Product Dimensions | 2.95"L x 2.95"W x 24.6"H (fully extended) |
| Indoor/Outdoor Usage | Outdoor |
| Power Source | Solar Powered |
| Special Feature | Waterproof (IP65) |
| Light Source Type | Tungsten Filament Bulb |
| Voltage | 1.2 Volts |
| Battery | 3.7V/1.85WH Rechargeable (Li-ion) |
| Solar Panel | Monocrystalline Silicon (30%+ conversion rate) |
| Water Resistance Level | IP65 |

Image: The internal 3.7V/1.85WH rechargeable battery, highlighting its stable power output and environmental friendliness.

Image: The upgraded monocrystalline silicon solar panel, demonstrating its higher energy conversion rate for faster charging.
Setup and Installation
Follow these steps to assemble and install your solar pathway lights:
- Unpack Components: Carefully remove all items from the packaging.
- Activate the Light: Gently pull out the solar panel from the top of the light unit. Locate the "OFF/ON" switch and slide it to the "ON" position.
- Assemble the Pole: Connect the extension stakes (pipes) to the light unit and the ground spike. You can adjust the height by using one or two extension stakes. The available heights are approximately 14.46 inches, 18.03 inches, and 24.6 inches.
- Select Installation Location: Choose a location outdoors where the solar panel can receive direct sunlight for at least 6-8 hours daily. Avoid areas under trees, eaves, or other obstructions that may block sunlight.
- Prepare the Ground: Loosen the soil before inserting the ground spike to prevent damage to the light unit.
- Insert into Ground: Firmly insert the assembled light into the prepared ground.
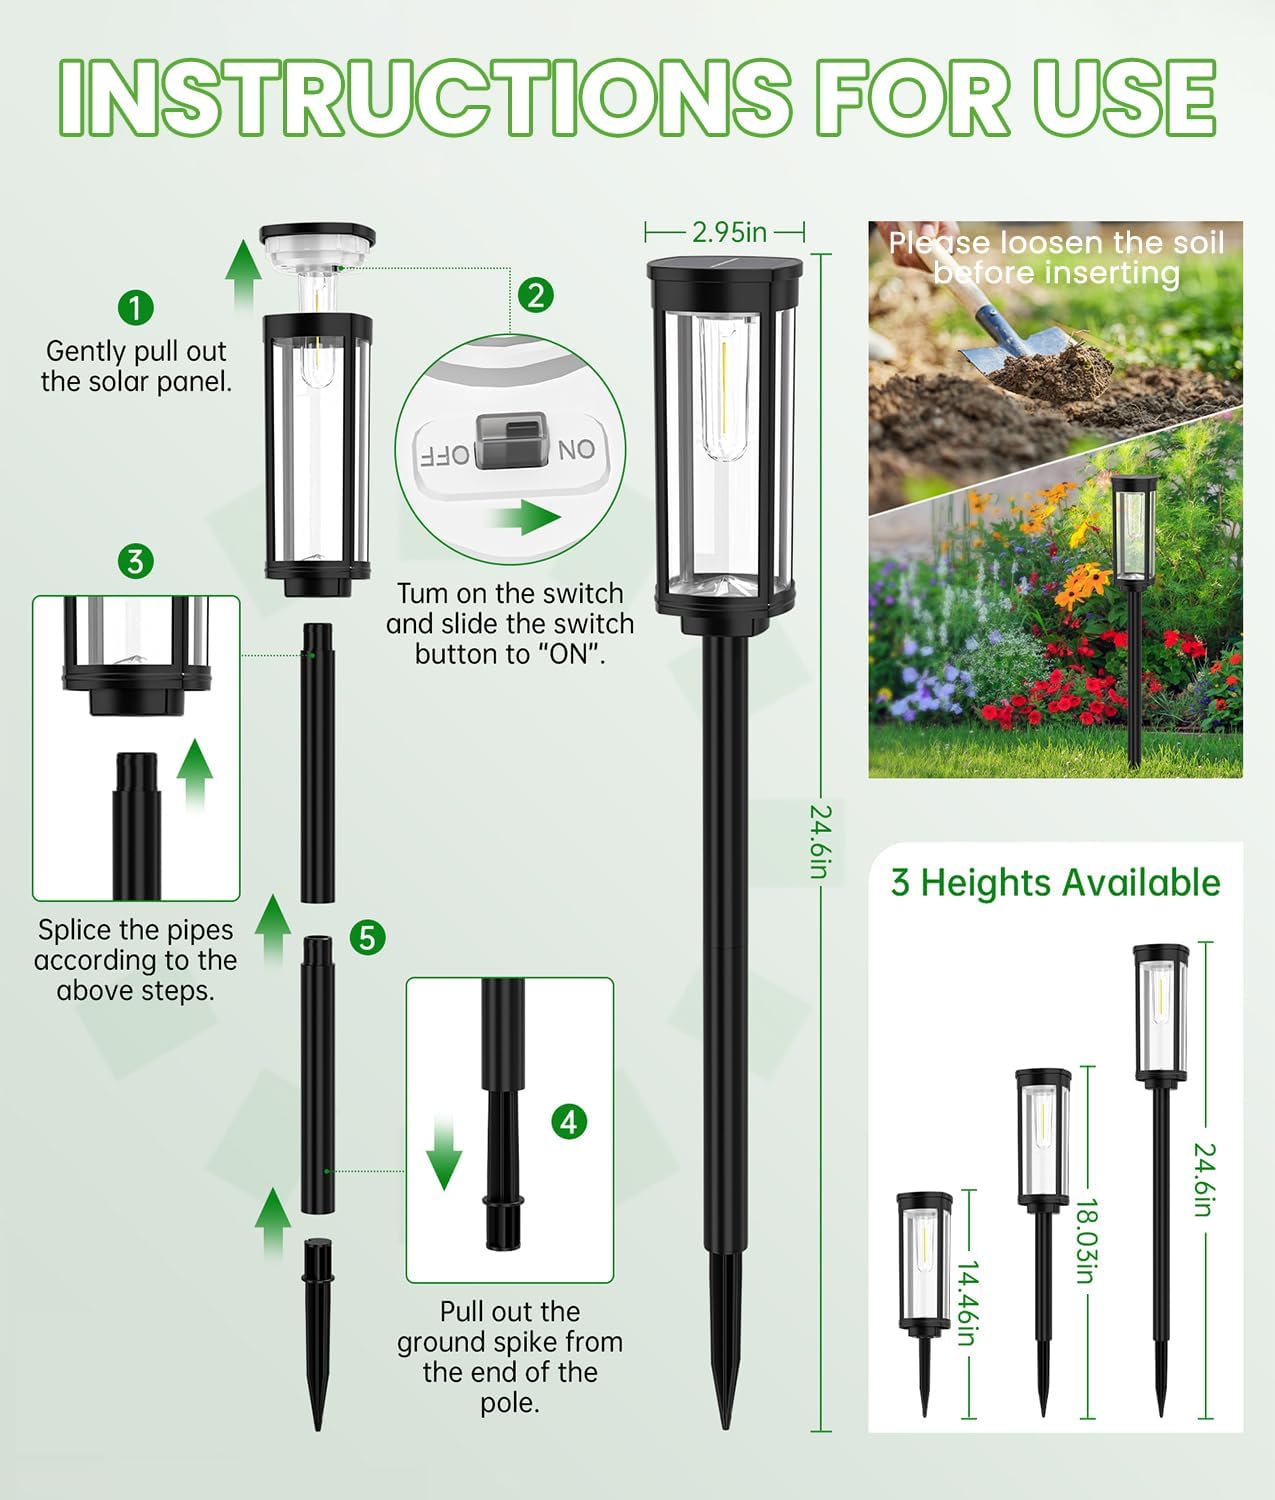
Image: Visual guide for assembling the solar pathway light, including pulling out the solar panel, turning on the switch, connecting extension stakes, and inserting the ground spike. It also illustrates the three adjustable heights.

Image: A detailed breakdown of the solar pathway light's components, showing the monocrystalline silicon solar panel, waterproof switch, longer filament, plastic lens, ABS ground pole, and upgraded ground spike.

Image: The solar pathway lights displayed at three different heights (14.46in, 18.03in, 24.6in) to show versatility in installation.
Operation
The BITPOTT Solar Pathway Lights are designed for automatic operation:
- Automatic Charging: During the day, the integrated solar panel charges the internal battery. A full charge typically takes 4-8 hours of direct sunlight. Charging time may vary based on weather conditions and sunlight intensity.
- Automatic Illumination: The lights feature a built-in light sensor. They will automatically turn on at dusk and turn off at dawn.
- Long-Lasting Performance: After a full charge, the lights can provide illumination for up to 12-14 hours, ensuring consistent lighting throughout the night.

Image: A visual representation of the solar lights' automatic function, showing charging during the day (4-8 hours) and lighting at night (12-14 hours).

Image: The upgraded extended filament ensuring high-quality illumination, with a graph showing sustained brightness over an extended period.
Maintenance
To ensure the longevity and optimal performance of your solar pathway lights, consider the following maintenance tips:
- Clean Solar Panels: Regularly wipe the solar panels with a soft, damp cloth to remove dust, dirt, and debris. A clean panel ensures maximum sunlight absorption and efficient charging.
- Clear Obstructions: Ensure that no leaves, branches, or other objects are blocking the solar panel's exposure to direct sunlight.
- Weather Resistance: The lights are rated IP65 waterproof, making them resistant to rain, snow, frost, and sleet. However, avoid submerging them in water.
- Seasonal Adjustments: In winter or periods of reduced sunlight, the charging time may be longer, and illumination duration shorter. Ensure the lights are placed in the sunniest available spot during these times.

Image: The solar pathway light demonstrating its IP65 waterproof rating and resistance to extreme temperatures (-4°F to 140°F) and wind, ensuring all-weather durability.
Troubleshooting
If your solar pathway lights are not functioning as expected, please refer to the following common issues and solutions:
| Problem | Possible Cause | Solution |
|---|---|---|
| Light does not turn on at night. |
|
|
| Light duration is shorter than expected. |
|
|
| Light is dim. |
|
|
Warranty and Support
BITPOTT is committed to providing high-quality products and customer satisfaction.
- 2-Year Warranty: Your BITPOTT Solar Pathway Lights are covered by a 2-year warranty from the date of purchase, protecting against manufacturing defects.
- 30-Day Money-Back Guarantee: If you are not satisfied with your purchase, you may be eligible for a refund within 30 days.
- Lifetime Technical Support: BITPOTT offers lifetime technical support for its products.
- 24/7 Live Chat: For immediate assistance, please utilize our 24/7 live chat support.
For warranty claims, technical assistance, or any other inquiries, please contact BITPOTT customer service through the retailer's platform or visit the official BITPOTT store online.

Image: Icons representing product certifications (CE, FCC, RoHS) and customer support features like 2-year warranty, 30-day money-back guarantee, lifetime tech support, and 24/7 live chat.