
1. Introduction
This manual provides essential information for the proper setup, operation, and maintenance of your MicrocKing Wireless Microphone System (Model MK207-2). Please read these instructions carefully before use to ensure optimal performance and longevity of your device.
2. Package Contents
Verify that all items listed below are included in your package:
- 2 x MicrocKing Wireless Microphones
- 1 x Wireless Receiver (with 1/4 inch jack)
- 1 x USB-A to USB-C Charging Cable
- 1 x 3.5mm Adapter (for receiver)
- 2 x Anti-slip Rings (color-coded)
- 2 x Foam Windscreen Covers
- 1 x User Manual (this document)
- 3 x 18650 Rechargeable Batteries (2 for microphones, 1 for receiver)

The package includes two wireless microphones, a receiver, a charging cable, a 3.5mm adapter, anti-slip rings, foam windscreens, and this user manual. Three rechargeable 18650 batteries are also supplied for immediate use.
3. Setup
3.1 Battery Installation & Charging
- Microphones: Unscrew the bottom part of each microphone. Insert one 18650 rechargeable battery into each microphone, ensuring correct polarity. Screw the bottom part back on.
- Receiver: Open the battery compartment of the receiver. Insert the remaining 18650 rechargeable battery, ensuring correct polarity. Close the compartment.
- Charging: Connect the provided USB-A to USB-C charging cable to a compatible USB power source (not included). Plug the USB-C end into the charging port located at the bottom of each microphone or on the side of the receiver. A full charge takes approximately 3 hours and provides up to 8 hours of working time.

3.2 Connecting to an Audio Device
- Power On Receiver: Press and hold the power button on the receiver until the indicator light illuminates.
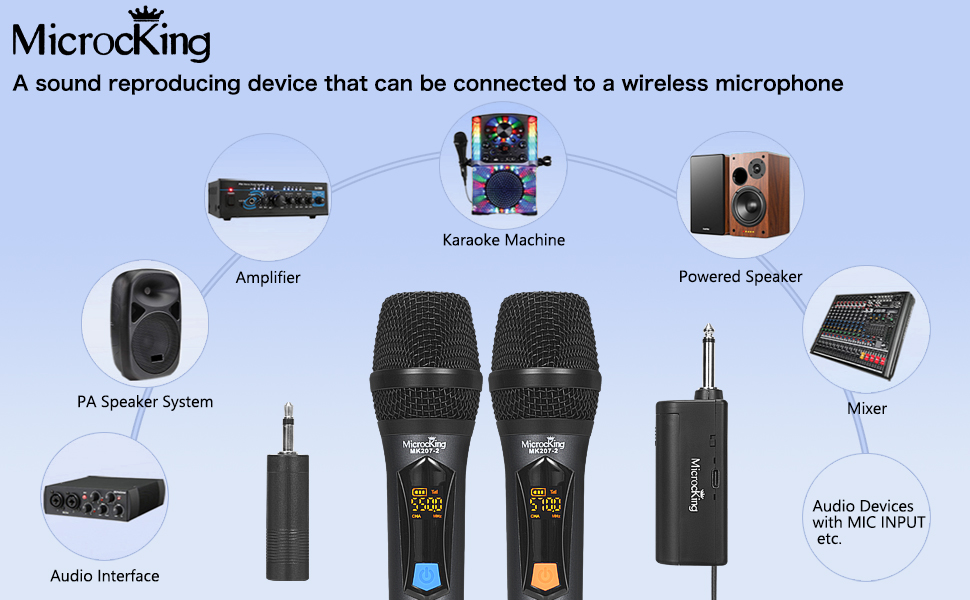
- Plug into Audio Device: Insert the 1/4 inch jack of the receiver directly into the microphone input port of your karaoke machine, mixer, PA system, or amplifier. If your device requires a 3.5mm input, attach the provided 3.5mm adapter to the receiver's 1/4 inch jack before plugging it in.
- Compatibility Note: This wireless microphone system is designed for audio devices with 6.35mm (1/4 inch) or 3.5mm microphone input jacks. It is not compatible with cell phones, computers, or tablets.


4. Operating Instructions
4.1 Powering On Microphones & Auto-Pairing
- Power On: Press and hold the power button on each microphone. The microphone's display will illuminate and flash as it searches for the receiver.
- Auto-Pairing: The microphones will automatically pair with the receiver. Once paired, the display on the microphone will stop flashing and show the channel and frequency. The receiver's indicator lights will also confirm connection.
- Simultaneous Use: Both microphones can be used simultaneously with the single receiver. Note that the volume output for both microphones will be controlled by the connected audio device.
4.2 Volume Control & Frequency Adjustment
- Microphone Volume: Each microphone features a volume control switch (Level 1-5) to adjust its individual output level.
- Frequency Adjustment: To prevent interference, each microphone offers 30 adjustable frequencies. Click the dedicated button on the microphone to change the frequency band.


4.3 Wireless Range
The MicrocKing Wireless Microphone System offers an upgraded wireless distance of up to 160 feet (50 meters), providing stable signal reception for various events.

5. Features
- UHF Wireless Technology: Ensures stable signal transmission and minimizes interference.
- Dynamic Cardioid Microphones: Provides clear, smooth, and high-fidelity audio, ideal for vocals.
- Durable Metal Housing: Offers outstanding impact resistance and a stylish, ergonomic design for comfortable grip.
- Intelligent Automatic Noise Reduction: Enhances sound clarity by minimizing unwanted background noise.
- Long Battery Life: Up to 8 hours of continuous use on a single charge.
6. Specifications
| Feature | Description |
|---|---|
| Model Number | MK207-2 |
| Dimensions (L x W x H) | 10.5 x 2 x 2 inches |
| Item Weight | 1.98 pounds |
| Material | Metal, Plastic |
| Color | Black |
| Connectivity Technology | UHF |
| Wireless Range | Up to 160 feet (50 meters) |
| Connector Type | 6.35 mm (1/4 inch) Jack, 3.5 mm Jack (with adapter) |
| Power Source | Battery Powered (18650 rechargeable batteries) |
| Battery Life | Approx. 8 hours working time, 3 hours charging time |
| Signal-to-Noise Ratio | 70 dB |
| Polar Pattern | Unidirectional |
| Microphone Form Factor | Handheld |
| Compatible Devices | Audio Mixer, Karaoke Machine, Speaker, PA System |
| Special Features | Volume Control, Wireless, Auto-Connect, Adjustable Frequencies |
7. Troubleshooting
- No Sound Output:
- Ensure both the microphone(s) and receiver have sufficient power and are fully charged.
- Verify that the receiver is correctly plugged into the microphone input of your audio device and that the device's volume is turned up.
- Check that the microphones are powered on and successfully paired with the receiver (display should be stable, not flashing).
- Interference or Poor Sound Quality:
- Change the frequency band on the microphone(s) by pressing the frequency adjustment button to find a clearer channel.
- Ensure there are no obstructions between the microphones and the receiver that could block the signal.
- Avoid using the system near other strong wireless devices that might cause interference.
- Microphones Cutting Out / Noise when using both:
- This can occur if both microphones are operating on conflicting frequencies or if the audio device's input is overdriven. Try adjusting the frequencies on both microphones.
- Lower the volume on the microphones or the audio device's input to prevent feedback or distortion.
- Microphone Not Turning On:
- Confirm that the 18650 battery is correctly inserted and fully charged.
- Ensure the power button is pressed and held for a few seconds until the display illuminates.
8. Maintenance
- Cleaning: Use a soft, dry cloth to clean the microphones and receiver. Do not use liquid cleaners or abrasive materials.
- Storage: Store the system in a cool, dry place away from direct sunlight and extreme temperatures.
- Battery Care: Fully charge batteries before extended storage. If not used for a long period, charge the batteries every 3 months to maintain their lifespan.
- Protection: Use the provided anti-slip rings to prevent microphones from rolling and the foam windscreens to protect against moisture and reduce plosive sounds.
9. Warranty & Support
MicrocKing is committed to providing quality products and dedicated service. If you encounter any product quality issues or have any other problems, please do not hesitate to contact our customer support team. We are here to assist you and ensure your satisfaction.
For support, please refer to the contact information provided with your purchase or visit the official MicrocKing website.
