1. Introduction
This manual provides essential instructions for the safe and efficient operation, installation, and maintenance of your Beko BDIN38521Q integrated dishwasher. Please read this manual thoroughly before using your appliance to ensure proper function and to prevent potential hazards.
2. Safety Information
Always follow basic safety precautions when using electrical appliances to reduce the risk of fire, electric shock, and injury to persons. Keep this manual for future reference.
- Ensure the appliance is properly grounded.
- Do not operate the dishwasher if it is damaged.
- Keep children away from the dishwasher, especially when it is operating.
- Use only detergents and rinse aid specifically designed for dishwashers.
- Do not open the door during operation, as hot water may spray out.
- Sharp items should be loaded with points down to prevent injury.
3. Setup and Installation
The Beko BDIN38521Q is an integrated dishwasher designed to be built into your kitchen cabinetry. Professional installation is highly recommended to ensure correct plumbing, electrical connections, and proper integration.
3.1 Unpacking and Placement
Carefully remove all packaging materials. Ensure the dishwasher is placed on a level, stable surface. Do not place the appliance near heat sources.
3.2 Electrical and Water Connections
- Electrical Connection: Connect the appliance to a grounded outlet with the correct voltage (230 Volts AC) and current rating. Refer to the appliance's rating label.
- Water Supply: Connect the water inlet hose to a cold water supply with a minimum pressure of 0.03 MPa and a maximum pressure of 1 MPa.
- Drainage: Connect the drain hose to a suitable drain pipe, ensuring there are no kinks or blockages.
3.3 Initial Use
Before the first wash cycle, perform the following steps:
- Add Dishwasher Salt: Unscrew the cap of the salt dispenser (usually located at the bottom of the wash tub) and fill it with dishwasher salt. Refill when the salt indicator light illuminates.
- Add Rinse Aid: Open the rinse aid dispenser cover (located on the inner door next to the detergent dispenser) and fill with rinse aid. Refill when the rinse aid indicator light illuminates.
- Run an Empty Cycle: Select a short program without dishes to flush out any manufacturing residues.

Figure 1: Front view of the Beko BDIN38521Q integrated dishwasher with the door partially open, showing the control panel and interior racks.
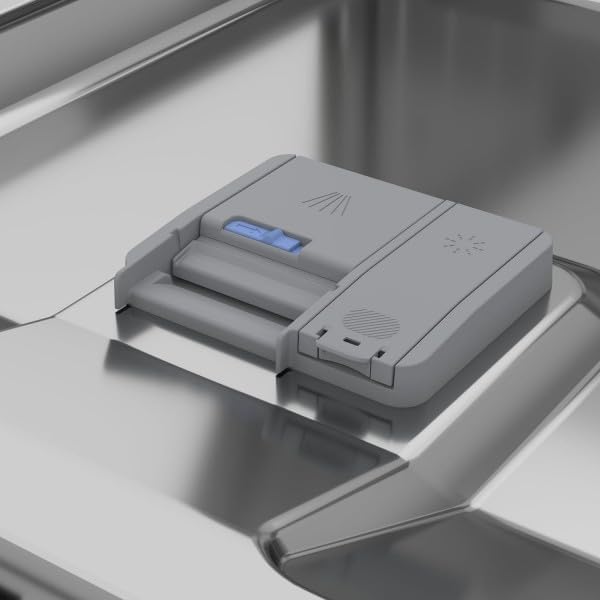
Figure 2: Close-up view of the detergent and rinse aid dispenser located on the inner door of the dishwasher.
4. Operating Instructions
Follow these steps for effective and efficient dishwashing.
4.1 Loading the Dishwasher
Proper loading ensures optimal cleaning results and prevents damage to dishes. Scrape off large food particles before loading.
- Lower Rack: Suitable for large items like plates, bowls, pots, and pans.
- Upper Rack: Ideal for glasses, cups, small plates, and delicate items.
- 3rd Rack: Designed for cutlery, small utensils, and espresso cups.

Figure 3: The lower rack of the dishwasher, demonstrating how to load larger items such as dinner plates and a pot.

Figure 4: The upper rack of the dishwasher, showing typical loading for glasses, cups, and smaller plates.

Figure 5: The dedicated third rack for cutlery and small utensils, ensuring thorough cleaning and efficient space utilization.
4.2 Adding Detergent and Rinse Aid
- Detergent: Add the appropriate amount of dishwasher detergent to the dispenser. The amount depends on the program selected and the soil level of the dishes.
- Rinse Aid: Ensure the rinse aid dispenser is filled. Rinse aid helps with drying and prevents water spots.
4.3 Selecting and Starting a Program
- Close the dishwasher door.
- Press the Power button to turn on the appliance.
- Use the program selection buttons or dial (refer to your control panel layout) to choose the desired wash program.
- Press the Start/Pause button to begin the cycle.
4.4 Interrupting or Canceling a Program
To interrupt a program, carefully open the door slightly to pause the cycle. To cancel, press and hold the Start/Pause button for a few seconds. The appliance will drain the water and reset.
4.5 End of Cycle
At the end of the cycle, an audible signal may sound, and the display will indicate completion. Wait a few minutes before opening the door to allow steam to dissipate and dishes to cool for easier handling.
5. Maintenance and Cleaning
Regular maintenance ensures optimal performance and extends the lifespan of your dishwasher.
5.1 Cleaning Filters
The filter system prevents larger food particles from reaching the pump. Clean the filters regularly (weekly or bi-weekly) to prevent blockages and ensure efficient cleaning.
- Turn off and unplug the dishwasher.
- Remove the coarse filter, fine filter, and microfilter from the bottom of the wash tub.
- Rinse them under running water to remove any debris. Use a soft brush if necessary.
- Reassemble the filters and place them back into the dishwasher, ensuring they are securely locked.
5.2 Cleaning Spray Arms
Periodically check the spray arm nozzles for blockages. If any holes are clogged, clear them with a thin object like a toothpick.
5.3 Cleaning the Interior and Exterior
- Interior: Use a damp cloth and a mild detergent to wipe down the interior. For stubborn stains, a dishwasher cleaner can be used periodically.
- Exterior: Wipe the control panel and exterior surfaces with a soft, damp cloth. Do not use abrasive cleaners or solvents.
5.4 Adding Salt and Rinse Aid
Monitor the indicator lights on your control panel for salt and rinse aid levels. Refill as needed to ensure optimal washing and drying performance.
5.5 Winter Storage (if applicable)
If the dishwasher will be out of use for an extended period in an unheated area, drain all water from the appliance to prevent freezing and damage. Consult a qualified technician if unsure.
6. Troubleshooting
Before contacting service, review the following common issues and their solutions.
- Dishwasher does not start:
- Check if the power cord is plugged in.
- Ensure the door is fully closed and latched.
- Check if a fuse has blown or a circuit breaker has tripped.
- Verify that the water supply is turned on.
- Dishes are not clean:
- Check if spray arm nozzles are blocked.
- Ensure filters are clean and correctly installed.
- Verify that dishes are loaded correctly and not blocking spray arms.
- Use sufficient detergent and select an appropriate program.
- Check water hardness settings and salt level.
- Water not draining:
- Check if the drain hose is kinked or blocked.
- Clean the filter system.
- Ensure the drain pump is not obstructed.
- White spots on dishes (limescale):
- Increase rinse aid dosage.
- Check and adjust water softener settings (salt level).
If the problem persists after attempting these solutions, please contact Beko customer service or a qualified technician.
7. Specifications
| Feature | Value |
|---|---|
| Brand | Beko |
| Model Number | BDIN38521Q |
| Alternative Model Number | BDIN38640D |
| Capacity | 16 Place Settings |
| Noise Level | 44 Decibels |
| Form Factor | Integrated |
| Material | Stainless Steel |
| Controls Type | Fully Integrated |
| Display Type | LCD |
| Voltage | 230 Volts (AC) |
| Item Weight | 60 Kilograms |
| Energy Efficiency Rating | C |
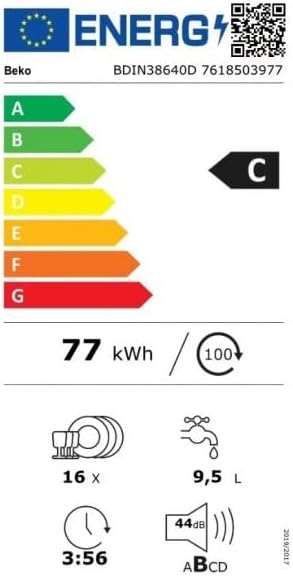
Figure 6: EU Energy Label for the Beko dishwasher, showing energy efficiency class C, 77 kWh/100 cycles, 16 place settings, 9.5 liters water/cycle, 3:56 cycle duration, and 44 dB noise level.
8. Warranty and Support
Your Beko BDIN38521Q dishwasher comes with a manufacturer's warranty. Please refer to the warranty card provided with your appliance for specific terms and conditions, including coverage duration and service procedures.
For technical assistance, spare parts, or to schedule a service appointment, please contact Beko customer support. Have your model number (BDIN38521Q) and serial number ready when contacting support.
Information regarding spare parts availability is not provided in this document. Please contact Beko customer service for details.


