DieseRC DC 12V 24V 30V Universal Wireless 433Mhz RF Relay Receiver Board User Manual
Secure Remote Control Switch for Motors, Lights, Gates, and Doors
1. Product Overview
The DieseRC DC 12V 24V 30V Secure Remote Control Switch is a universal wireless 433Mhz RF 10A relay receiver board designed for various remote control applications. It offers stable and reliable performance with high reception sensitivity, allowing control within a 30-meter distance without obstacles. The system utilizes EV1527 learning code technology for enhanced security. This product is ideal for DIY wireless control of devices such as garage doors, electric doors, shutter doors, expansion doors, electric curtains, fans, lamps, lighting, and ventilation systems.

Figure 1.1: The DieseRC wireless remote control switch kit, including the receiver board and two transmitter key fobs.
2. Safety Information
- Voltage Compatibility: Ensure the power supply voltage (DC 6V-30V) matches the receiver board's requirements to prevent damage.
- Wiring: All wiring should be performed by a qualified individual following local electrical codes. Disconnect power before making any connections.
- Load Capacity: Do not exceed the 10A current rating of the relays. Overloading can cause overheating and damage.
- Environment: Avoid exposing the device to moisture, extreme temperatures, or corrosive environments.
- Interference: While designed for stable performance, strong electromagnetic interference can affect operation.
3. Package Contents
Upon opening your package, please verify that all components are present and undamaged:
- 1 x DieseRC 433Mhz RF Relay Receiver Board
- 2 x Transmitter Key Fobs (2 Buttons)

Figure 3.1: The main components of the remote control system, ready for installation.
4. Product Features
- 433Mhz RF Wireless Control: Stable and reliable performance with high reception sensitivity (> 97dBm).
- Strong Signal Penetration: Radio frequency signal transmission can pass through walls, floors, doors, and boards.
- Long Control Distance: Can be controlled within 30 meters distance with no obstacles.
- Secure Learning Code: Utilizes EV1527 learning code technology for enhanced system security.
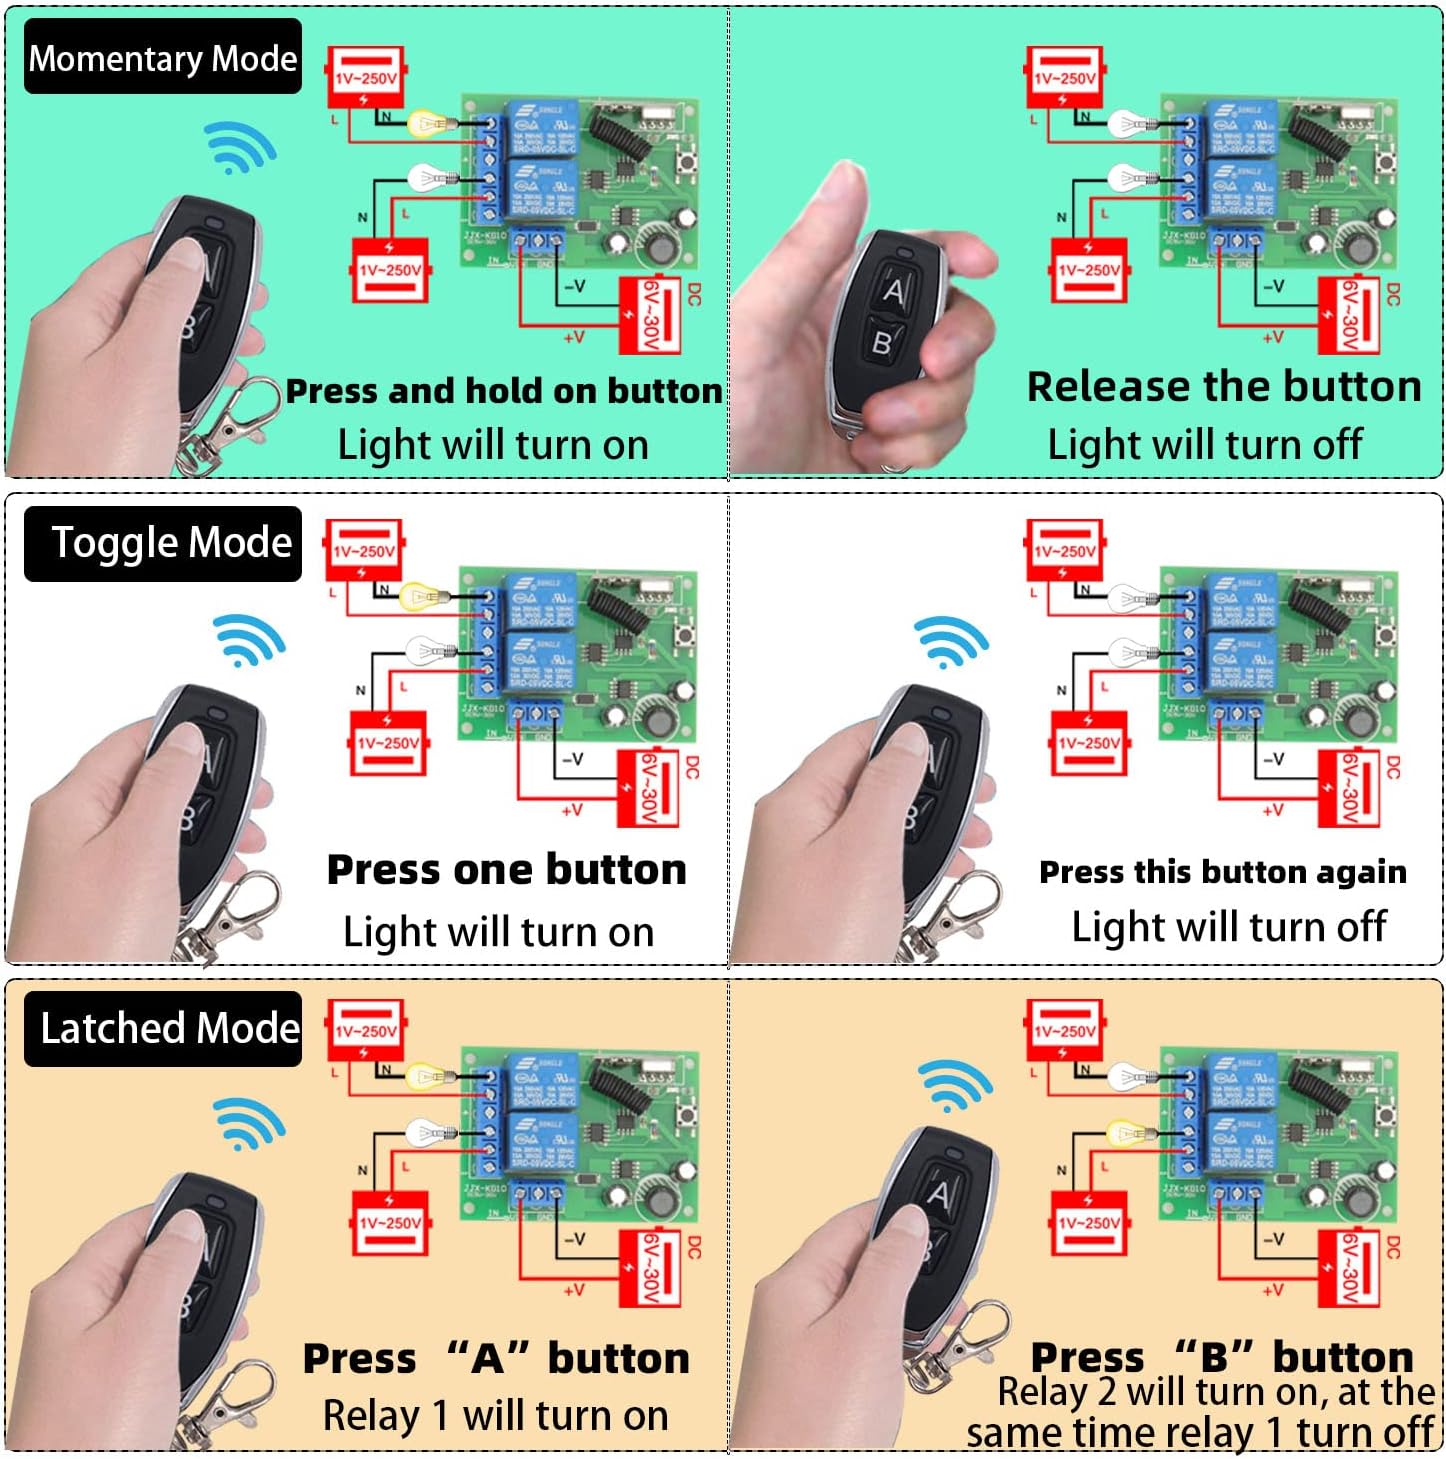
- Multiple Operating Modes: Supports Momentary, Toggle, and Latched modes, easily adjustable to suit various needs.
- Independent Dual Relays: Contains two independent relays, each with Normally Open (NO), Common (COM), and Normally Closed (NC) terminals, allowing independent control.
- High Capacity: Each receiver can store up to 20 transmitters. One transmitter can also control multiple receivers.
- Durable Relays: High-quality relays designed for over 100,000 operations, ensuring long-lasting stability.
- High-Power Terminal: Can withstand a current of 15A, suitable for unstable current conditions.
- Wide Voltage Compatibility: Receiver is suitable for DC 6V~30V voltage, including DC12V and DC24V.
- Broad Application: Suitable for homes, farms, factories, offices, laboratories, supermarkets, and various remote control devices like garage doors, electric curtains, lamps, and ventilation systems.

Figure 4.1: Examples of common applications for the wireless relay module.
5. Specifications
| Attribute | Value |
|---|---|
| Brand | DieseRC |
| Model Number | 2402 |
| Connector Type | Screw |
| Contact Material | Silver |
| Contact Type | NO, NC |
| Current Rating | 10 Amps |
| Mounting Type | Surface Mount |
| Operation Mode | Latched, Momentary, Toggle |
| Wattage | 300 Watts |
| Coil Voltage | 6-30 Volts DC |
| Item Weight | 4.8 ounces |
| Product Dimensions | 2.95 x 2.17 x 1.18 inches |
| Batteries (Remote) | 1 CR2 battery required (included) |

Figure 5.1: Physical dimensions of the receiver board.
6. Setup Instructions
Follow these steps to set up your DieseRC remote control switch. Ensure power is disconnected before making any electrical connections.
6.1 Wiring the Receiver Board
The receiver board supports both DC and AC motor/device connections. Identify the NO (Normally Open), COM (Common), and NC (Normally Closed) terminals for each of the two independent relays.
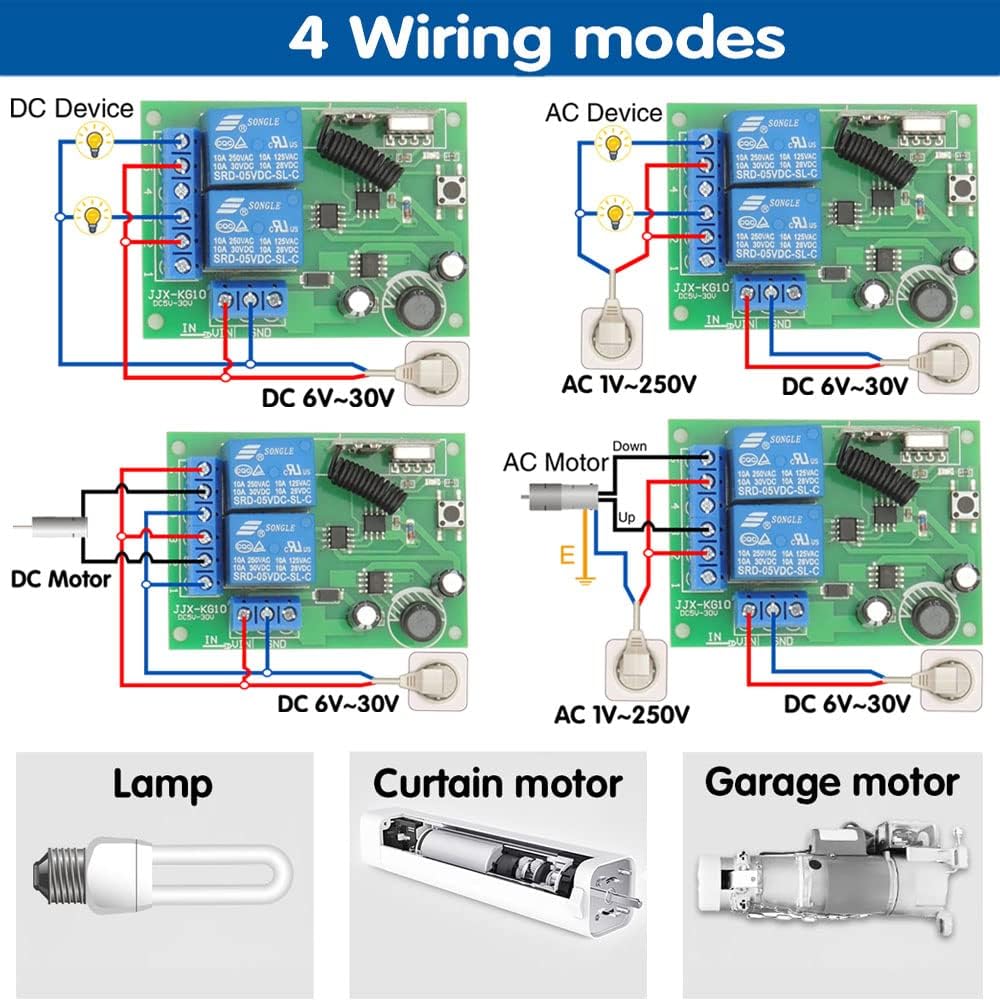
Figure 6.1: Various wiring configurations for different device types.
For detailed wiring examples, refer to Figure 6.1. The input voltage for the receiver board is DC 6V-30V. The relays can switch loads from 1V-250V AC/DC up to 10A.
6.2 Pairing the Remote Control (Programming Modes)
The receiver board has a 'Learning Button' to pair with the remote control and set the operating mode. There are three main operating modes: Momentary, Toggle, and Latched. The product is typically pre-set to Toggle mode.
Video 6.1: Detailed instructions on how to program the remote control switch for different operating modes.
- Momentary Mode (Mode 1): Press the learning button 1 time. Then, press the desired button on the remote (e.g., 'A'). The light on the receiver will flash, indicating successful pairing. In this mode, the relay activates only while the remote button is pressed.
- Toggle Mode (Mode 2): Press the learning button 2 times. Then, press the desired button on the remote. The light on the receiver will flash. In this mode, one press turns the relay ON, and another press turns it OFF.
- Latched Mode (Mode 3): Press the learning button 3 times. Then, press button 'A' on the remote, followed by button 'B'. The light on the receiver will flash. In this mode, pressing 'A' turns Relay 1 ON and turns Relay 2 OFF (if it was ON). Pressing 'B' turns Relay 2 ON and turns Relay 1 OFF (if it was ON).

Figure 6.2: Visual guide for programming the remote control modes.
6.3 Resetting the Receiver
To clear all paired remotes and reset the receiver to its default state, press the learning button 8 times. The indicator light will flash rapidly, confirming that all stored remote codes have been cleared.