
ToughBuilt TB-H2-LL-100-L2
ToughBuilt TB-H2-LL-100-L2 Cross-Line Laser Level User Manual
Model: TB-H2-LL-100-L2
1. Introduction
The ToughBuilt TB-H2-LL-100-L2 Cross-Line Laser Level is a precision instrument designed for accurate leveling and layout tasks. It projects highly visible horizontal and vertical laser lines, making it ideal for a wide range of applications from carpentry installations to construction projects. With a working range of 30.5 meters (100 feet), this tool offers exceptional versatility and reliability for professionals requiring exact measurements.
2. Safety Information
WARNING: Read all safety warnings and instructions before operating this product.
- Laser Radiation: Do not stare directly into the laser beam. This is a Class 2 laser product.
- Always operate the laser level in a safe environment, away from children and unauthorized personnel.
- Do not attempt to disassemble or modify the laser level. This may cause hazardous laser radiation exposure.
- Use only specified batteries (AAA). Ensure correct polarity when inserting batteries.
- Avoid exposing the device to extreme temperatures, moisture, or direct sunlight for prolonged periods.
- Protect the laser level from impacts and drops.
3. Package Contents
Verify that all items listed below are included in your package:
- 1 x ToughBuilt Cross-Line Laser Level (TB-H2-LL-100-L2)
- 1 x Soft Carrying Case
- 1 x Adjustable Ceiling Bracket
- 1 x Laser Receiver
- 1 x 180° Rotating Mount
- 3 x AAA Batteries

Figure 3.1: Contents of the ToughBuilt TB-H2-LL-100-L2 package, including the laser level, soft case, adjustable ceiling bracket, a green laser target plate (acting as receiver), 180° rotating mount, and AAA batteries.
4. Product Overview
Familiarize yourself with the components of your ToughBuilt Cross-Line Laser Level.

Figure 4.1: Top view of the laser level, highlighting the power button and battery/lock indicators.
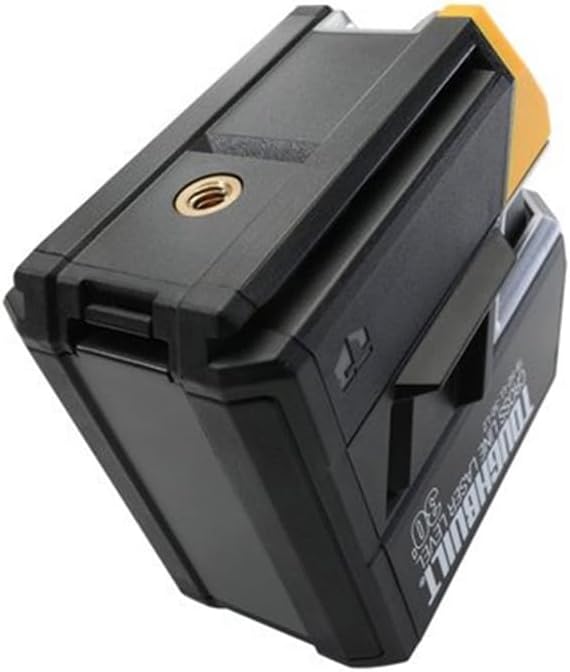
Figure 4.2: Bottom view of the laser level, showing the 1/4" tripod mounting thread.

Figure 4.3: Front view of the laser level, demonstrating the active green laser lines.
5. Setup
5.1 Battery Installation
- Locate the battery compartment on the device.
- Open the compartment cover.
- Insert 3 AAA batteries, ensuring correct polarity (+/-).
- Close the battery compartment cover securely.
5.2 Mounting the Laser Level
The ToughBuilt laser level offers versatile mounting options:
- On a Flat Surface: Place the laser level directly on a stable, flat surface.
- Using the 180° Rotating Mount: Attach the laser level to the rotating mount via the 1/4" tripod thread. This mount allows for precise angular adjustments.

Figure 5.1: Laser level attached to the 180° rotating mount.
- Using the Adjustable Ceiling Bracket: For overhead applications, attach the laser level to the ceiling bracket. This bracket provides a secure hold for various ceiling types.

Figure 5.2: Laser level mounted on the adjustable ceiling bracket.
- Using a Clamp Mount: The multi-position support allows for versatile attachment to various work environments, ensuring stability and adaptability.

Figure 5.3: Laser level secured with a clamp mount for flexible placement.
6. Operating Instructions
6.1 Power On/Off
Press and hold the power button (ⓘ) located on the top of the device to turn the laser level ON or OFF.
6.2 Self-Leveling Mode
When powered on, the device automatically enters self-leveling mode. The laser lines will blink if the device is outside its self-leveling range. Adjust the position of the laser level until the lines become steady, indicating it is level.
6.3 Line Projection Modes
Press the power button briefly to cycle through different laser line projection modes:
- Horizontal Line only
- Vertical Line only
- Cross-Line (Horizontal and Vertical lines simultaneously)
6.4 Pendulum Lock
The pendulum lock feature secures the internal pendulum during transport, preventing damage. Ensure the pendulum is locked when the device is not in use or being moved.
7. Maintenance
- Cleaning: Use a soft, damp cloth to clean the exterior of the laser level. Do not use abrasive cleaners or solvents. Keep the laser apertures clean and free of dust.
- Storage: Store the laser level in its soft carrying case in a cool, dry place when not in use. Remove batteries if storing for extended periods to prevent leakage.
- Calibration: While the device is self-leveling, periodic professional calibration may be required for critical applications to ensure continued accuracy.
8. Troubleshooting
| Problem | Possible Cause | Solution |
|---|---|---|
| Laser lines are blinking. | The device is out of its self-leveling range. | Place the laser level on a more level surface or adjust its position until the lines become steady. |
| Laser does not turn on. | Low or dead batteries; incorrect battery installation. | Replace batteries with new AAA batteries. Check battery polarity. |
| Laser lines are dim or unclear. | Dirty laser aperture; excessive ambient light. | Clean the laser aperture with a soft cloth. Reduce ambient light if possible, or use the laser receiver for better visibility over distance. |
| Device seems inaccurate. | Device was dropped or subjected to impact; needs calibration. | Perform a simple accuracy check (refer to advanced user guides or contact support). If issues persist, professional calibration may be required. |
9. Specifications
| Feature | Detail |
|---|---|
| Model | TB-H2-LL-100-L2 |
| Laser Type | Green Cross-Line Laser |
| Working Range | 30.5 meters (100 feet) |
| Accuracy | High precision |
| Self-Leveling | Automatic, with out-of-level indicator |
| Power Source | 3 x AAA Batteries |
| Material | PC/ABS/TPE |
| Dimensions (Closed) | 11 x 5.8 x 10.5 cm (4.3 x 2.3 x 4.1 inches) |
| Weight (Approx.) | 1.18 kg (2.6 lbs) |
| Operating Mode | Automatic |
10. Warranty and Support
This ToughBuilt product comes with a 3-Year Limited Warranty. For warranty claims, technical support, or service inquiries, please contact ToughBuilt customer service through their official website or the retailer where the product was purchased.
Please retain your proof of purchase for warranty validation.
Related documentsTB-H2-LL-100-L2


Ask a question about this manual
Ask about setup, troubleshooting, compatibility, parts, safety, or missing instructions. Manuals+ will review the question and use this page’s manual context to help answer it.