
inruwo MHW6630HC2 MHW6630HWO
Washing Machine Water Inlet Valve User Manual
Model: MHW6630HC2 MHW6630HWO
Brand: inruwo
Introduction
This manual provides essential information for the installation, operation, maintenance, and troubleshooting of your new inruwo Washing Machine Water Inlet Valve. Please read this manual thoroughly before installation and use to ensure proper function and safety.
This water inlet valve is designed to address common washing machine issues such as leaking, no hot water, failure to fill, and improper draining. It is compatible with various Whirlpool, Maytag, and Amana washer models.
Safety Information
WARNING:
- Always disconnect power to the washing machine before attempting any installation, repair, or maintenance.
- Turn off the water supply to the washing machine before beginning any work.
- Wear appropriate personal protective equipment (PPE), such as gloves and eye protection, during installation.
- If you are unsure about any step, consult a qualified appliance technician.
- Ensure all connections are secure and leak-free before restoring water and power.
Product Overview
The inruwo Washing Machine Water Inlet Valve (Part Number: W11316256) is a critical component responsible for controlling the flow of hot and cold water into your washing machine. It features two solenoids that open and close to allow water to enter the tub based on the selected wash cycle.
Components
- Water Inlet Valve Assembly
- Electrical Connectors
- Threaded Inlet Port (for water supply hose)
- Outlet Ports (for water distribution within the washer)
- Integrated Filter Screen
Product Images

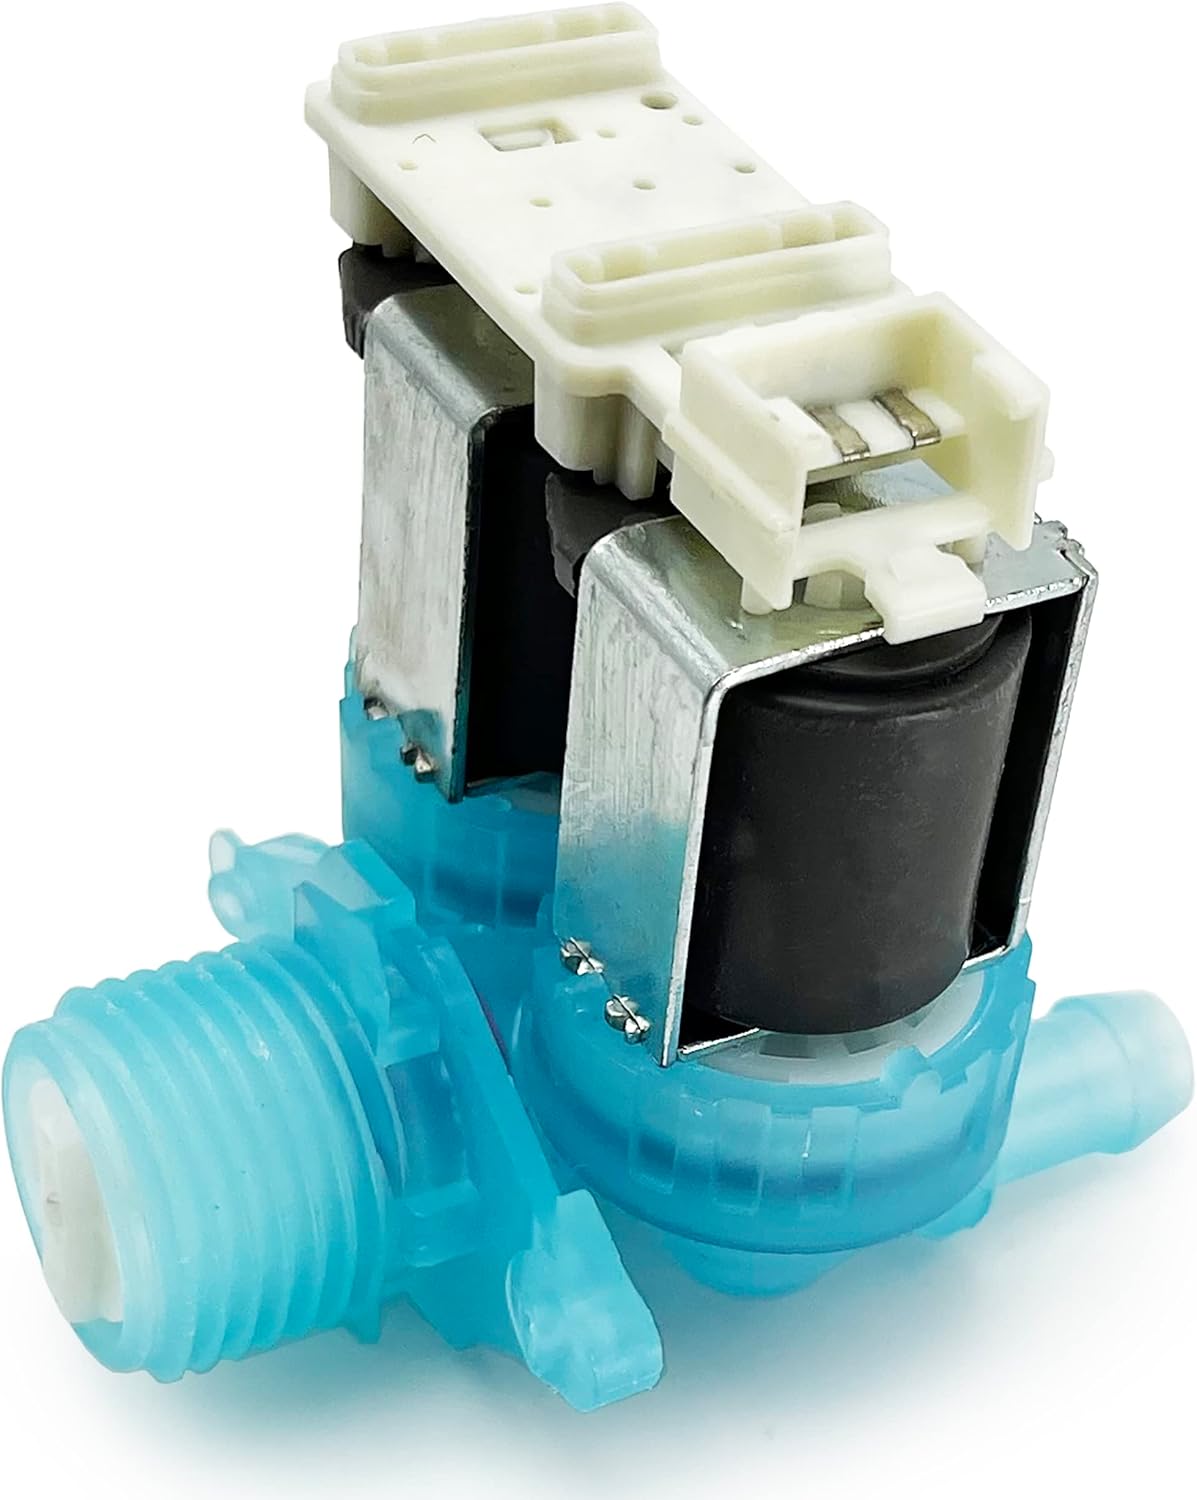
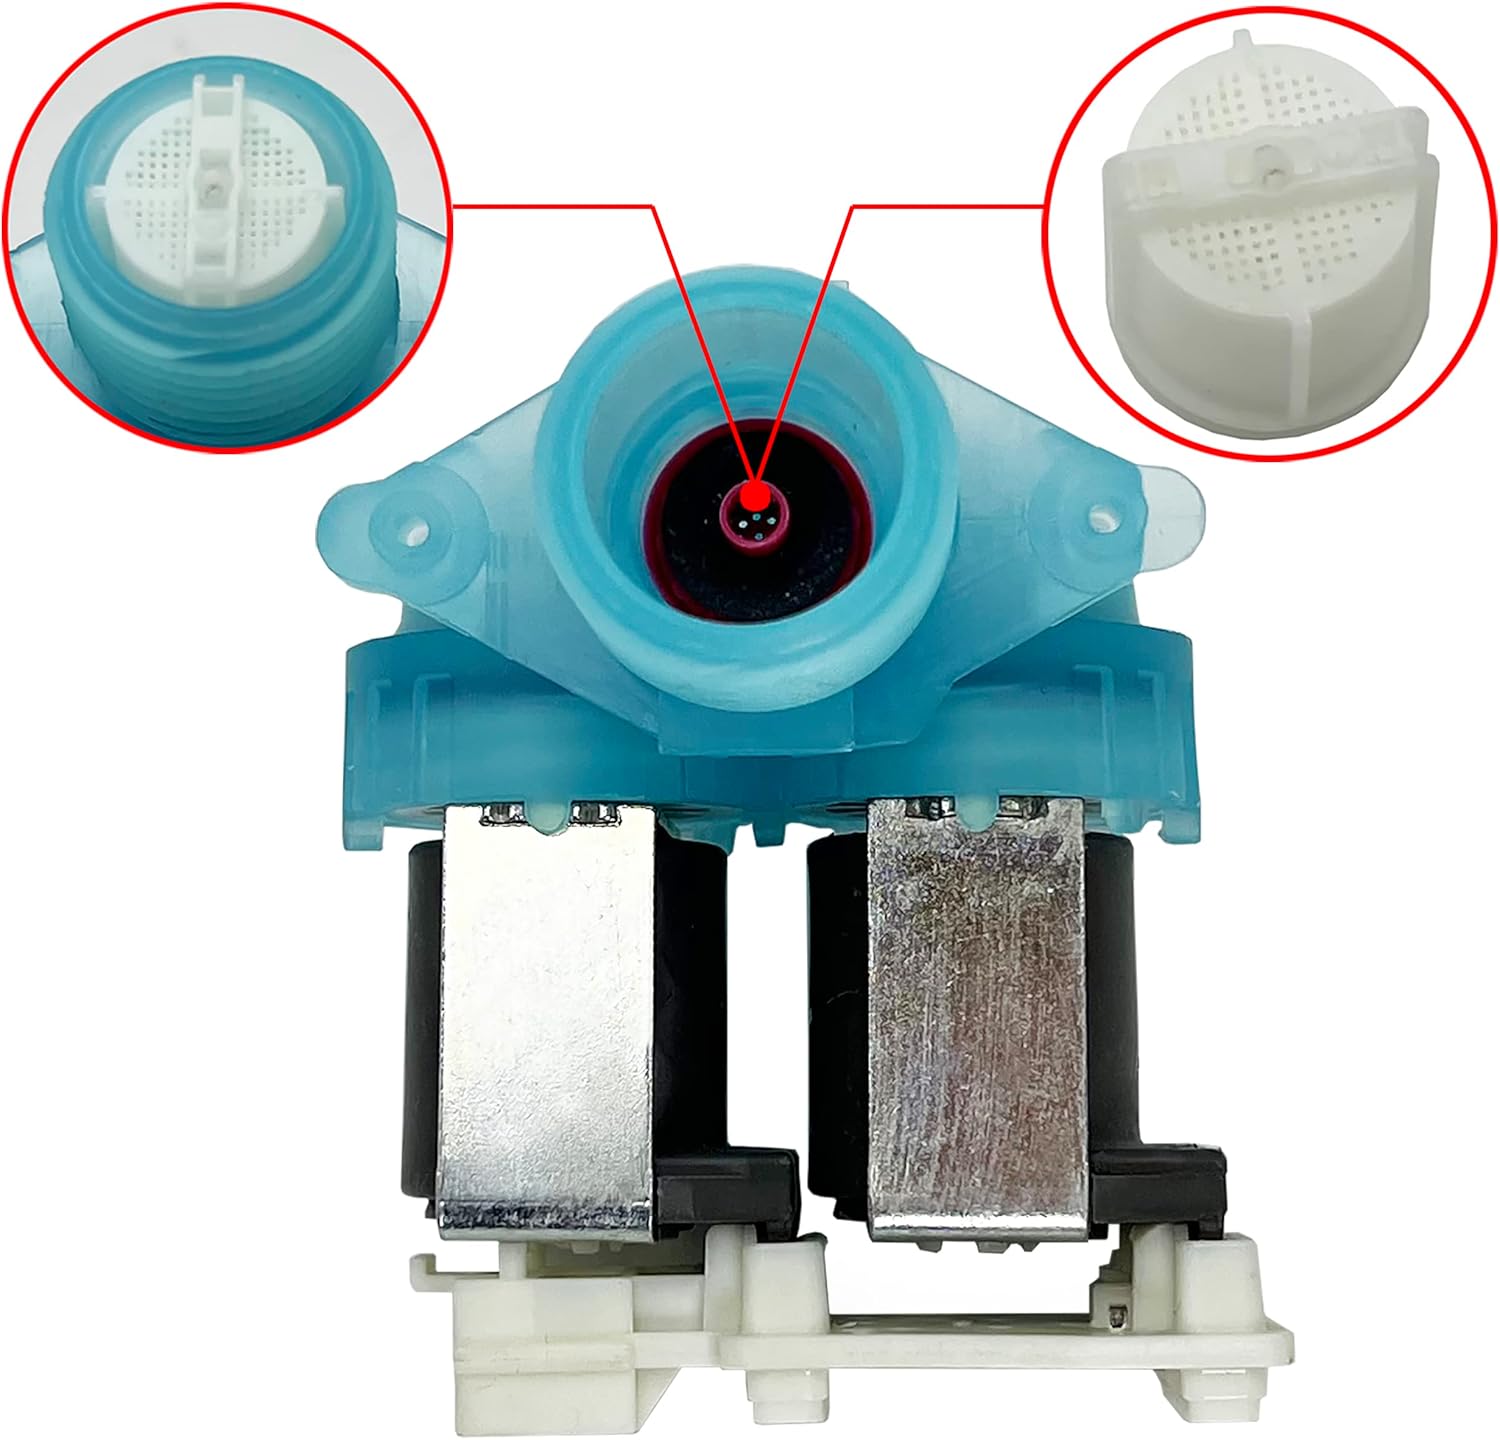


Setup and Installation
This section provides general guidelines for replacing a washing machine water inlet valve. Specific steps may vary depending on your washing machine model. Always refer to your washing machine's service manual for detailed instructions.
- Preparation:
- Disconnect the washing machine from the electrical outlet.
- Turn off the hot and cold water supply valves to the washing machine.
- Disconnect the hot and cold water supply hoses from the back of the washing machine. Have a bucket or towels ready to catch any residual water.
- Move the washing machine away from the wall to access the rear panel.
- Accessing the Valve:
- Remove the screws securing the rear access panel of the washing machine. Carefully remove the panel.
- Locate the water inlet valve. It is typically mounted near where the water supply hoses connect.
- Removing the Old Valve:
- Disconnect the electrical connectors from the solenoids on the old valve. Note their positions if they are not identical.
- Carefully detach the internal hoses or tubes connected to the valve's outlet ports. You may need pliers or a screwdriver for hose clamps.
- Unscrew or unclip the mounting screws/clips that secure the valve to the washing machine chassis.
- Remove the old water inlet valve.
- Installing the New Valve:
- Position the new inruwo water inlet valve in the same location as the old one.
- Secure the valve with the mounting screws/clips.
- Reconnect the internal hoses or tubes to the valve's outlet ports, ensuring they are securely clamped.
- Reconnect the electrical connectors to the solenoids. Ensure they are firmly seated.
- Final Steps:
- Replace the rear access panel and secure it with screws.
- Reconnect the hot and cold water supply hoses to the threaded inlet ports on the new valve. Hand-tighten, then use a wrench for a quarter turn, being careful not to overtighten.
- Slowly turn on the hot and cold water supply valves and check for leaks at all connections.
- Plug the washing machine back into the electrical outlet.
- Run a short cycle (e.g., rinse and spin) to verify proper operation and check for any leaks under pressure.
Operating Instructions
The water inlet valve operates automatically based on the wash cycle selected on your washing machine. There are no direct user controls for the valve itself. Ensure your washing machine is properly connected to both water supply and power. The valve will open and close as needed to fill the tub with the correct temperature and amount of water for each stage of the wash cycle.
Maintenance
The water inlet valve itself requires minimal maintenance. However, periodic checks can help ensure its longevity and proper function:
- Filter Screen Inspection: The valve has an integrated filter screen at the inlet port (refer to Figure 3). If you experience slow filling or no water, this screen may be clogged with sediment.
- Disconnect power and water supply to the washer.
- Disconnect the water supply hoses from the valve.
- Carefully remove the filter screen using needle-nose pliers or tweezers.
- Rinse the screen under running water to remove any debris. If heavily clogged, use a soft brush.
- Reinsert the clean filter screen and reconnect hoses and power.
- Leak Checks: Periodically inspect the water supply hose connections at the back of the washing machine and around the valve for any signs of leaks. Address any leaks immediately to prevent water damage.
- Hose Condition: Check the condition of your washing machine's water supply hoses. Replace any hoses that show signs of wear, cracking, or bulging.
Troubleshooting
This section outlines common issues and potential solutions related to the water inlet valve. Always ensure power and water supply are connected before troubleshooting.
| Problem | Possible Cause | Solution |
|---|---|---|
| Washing machine not filling with water |
|
|
| Washing machine fills slowly |
|
|
| Water leaking from valve area |
|
|
| No hot water or no cold water |
|
|
If these troubleshooting steps do not resolve the issue, it is recommended to consult a professional appliance repair technician.
Specifications
| Voltage | 120V 60Hz |
| Material | Plastic |
| Color | Blue |
| Inlet Connection Size | 4.7 Inches |
| Inlet Connection Type | Threaded |
| Outlet Connection Type | G Connector |
| Number of Ports | 2 |
| Valve Type | Globe Valve |
| Item Weight | 5.3 ounces (0.8 lbs / 363 g) |
| Package Dimensions | 3.82 x 3.74 x 2.52 inches |
| Compatible Models (Maytag) | MHW5630HW1, MHW5630HC0, MHW5630HC1, MHW5630HC2, MHW5630HWO, MHW5630HW2, MHW6630HCO, MHW6630HC2, MHW6630HWO, MHW6630HW1, MHW6630HW2, MHW8630HCO, MHW8630HC1, MHW8630HC3, MHW8630HWO, MHW5630MBKO, MHW6630HC1, MHW6630HC3, MHW6630HW3, MHW8630HW1, MHW6630MBKO, MHW8630HC2, MHW8630HW2, MHW8630HW3 |
| Compatible Models (Whirlpool) | WFW5620HWO, 8TWFC6810LWO, WFW6620HC3, WFW560CHWO, WFW560CHW1, WFW6620HCO, WFW6620HC2, WFW6620HWO, WFW6620HW1, WFW6620HW2, WFW8620HC1, WFW8620HW1, WFW8620HW2, WFW862CHC1, WFW862CHC2, WFW9620HC1, WFC6810LWO, WFC9820HCO, WFC9820HWO, WFW5605MCO, WFW5605MWO, WFW560CHW3, WFW560CHW4, WFW5620HW1, WFW5620HW2, WFW6605MCO, WFW6605MWO, WFW6620HC1, WFW6620HW3, WFW8620HCO, WFW8620HC2, WFW8620HC4, WFW8620HWO, WFW8620HW3, WEW8620HW4, WFW862CHCO, WFW862CHC3, WFW9620HBK1, WEW9620HBK2, WEW9620HBK3, WFW9620HCO, WEW9620HC3, WEW9620HWO, WFW9620HW1, WFW9620HW2, WFW9620HW3, WFW9620HW1, WFW9620HW2, WFW9620HW3 |
| Compatible Models (Amana) | NFW5800HWO, NFW5800HW4, NFW5800HW1, NFW5800HW2 |
Warranty and Support
For warranty information and customer support, please refer to the documentation provided with your original purchase or contact the manufacturer directly. Keep your purchase receipt as proof of purchase.
For technical assistance or further inquiries, please visit the inruwo brand's official support channels or contact your appliance repair professional.
Related documentsMHW6630HC2 MHW6630HWO


Ask a question about this manual
Ask about setup, troubleshooting, compatibility, parts, safety, or missing instructions. Manuals+ will review the question and use this page’s manual context to help answer it.