
1. Important Safety Instructions
When using electrical appliances, basic safety precautions should always be followed to reduce the risk of fire, electric shock, and injury to persons, including the following:
- Read all instructions before operating the appliance.
- Do not touch hot surfaces. Use handles or knobs.
- To protect against electric shock, do not immerse cord, plugs, or the appliance in water or other liquid.
- Close supervision is necessary when any appliance is used by or near children.
- Unplug from outlet when not in use and before cleaning. Allow to cool before putting on or taking off parts.
- Do not operate any appliance with a damaged cord or plug or after the appliance malfunctions or has been damaged in any manner. Contact customer service for examination, repair, or adjustment.
- The use of accessory attachments not recommended by the appliance manufacturer may cause injuries.
- Do not use outdoors.
- Do not let cord hang over edge of table or counter, or touch hot surfaces.
- Do not place on or near a hot gas or electric burner, or in a heated oven.
- Extreme caution must be used when moving an appliance containing hot oil or other hot liquids.
- Always attach plug to appliance first, then plug cord into the wall outlet. To disconnect, turn any control to "off", then remove plug from wall outlet.
- Do not use appliance for other than intended use.
- Ensure adequate ventilation around the appliance during operation.
2. Product Overview
The STARLYF Air Oven is a versatile kitchen appliance designed for oil-free frying, roasting, and baking. It utilizes advanced Air Cycling Technology to circulate hot air rapidly, ensuring even cooking and crispy results with significantly less oil.
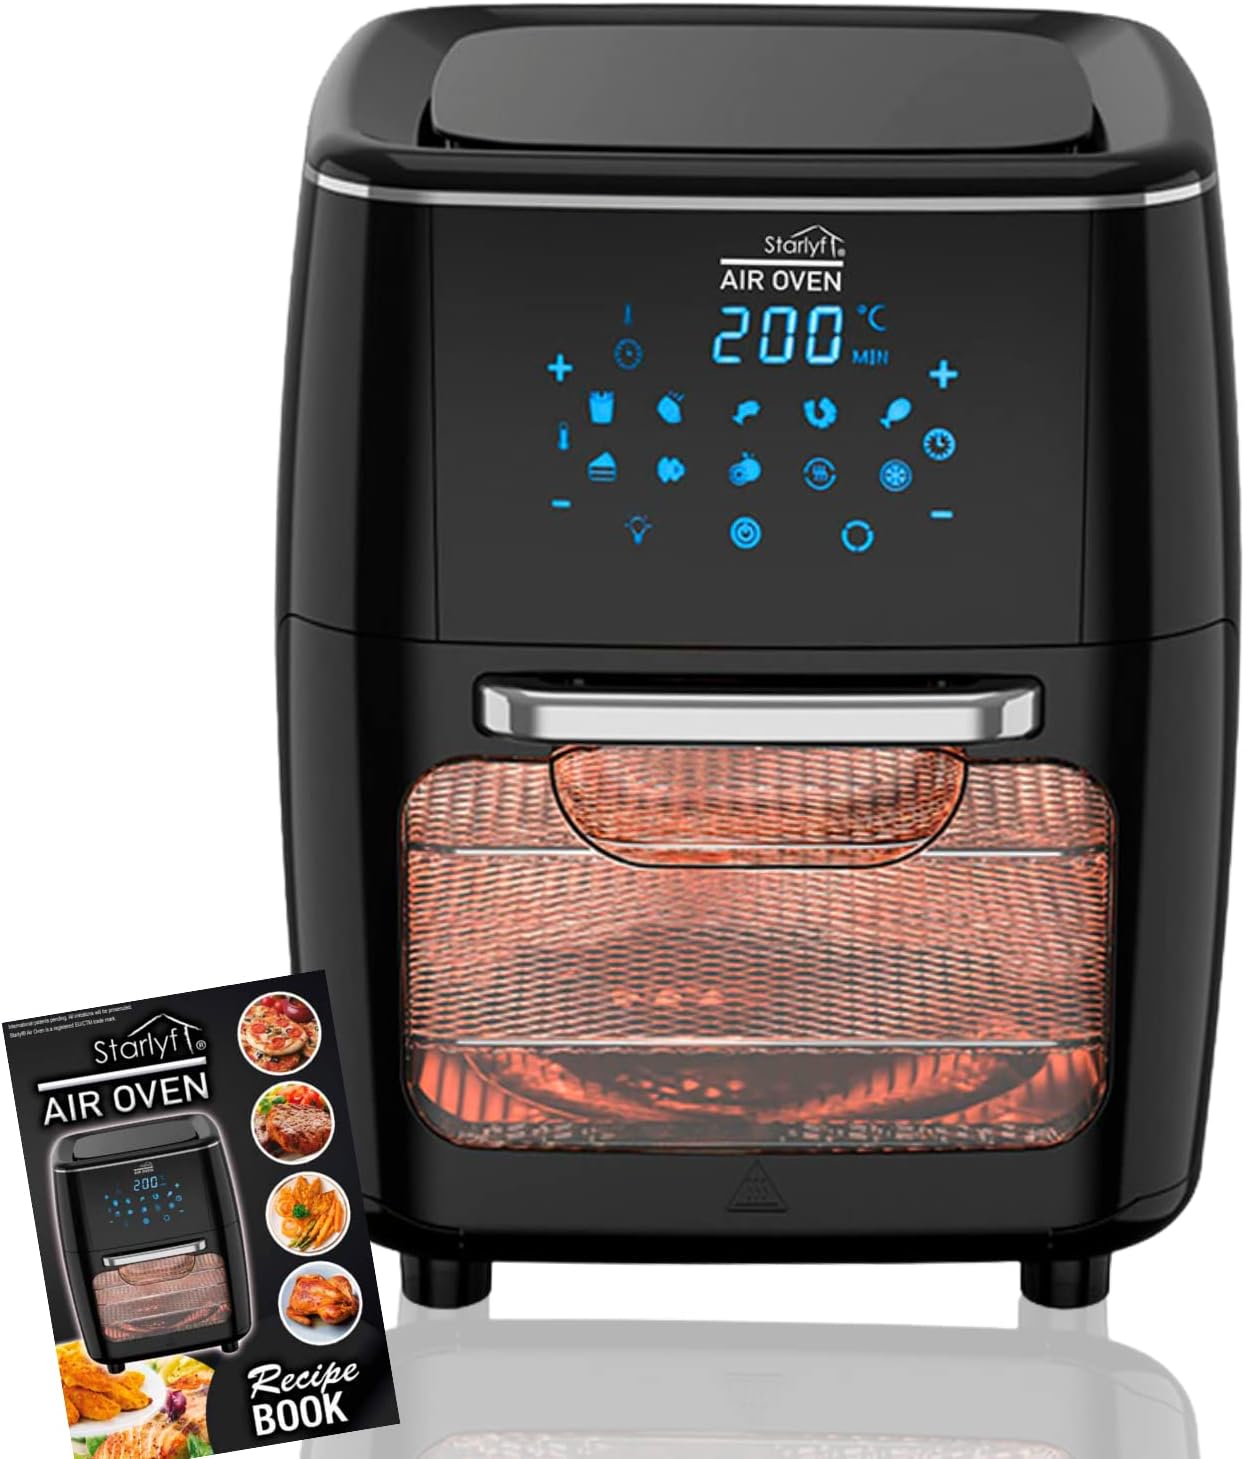
Figure 2.1: Front view of the STARLYF Air Oven, showcasing its sleek black design, digital LED touch panel, and transparent cooking window. A recipe book is also visible, indicating included accessories.
Key Features:
- Powerful Performance: 1700W heating element for rapid heating and efficient cooking.
- Air Cycling Technology: Ensures even heat distribution for consistent results.
- 10 Pre-set Programs: Convenient one-touch cooking for various dishes.
- LED Touch Panel: Intuitive digital display for easy control of temperature and time.
- Oil-Free Frying: Achieves crispy textures with up to 85% less oil compared to traditional deep frying.
- Interior Light: Allows monitoring of cooking progress without opening the door.
- Auto Shut-Off: Enhances safety by automatically turning off the appliance after cooking is complete or if the door is opened.

Figure 2.2: Diagram illustrating key features of the STARLYF Air Oven, including LED touch screen, auto shut-off, 85% less oil cooking, adjustable time/temperature, 1700W power, interior light, and preset cooking programs.

Figure 2.3: Illustration showing the STARLYF Air Oven's versatility, capable of performing functions typically requiring multiple appliances such as a frying pan, baking oven, electric grill, rotisserie, dehydrator, microwave oven, and toaster oven.
Components:
- Main Unit with LED Touch Panel
- Transparent Viewing Window
- Door Handle
- Removable Cooking Racks/Trays (specific accessories may vary)
- Drip Tray
- Power Cord
3. Setup and First Use
3.1 Unpacking
- Carefully remove all packaging materials from the appliance and its accessories.
- Check for any damage during transit. Do not use if damaged.
- Retain packaging for future storage or transport if necessary.
3.2 Placement
- Place the Air Oven on a stable, flat, heat-resistant surface.
- Ensure there is at least 15 cm (6 inches) of clear space on all sides and above the appliance for proper air circulation.
- Do not place the appliance near flammable materials or heat sources.
- Ensure the power cord is not pinched or touching hot surfaces.
3.3 Initial Cleaning
- Wipe the exterior of the appliance with a damp cloth.
- Wash all removable accessories (racks, drip tray) with warm soapy water. Rinse thoroughly and dry completely.
- Insert the drip tray at the bottom of the oven and slide in the cooking racks as desired.
3.4 First Use (Burn-in)
- Plug the appliance into a grounded electrical outlet.
- Run the Air Oven empty for approximately 10-15 minutes at 200°C (390°F) to burn off any manufacturing residues. A slight odor or smoke may be present; this is normal.
- Ensure the area is well-ventilated during this process.
- Allow the appliance to cool completely before proceeding with cooking.
4. Operating Instructions
4.1 Powering On/Off
- Plug the power cord into a suitable electrical outlet. The LED display will illuminate.
- Press the Power button (⏻) on the touch panel to turn the appliance on.
- To turn off, press and hold the Power button until the display turns off, or simply unplug the unit.
4.2 Using the LED Touch Panel
The touch panel allows you to control all functions of the Air Oven. It features dedicated buttons for temperature, time, pre-set programs, and an interior light.
- Temperature Control: Use the + and - buttons to adjust the cooking temperature (range: 65°C - 200°C).
- Time Control: Use the + and - buttons to adjust the cooking time.
- Pre-set Programs: Select from 10 pre-programmed settings for common dishes. Each icon represents a specific food type (e.g., fries, chicken, fish). Press the desired icon to activate the program.
- Interior Light: Press the light bulb icon to turn the interior light on or off, allowing you to monitor food without opening the door.
4.3 Cooking Process
- Prepare your food and place it on the cooking racks or in suitable oven-safe accessories. Do not overload the racks.
- Slide the racks into the Air Oven. Ensure the drip tray is in place at the bottom.
- Close the oven door securely.
- Turn on the appliance using the Power button.
- Manual Mode: Set your desired temperature and time using the respective + and - buttons. The oven will start preheating.
- Pre-set Program Mode: Select one of the 10 pre-set programs. The oven will automatically set the optimal temperature and time for that program.
- The cooking process will begin. You can use the interior light to check on your food.
- Some recipes may require shaking or flipping food halfway through cooking. Carefully open the door, remove the rack, shake/flip, and reinsert. The oven will pause when the door is open and resume when closed.
- Once the cooking time is complete, the oven will beep and automatically shut off.
- Carefully remove the cooked food using oven mitts. Be aware of hot steam.

Figure 4.1: Images demonstrating the use of the STARLYF Air Oven, including loading food and interacting with the touch panel. The accompanying recipe book is also shown, providing cooking ideas.
4.4 Cooking Tips
- For best results, preheat the Air Oven for 3-5 minutes before adding food.
- Do not overcrowd the cooking racks. Cook in batches if necessary to ensure even cooking.
- Lightly spray or toss food with a small amount of oil for extra crispiness, especially for fresh vegetables or homemade fries.
- Adjust cooking times and temperatures based on food quantity, thickness, and desired crispiness.
5. Maintenance and Cleaning
Regular cleaning will extend the life of your STARLYF Air Oven and ensure optimal performance.
5.1 Before Cleaning
- Always unplug the appliance from the power outlet.
- Allow the Air Oven to cool down completely before cleaning any parts.
5.2 Cleaning the Main Unit
- Wipe the exterior with a damp cloth and mild detergent. Do not use abrasive cleaners or scouring pads.
- Clean the interior with a soft, damp cloth. For stubborn food residue, use a non-abrasive sponge with warm soapy water.
- Never immerse the main unit in water or any other liquid.
- Ensure the interior is completely dry before plugging in or storing.
5.3 Cleaning Accessories
- Remove all cooking racks and the drip tray.
- Wash them in warm soapy water using a non-abrasive sponge. For baked-on food, soak them in warm water for a few minutes before cleaning.
- Rinse thoroughly and dry completely before reinserting into the oven or storing.
- Some accessories may be dishwasher safe; refer to specific accessory instructions if available.
5.4 Storage
- Ensure the appliance is clean and dry before storing.
- Store the Air Oven in a cool, dry place.
- Do not place heavy objects on top of the appliance during storage.
6. Troubleshooting
If you encounter issues with your STARLYF Air Oven, please consult the following table before contacting customer service.
| Problem | Possible Cause | Solution |
|---|---|---|
| Appliance does not turn on. | Not plugged in. Power outlet malfunction. Appliance damaged. | Ensure the power cord is securely plugged into a working outlet. Test the outlet with another appliance. If damaged, do not use; contact customer service. |
| Food is not cooked evenly. | Overcrowding of racks. Incorrect temperature/time. Food not shaken/flipped. | Reduce food quantity; cook in smaller batches. Adjust temperature and time as per recipe or food type. Shake or flip food halfway through cooking. |
| White smoke coming from the appliance. | Grease/oil residue on heating element. Fatty food being cooked. | Unplug and allow to cool. Clean the interior and heating element. This is normal for very fatty foods; ensure drip tray is clean. |
| Appliance suddenly stops during operation. | Overheating protection activated. Door opened. | Unplug and allow to cool for 30 minutes before restarting. Close the door securely; the appliance will resume operation. |
| Food is not crispy. | Too much moisture in food. Not enough oil (for certain foods). Overcrowding. | Pat food dry before cooking. Lightly toss with a small amount of oil. Cook in smaller batches. |
7. Technical Specifications
| Feature | Detail |
|---|---|
| Model Name | STARLYF Air Oven |
| ASIN | B0BRLB3G3N |
| Power Supply | 2.3E+2 Volts (AC) |
| Rated Power | 1700 Watts (also listed as 1500 Watts in some specifications) |
| Capacity | 10 Litres |
| Temperature Range | 65°C - 200°C |
| Dimensions (L x W x H) | 30 x 31 x 40 cm |
| Weight | 7.22 Kilograms |
| Color | Black |
| Special Features | Temperature Control, LED Touch Panel, Air Cycling Technology, 10 Programs |
8. Warranty and Customer Support
8.1 Warranty Information
The STARLYF Air Oven is manufactured with high-quality materials and undergoes strict quality control. While specific warranty terms may vary by region and retailer, generally, the product is covered against manufacturing defects for a limited period from the date of purchase.
Please retain your proof of purchase (receipt or invoice) as it will be required for any warranty claims. The warranty typically does not cover damage resulting from misuse, neglect, unauthorized repairs, or normal wear and tear.
8.2 Customer Support
For any questions, technical assistance, or warranty inquiries, please contact the retailer where you purchased the product or the STARLYF customer service department. Contact details can usually be found on the product packaging or the brand's official website.
When contacting support, please be prepared to provide the product model (STARLYF Air Oven 10L) and ASIN (B0BRLB3G3N) for faster assistance.


