1. Introduction
This manual provides detailed instructions for the waveshare Flexible RGB Full Color LED Matrix Panel 96x48. This panel features 4608 individual RGB LEDs with a 2.5mm pitch, offering a full-color display with adjustable brightness. Its flexible PCB material allows for gentle bending, making it suitable for various creative display shapes. The panel is compatible with popular development boards such as Raspberry Pi, Raspberry Pi Pico, and ESP32.
The 96x48 pixel resolution and 2.5mm pitch enable the display of text, colorful images, and animations. With dimensions of 240mm × 120mm, it is a moderate size suitable for DIY desktop or wall-mount displays. The panel includes two HUB75 headers for data input and output, supporting chainable configurations to build larger display panels.

Image 1.1: The waveshare 96x48 Flexible RGB LED Matrix Panel displaying various content.
Key Features:
- Display: 96×48 pixels, 2.5mm pitch, 4608 individual RGB LEDs, full-color display.
- Flexibility: Flexible PCB material, allowing for gentle bending for curved surfaces.
- Compatibility: Supports Raspberry Pi, Raspberry Pi Pico, ESP32, and Arduino.
- Connectivity: Two HUB75 headers for data input and output, supporting chainable designs.
- Dimensions: 240mm × 120mm.

Image 1.2: Examples of the flexible LED matrix panel used in cylindrical, circular, and curved display applications.
2. Setup
Proper setup is crucial for the optimal performance of your LED matrix panel. Follow these steps for initial connection and configuration.
2.1 Power Supply Connection
The LED matrix panel requires a 5V power supply. For a single panel, a 5V/4A power supply is recommended. Connect the power supply to the VH4 header input on the panel. Ensure the correct polarity to prevent damage.
2.2 Data Connection (HUB75 Header)
The panel features two HUB75 headers. One serves as the data input from your controller (e.g., Raspberry Pi, ESP32), and the other is for data output, enabling the chaining of multiple panels.
- Connect the provided 16P wire from your controller's HUB75 interface to the input HUB75 header on the LED matrix panel.
- If chaining multiple panels, connect the output HUB75 header of the first panel to the input HUB75 header of the next panel. Each chained panel requires its own standalone 5V/4A or above power supply.

Image 2.1: Header Definition for HUB75 data input and output. This diagram illustrates the pin assignments for connecting the panel to a controller.
2.3 Controller Compatibility
The panel is designed to be compatible with various microcontrollers and single-board computers. Waveshare provides open-source development resources and examples for:
- Raspberry Pi
- Raspberry Pi Pico
- ESP32
- Arduino
Refer to the online tutorial for specific wiring diagrams and code examples for your chosen platform.
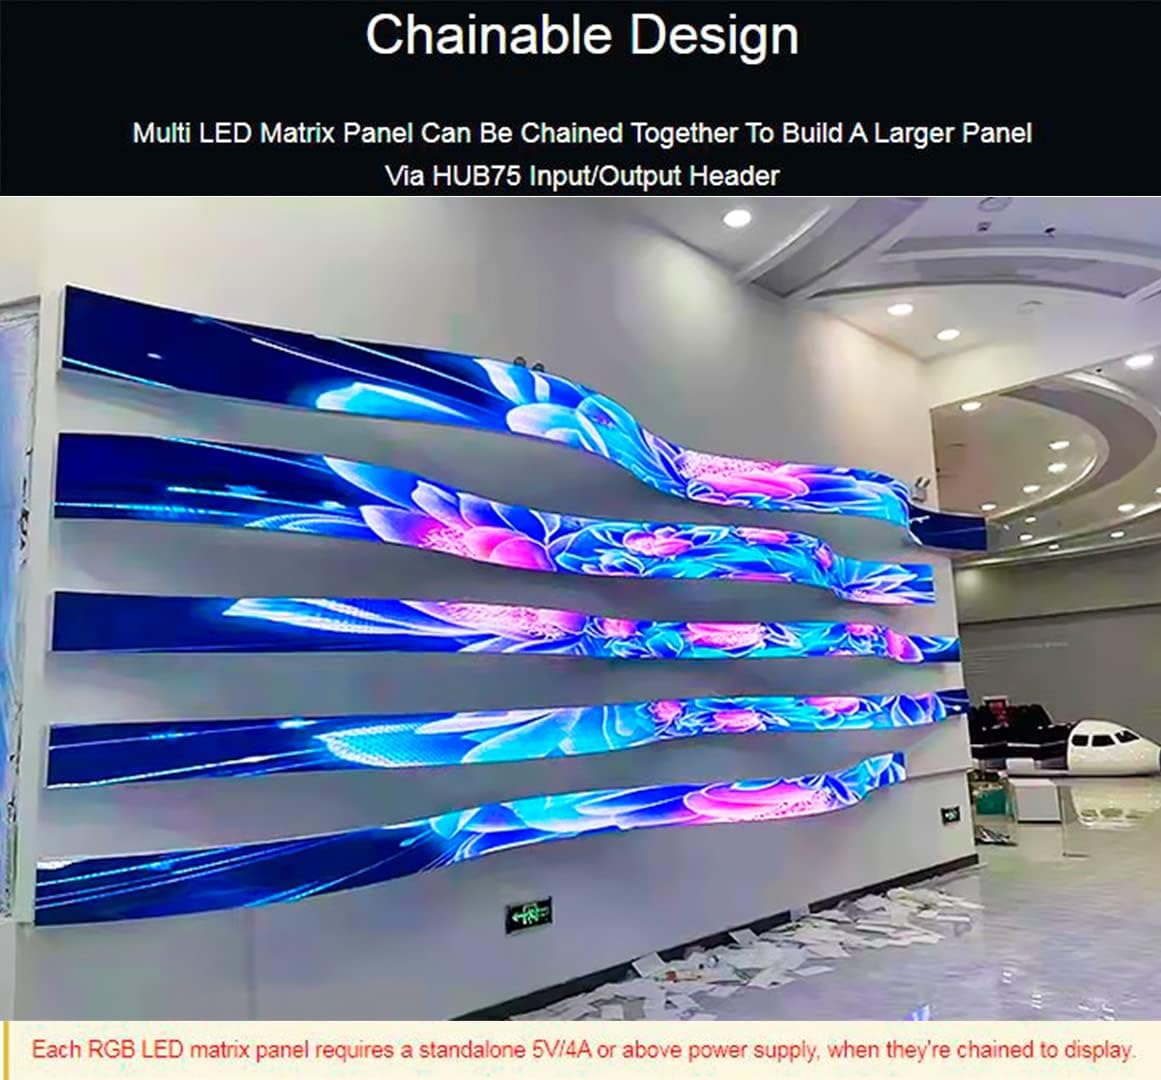
Image 2.2: Illustration of the chainable design, where multiple LED matrix panels are connected via HUB75 input/output headers to create a larger display.
3. Operating
Once the panel is correctly set up and connected to your controller, you can begin programming it to display content.
3.1 Displaying Content
Utilize the provided open-source libraries and examples for your specific controller to program the panel. These resources typically include functions for:
- Drawing pixels and shapes.
- Displaying text with various fonts and colors.
- Loading and displaying images.
- Creating animations.
3.2 Adjusting Brightness
The panel supports adjustable brightness. This feature is typically controlled through software commands provided by the libraries. Consult the specific documentation for your chosen controller and library for instructions on how to implement brightness control.
4. Maintenance
To ensure the longevity and optimal performance of your flexible LED matrix panel, observe the following maintenance guidelines:
- Handling: The PCB material is flexible and can be gently bent to conform to curved surfaces. However, avoid excessive or repeated bending, as this can damage the internal circuitry and LED connections.
- Cleaning: If necessary, gently clean the surface of the panel with a soft, dry, anti-static cloth. Avoid using liquids or abrasive materials.
- Storage: Store the panel in a dry, dust-free environment, away from direct sunlight and extreme temperatures. If storing for extended periods, keep it in its original packaging or a protective container.
- Power: Always ensure the correct 5V power supply is used. Over-voltage can permanently damage the LEDs and control circuitry.
5. Troubleshooting
If you encounter issues with your LED matrix panel, consider the following troubleshooting steps:
5.1 No Display or Partial Display
- Power Check: Verify that the 5V power supply is correctly connected and providing sufficient current (at least 4A for a single panel). Ensure the power supply is functional.
- Data Cable: Check the 16P data cable connection between the controller and the panel. Ensure it is securely seated at both ends and that the cable is not damaged.
- Pinout: Confirm that the HUB75 pinout on your controller matches the panel's requirements. Refer to the online tutorial for specific wiring diagrams.
- Software: Ensure your code is correctly initialized and sending data to the panel. Test with a simple example program provided in the open-source resources.
- Chained Panels: If using multiple panels, ensure each panel has adequate power and that the data chain is correctly connected from output to input.
5.2 Incorrect Colors or Flickering
- Software Configuration: Verify that the color order (RGB, GRB, etc.) is correctly configured in your software library.
- Refresh Rate: Flickering can sometimes be due to an incorrect refresh rate or timing issues in the software. Adjust these parameters if possible.
- Power Fluctuations: Unstable power can cause flickering. Ensure your power supply is stable and capable of handling the panel's maximum power draw.
5.3 Damaged Pixels
Individual damaged pixels are typically a hardware issue and cannot be repaired by software. If a significant number of pixels are affected, contact support.
6. Specifications
| Specification | Value |
|---|---|
| Dimensions | 240mm × 120mm |
| Pixels | 96×48 = 4608 dots |
| Dot Pitch | 2.5mm |
| Pixel Form | 1R1G1B |
| Viewing Angle | ≥140° |
| Control Type | Synchronization |
| Driving | 1/24 scan |
| Header | HUB75 |
| Power Supply | 5V / 4A (VH4 header input) |
| Power Consumption | ≤20W |
| Item Weight | 0.352 ounces |
| Model Number | 4608 Matrix 96x48-2.5 Pitch-FL |
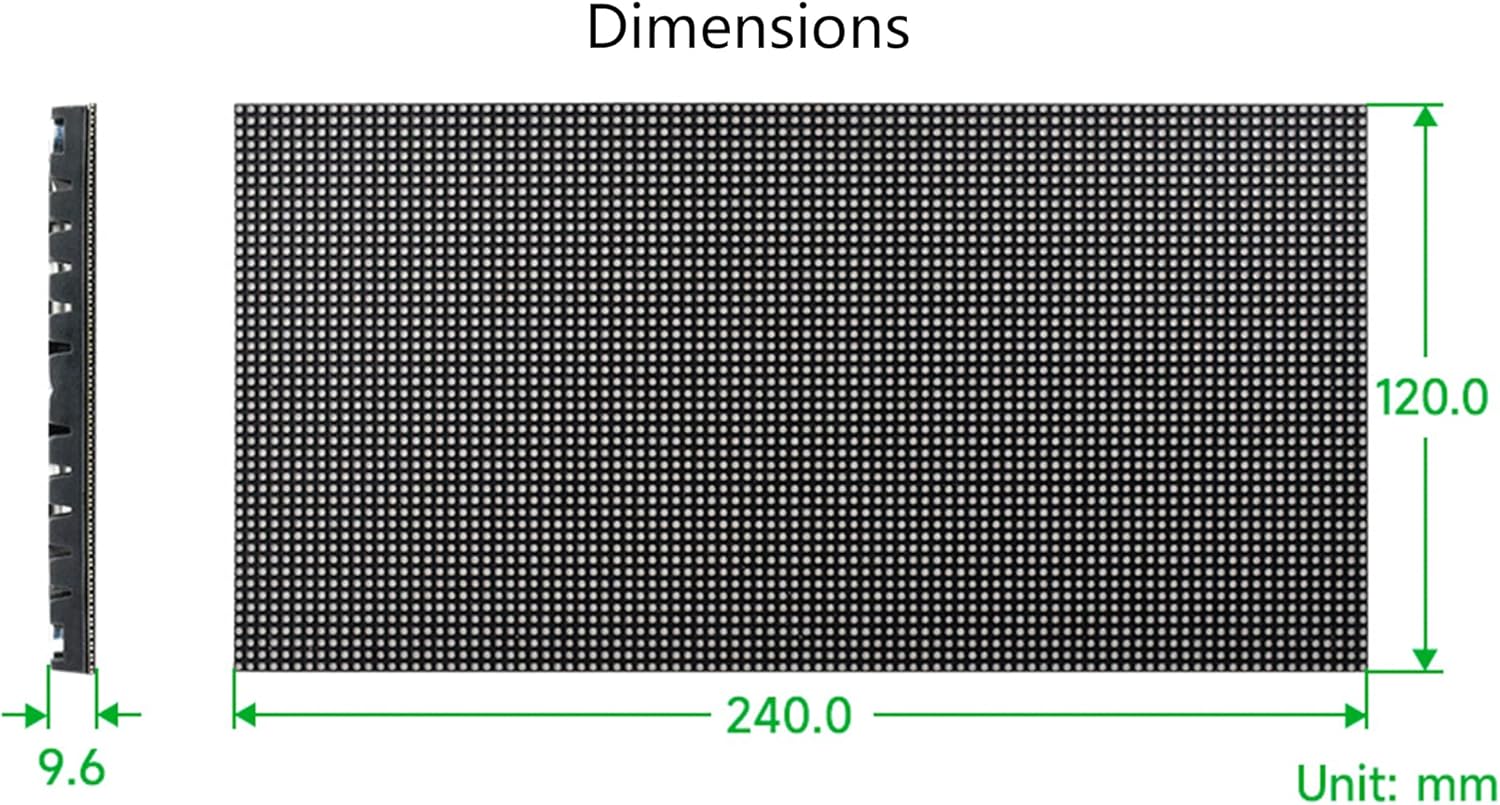
Image 6.1: Detailed dimensions of the LED matrix panel (240.0mm x 120.0mm x 9.6mm).
7. Package Content
The following items are included in your waveshare Flexible RGB Full Color LED Matrix Panel 96x48 package:
- RGB-Matrix-P2.5-96x48-F LED matrix and accessories x1
- Power supply terminal adapter x1
- 16P wire (~30cm) x1

Image 7.1: Overview of the package contents, showing the LED matrix panel, power supply terminal adapter, and connection wires.
8. Support
For further assistance, detailed tutorials, and open-source development resources (including examples for Raspberry Pi, Raspberry Pi Pico, ESP32, and Arduino), please visit the official Waveshare online tutorial page:
This resource provides comprehensive guides to help you get started and troubleshoot common issues.


