
SpeaKa Professional SP-HDA-510
SpeaKa Professional SP-HDA-510 User Manual
HDMI Audio Extractor
1. Introduction
Thank you for purchasing the SpeaKa Professional SP-HDA-510 HDMI Audio Extractor. This device is designed to enhance your audio-visual experience by allowing you to extract audio from an HDMI source and output it to various audio systems, including soundbars with eARC, or traditional audio receivers via S/PDIF (optical) or analog audio outputs. It also features multiple HDMI inputs for connecting various devices and a single HDMI output for your display.
2. Safety Information
- Read all instructions carefully before operating the device.
- Keep this manual for future reference.
- Do not expose the device to moisture, rain, or extreme temperatures.
- Ensure proper ventilation around the device to prevent overheating.
- Use only the provided power adapter.
- Do not attempt to disassemble or modify the device. Refer all servicing to qualified personnel.
- Disconnect power during lightning storms or when unused for long periods.
3. Package Contents
Please check the contents of your package. If any items are missing or damaged, contact your retailer.
- SpeaKa Professional SP-HDA-510 HDMI Audio Extractor Unit
- Power Adapter (DC 5V)
- Remote Control
- User Manual (this document)
- Installation Hardware (if applicable)
4. Product Overview

Figure 4.1: Top-front view of the SpeaKa Professional SP-HDA-510, showing the brand logo, 4K UHD indicator, input LEDs (IN-1, IN-2, IN-3), audio channel LEDs (2CH, 5.1CH, 7.1CH, eARC), and the 'SELECT' button.
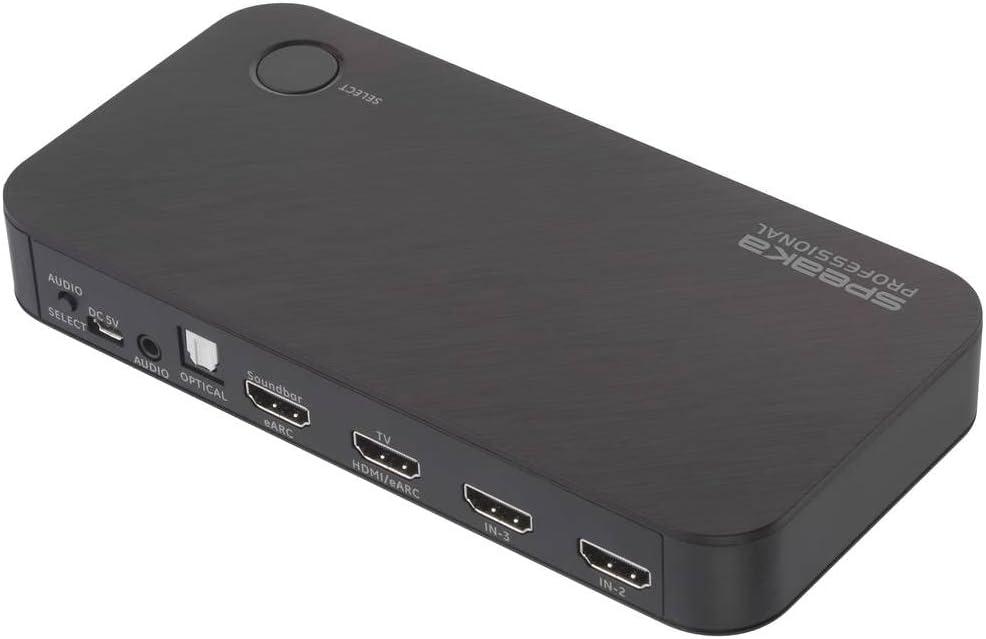
Figure 4.2: Rear-side view of the SpeaKa Professional SP-HDA-510, highlighting the various input and output ports including HDMI inputs, HDMI output to TV, eARC output, Optical, and Analog audio outputs, along with the DC 5V power input and Audio Select button.
4.1 Front Panel Features

Figure 4.3: Detailed view of the front panel, showing the HDMI input indicators (IN-1, IN-2, IN-3) and audio mode indicators (2CH, 5.1CH, 7.1CH, eARC).
- 4K UHD Indicator: Lights up when a 4K UHD signal is detected.
- IN-1 / IN-2 / IN-3 LEDs: Indicate which HDMI input is currently active.
- 2CH / 5.1CH / 7.1CH / eARC LEDs: Indicate the current audio output mode.
- SELECT Button: Used to manually switch between HDMI input sources.
4.2 Rear Panel Features

Figure 4.4: Detailed view of the rear panel, showing all connectivity ports.
- DC 5V: Power input port. Connect the provided power adapter here.
- AUDIO SELECT: Button to cycle through audio output modes (2CH, 5.1CH, 7.1CH, eARC).
- AUDIO (3.5mm Jack): Analog stereo audio output.
- OPTICAL (S/PDIF): Digital optical audio output.
- Soundbar (eARC): HDMI output specifically for connecting to an eARC-compatible soundbar. This port supports Audio Return Channel.
- TV (HDMI/eARC): HDMI output for connecting to your television or display. This port also supports eARC functionality.
- IN-3 / IN-2 / IN-1: HDMI input ports for connecting source devices such as game consoles, Blu-ray players, or streaming devices.
5. Setup
Follow these steps to set up your SpeaKa Professional SP-HDA-510:
- Connect HDMI Sources: Connect your HDMI source devices (e.g., PC, game console, satellite receiver) to the HDMI IN-1, IN-2, or IN-3 ports on the rear panel of the SP-HDA-510.
- Connect to TV/Display: Connect an HDMI cable from the "TV (HDMI/eARC)" output port on the SP-HDA-510 to an HDMI input on your television or display.
- Connect Audio Output (Optional):
- For eARC Soundbar: Connect an HDMI cable from the "Soundbar (eARC)" output port on the SP-HDA-510 to the eARC/ARC input on your soundbar.
- For Optical Audio: Connect an optical cable from the "OPTICAL" port on the SP-HDA-510 to the optical input on your audio receiver or sound system.
- For Analog Audio: Connect a 3.5mm audio cable from the "AUDIO" port on the SP-HDA-510 to the analog input on your audio system.
- Connect Power: Connect the provided DC 5V power adapter to the "DC 5V" port on the SP-HDA-510, then plug the adapter into a power outlet. The unit will power on automatically.
- Power On Devices: Power on your TV/display and all connected HDMI source devices.
6. Operating Instructions
6.1 Switching HDMI Sources
- Automatic Switching: The SP-HDA-510 is designed to automatically detect and switch to the active HDMI input source.
- Manual Switching (Device): Press the "SELECT" button on the top of the unit to cycle through the HDMI input sources (IN-1, IN-2, IN-3). The corresponding LED will illuminate.
- Manual Switching (Remote Control): Use the dedicated input selection buttons on the included remote control to directly select the desired HDMI input.
6.2 Audio Output Modes
The SP-HDA-510 supports various audio output modes. You can select the desired mode using the "AUDIO SELECT" button on the rear panel or the remote control.
- 2CH: Stereo audio output. Suitable for 2-channel audio systems.
- 5.1CH: 5.1 channel surround sound output.
- 7.1CH: 7.1 channel surround sound output.
- eARC: Enhanced Audio Return Channel. This mode allows audio from your TV (e.g., smart TV apps, broadcast TV) to be sent back to the SP-HDA-510 and then output to an eARC-compatible soundbar or audio receiver connected to the "Soundbar (eARC)" port. Ensure your TV and soundbar also support eARC for this functionality.
7. Maintenance
- Cleaning: Use a soft, dry cloth to clean the surface of the device. Do not use liquid or aerosol cleaners.
- Storage: If storing the device for an extended period, disconnect it from power and store it in a cool, dry place.
8. Troubleshooting
| Problem | Possible Cause | Solution |
|---|---|---|
| No video or audio output. |
|
|
| Intermittent screen blackouts (e.g., 2-3 seconds). |
|
|
| eARC/ARC not working. |
|
|
9. Specifications
| Model Number | SP-10102940 (SP-HDA-510) |
| Video Resolution | Up to 3840 x 2160 pixels (4K@60Hz) |
| HDMI Inputs | 3 |
| HDMI Outputs | 2 (1x TV/HDMI/eARC, 1x Soundbar/eARC) |
| Audio Outputs | Optical (S/PDIF), Analog (3.5mm Jack), eARC via HDMI |
| Supported Audio Formats | 2CH, 5.1CH, 7.1CH, eARC |
| Dimensions (L x W x H) | 9 x 11 x 36 cm (approx. 3.54 x 4.33 x 14.17 inches) |
| Weight | 156.33 Grams (approx. 0.34 lbs) |
| Power Supply | DC 5V (via included power adapter) |
| Color | Black |
10. Warranty and Support
SpeaKa Professional provides a warranty for a minimum period of 2 years from the date of purchase for this product. This warranty covers defects in materials and workmanship under normal use.
For technical support, troubleshooting assistance, or warranty claims, please contact your original retailer or visit the official SpeaKa Professional website for contact information.
Please retain your proof of purchase for warranty purposes.
Related documentsSP-HDA-510


Ask a question about this manual
Ask about setup, troubleshooting, compatibility, parts, safety, or missing instructions. Manuals+ will review the question and use this page’s manual context to help answer it.