1. Introduction
This manual provides essential information for the safe and efficient operation, maintenance, and troubleshooting of your Cecotec Sprint Silver City Electric Bike. Please read this manual thoroughly before your first ride and retain it for future reference. Proper understanding and adherence to these instructions will ensure a safe and enjoyable experience with your electric bike.

Image 1.1: Front-side view of the Cecotec Sprint Silver City Electric Bike.
2. Safety Instructions
Your safety is paramount. Always wear a helmet and appropriate safety gear when riding. Familiarize yourself with local traffic laws and regulations for electric bicycles. Regular inspection and maintenance are crucial for safe operation.
- Pre-Ride Check: Before each ride, inspect tires, brakes, lights, and ensure all bolts and quick releases are securely fastened.
- Braking: Practice using both front and rear hydraulic disc brakes to understand their responsiveness. Always brake smoothly and anticipate stops.
- Visibility: Use the integrated lights during low light conditions and consider wearing reflective clothing.
- Battery Care: Do not expose the battery to extreme temperatures or moisture. Use only the provided charger.
- Weight Limit: Do not exceed the maximum recommended weight of 150 kg (including rider and cargo).
3. Package Contents
Carefully unpack your electric bike and verify that all components are present. If any items are missing or damaged, contact customer support immediately.
- 1 x Cecotec Sprint Silver City Electric Bike
- 1 x Instruction Manual (this document)
- Mounting Tools
- 1 x Battery Charger
4. Setup
4.1 Initial Assembly
While the bike is largely pre-assembled, some components require attachment and adjustment. Use the included mounting tools for these steps.
- Handlebar Installation: Attach the handlebar to the stem, ensuring it is centered and tightened securely. Adjust the angle for comfortable riding posture.
- Pedal Attachment: Identify the left (L) and right (R) pedals. Thread the 'L' pedal counter-clockwise into the left crank arm and the 'R' pedal clockwise into the right crank arm. Tighten firmly with a wrench.
- Seat Post Adjustment: Insert the seat post into the frame and adjust the saddle height so your leg has a slight bend at the knee when the pedal is at its lowest point. Secure the quick-release lever or bolt.
- Front Wheel Installation (if detached): Align the front wheel into the fork dropouts. Ensure the disc brake rotor is correctly seated within the caliper. Secure the quick-release skewer or axle nuts.
4.2 Battery Charging
Before your first ride, fully charge the 360Wh (36V 10Ah) battery. The battery is integrated into the frame.
- Locate the charging port on the bike frame.
- Connect the charger to a standard electrical outlet.
- Connect the charging cable to the bike's charging port.
- The charger's indicator light will show the charging status (e.g., red for charging, green for fully charged).
- Once fully charged, disconnect the charger from the bike and then from the outlet.
A full charge typically takes several hours. Avoid overcharging by disconnecting the charger once the battery is full.

Image 4.1: The LCD display provides information on battery level, speed, and assist level.
5. Operating Instructions
5.1 Powering On/Off
To power on the electric system, press and hold the power button on the LCD display unit. To power off, press and hold the same button until the display turns off.
5.2 Using the LCD Display
The LCD display provides real-time information and control over your bike's electric functions.
- Speed: Shows current riding speed.
- Kilometers: Displays trip distance or total odometer reading.
- Assist Level: Indicates the current level of motor assistance. Use the '+' and '-' buttons to cycle through assistance levels (typically 0-5). Level 0 provides no motor assistance.
- Battery Level: Shows the remaining battery charge.
- Lights: Press the light button to turn the integrated front and rear lights on or off.

Image 5.1: Integrated front headlight for enhanced visibility.
5.3 Gear Shifting (Shimano Altus 8-Speed)
Your bike is equipped with a Shimano Altus 8-speed gear system for efficient pedaling across various terrains.
- Use the shifter on the right handlebar to change gears.
- Shift to a lower gear (larger cog) for easier pedaling on inclines.
- Shift to a higher gear (smaller cog) for faster speeds on flat terrain or descents.
- Always pedal lightly when shifting gears to ensure smooth transitions and prevent damage to the drivetrain.
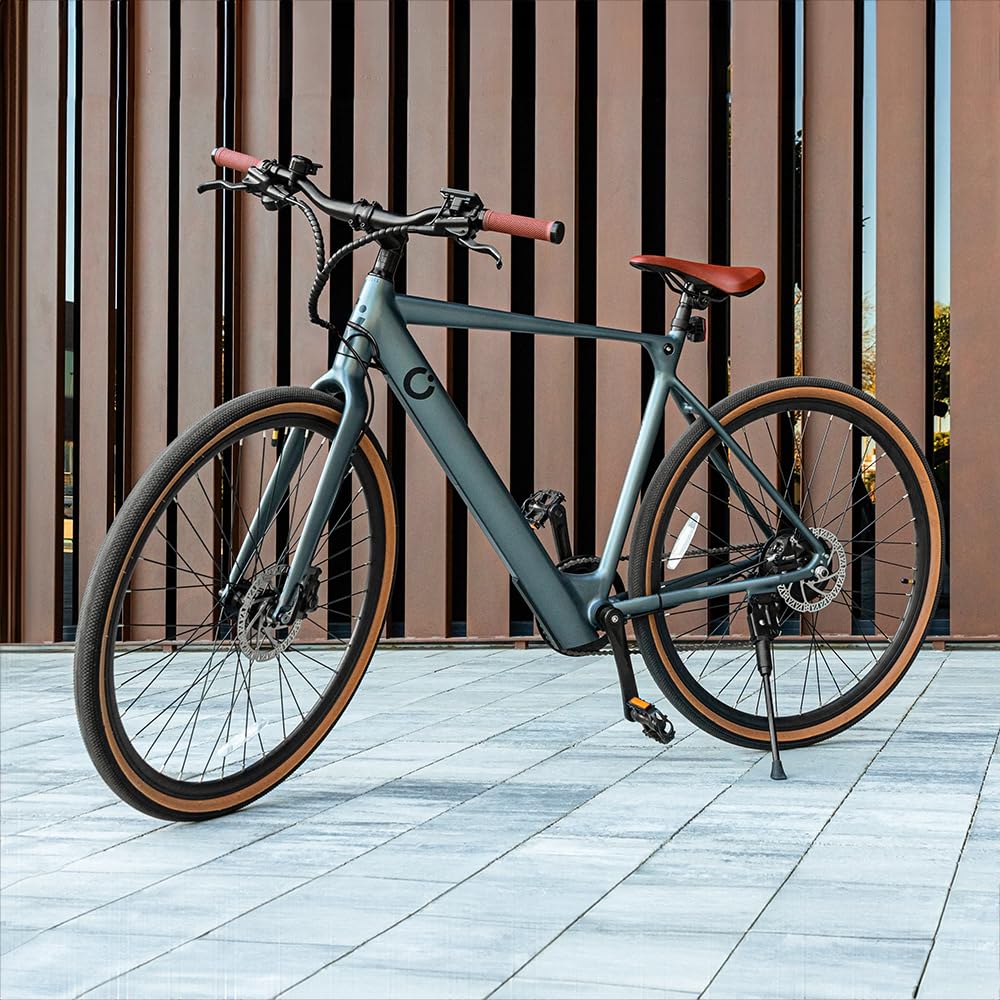
Image 5.2: Shimano Altus 8-speed gear system for versatile riding.
5.4 Braking (Double Hydraulic Disc Brakes)
The bike features double hydraulic disc brakes for reliable stopping power in various conditions.
- The right lever controls the rear brake, and the left lever controls the front brake.
- Apply both brakes simultaneously for optimal stopping power and control.
- Avoid sudden, hard braking, especially with the front brake, as this can lead to loss of control.
- Regularly check brake pads for wear and hydraulic fluid levels.

Image 5.3: Hydraulic disc brake system for effective stopping.
6. Maintenance
Regular maintenance ensures the longevity and safe operation of your electric bike.
- Cleaning: Clean the bike regularly with a damp cloth and mild soap. Avoid high-pressure washing, especially near electrical components.
- Tire Pressure: Check tire pressure before each ride. Maintain the recommended pressure (usually indicated on the tire sidewall) for optimal performance and puncture resistance. The 28-inch wheels require specific pressure.
- Chain Lubrication: Lubricate the chain every 100-200 km or after riding in wet conditions to ensure smooth gear changes and prevent wear.
- Brake Inspection: Regularly check brake pads for wear and replace them when necessary. Ensure brake levers feel firm and responsive.
- Bolt Tightness: Periodically check and tighten all bolts and fasteners, especially on the handlebars, stem, seat post, and wheels.
- Battery Storage: If storing the bike for an extended period, charge the battery to 50-70% and store it in a cool, dry place. Recharge every 2-3 months to prevent deep discharge.
7. Troubleshooting
This section addresses common issues you might encounter. For problems not listed here, contact customer support.
| Problem | Possible Cause | Solution |
|---|---|---|
| Bike does not power on | Battery discharged; Loose battery connection; Faulty power button | Charge battery; Check battery connection; Contact support |
| Motor not assisting | Assist level set to 0; Brake lever engaged; Sensor issue | Increase assist level; Release brake levers; Contact support |
| Brakes feel spongy or weak | Air in hydraulic line; Worn brake pads; Low hydraulic fluid | Bleed brakes (professional service recommended); Replace brake pads; Refill hydraulic fluid (professional service recommended) |
| Gears not shifting smoothly | Dirty/dry chain; Misaligned derailleur; Damaged shifter cable | Clean and lubricate chain; Adjust derailleur; Replace cable (professional service recommended) |
8. Specifications
Detailed technical specifications for the Cecotec Sprint Silver City Electric Bike.
| Feature | Specification |
|---|---|
| Model Name | Sprint Silver |
| Item Model Number | 07252 |
| Bike Type | Electric Bike, Urban |
| Motor Power | 250W |
| Wheel Size | 28 inches |
| Battery Capacity | 360 Wh (36V 10Ah) |
| Estimated Autonomy | Up to 70 km |
| Gear System | Shimano Altus 8-Speed |
| Brake Type | Double Hydraulic Disc Brake |
| Frame Material | Aluminum |
| Suspension Type | Rigid |
| Display | LCD (Speed, Kilometers, Assist Level, Lights) |
| Item Weight | 19.4 Kilograms |
| Maximum Weight Recommendation | 150 Kilograms |
| Color | Grey |
9. Warranty and Support
Cecotec provides a commitment to quality and support for its products.
- Spare Part Availability: EU spare parts are available for a duration of 10 years from the date of purchase.
- Customer Support: For warranty claims, technical assistance, or any questions regarding your Cecotec Sprint Silver City Electric Bike, please contact Cecotec customer service through their official website or the contact information provided at the point of purchase.


