
1. Product Overview
The ELIVED Long Arm TV Wall Mount (Model YD3018) is designed to securely hold most 26-65 inch televisions, offering full motion capabilities for optimal viewing. It features a 37.4-inch long extension arm, swivel, and tilt adjustments, supporting VESA patterns up to 400x400mm and a maximum weight of 77 lbs.

Image: Main components of the ELIVED Long Arm TV Wall Mount.
2. Safety Information
WARNING: Failure to read and follow these instructions may result in serious personal injury, property damage, or voiding of your warranty. If you do not understand these instructions or have doubts about the safety of the installation, please contact customer service.
- Do not install into drywall alone.
- Ensure the mounting surface can safely support the combined weight of the equipment and all attached hardware.
- Always use a stud finder to locate wood studs for secure mounting.
- For concrete or brick walls, use appropriate anchors (may be provided or require separate purchase).
- Do not exceed the maximum weight capacity of 77 lbs (35 kg).
- This product is intended for indoor use only.
3. Package Contents
Verify all components are present and undamaged before installation. If any parts are missing or defective, contact ELIVED customer service.
The package includes the main mount assembly, TV plate, extension adapter arms, various screws, washers, spacers, concrete anchors (if requested), a bubble level, and a wrench.

Image: Illustration of wall compatibility for wood studs and brick/concrete walls.
4. Specifications
| Feature | Detail |
|---|---|
| Brand | ELIVED |
| Model Number | YD3018 |
| Compatible TV Sizes | 26-65 inches |
| Maximum Weight Capacity | 77 lbs (35 kg) |
| VESA Compatibility | 100x100mm to 400x400mm |
| Extension from Wall | 37.4 inches (max) |
| Retraction to Wall | 3 inches (min) |
| Tilt Angle | +5° / -15° |
| Swivel Angle | ±90° |
| Screen Level Adjustment | ±3° |
| Material | Alloy Steel |
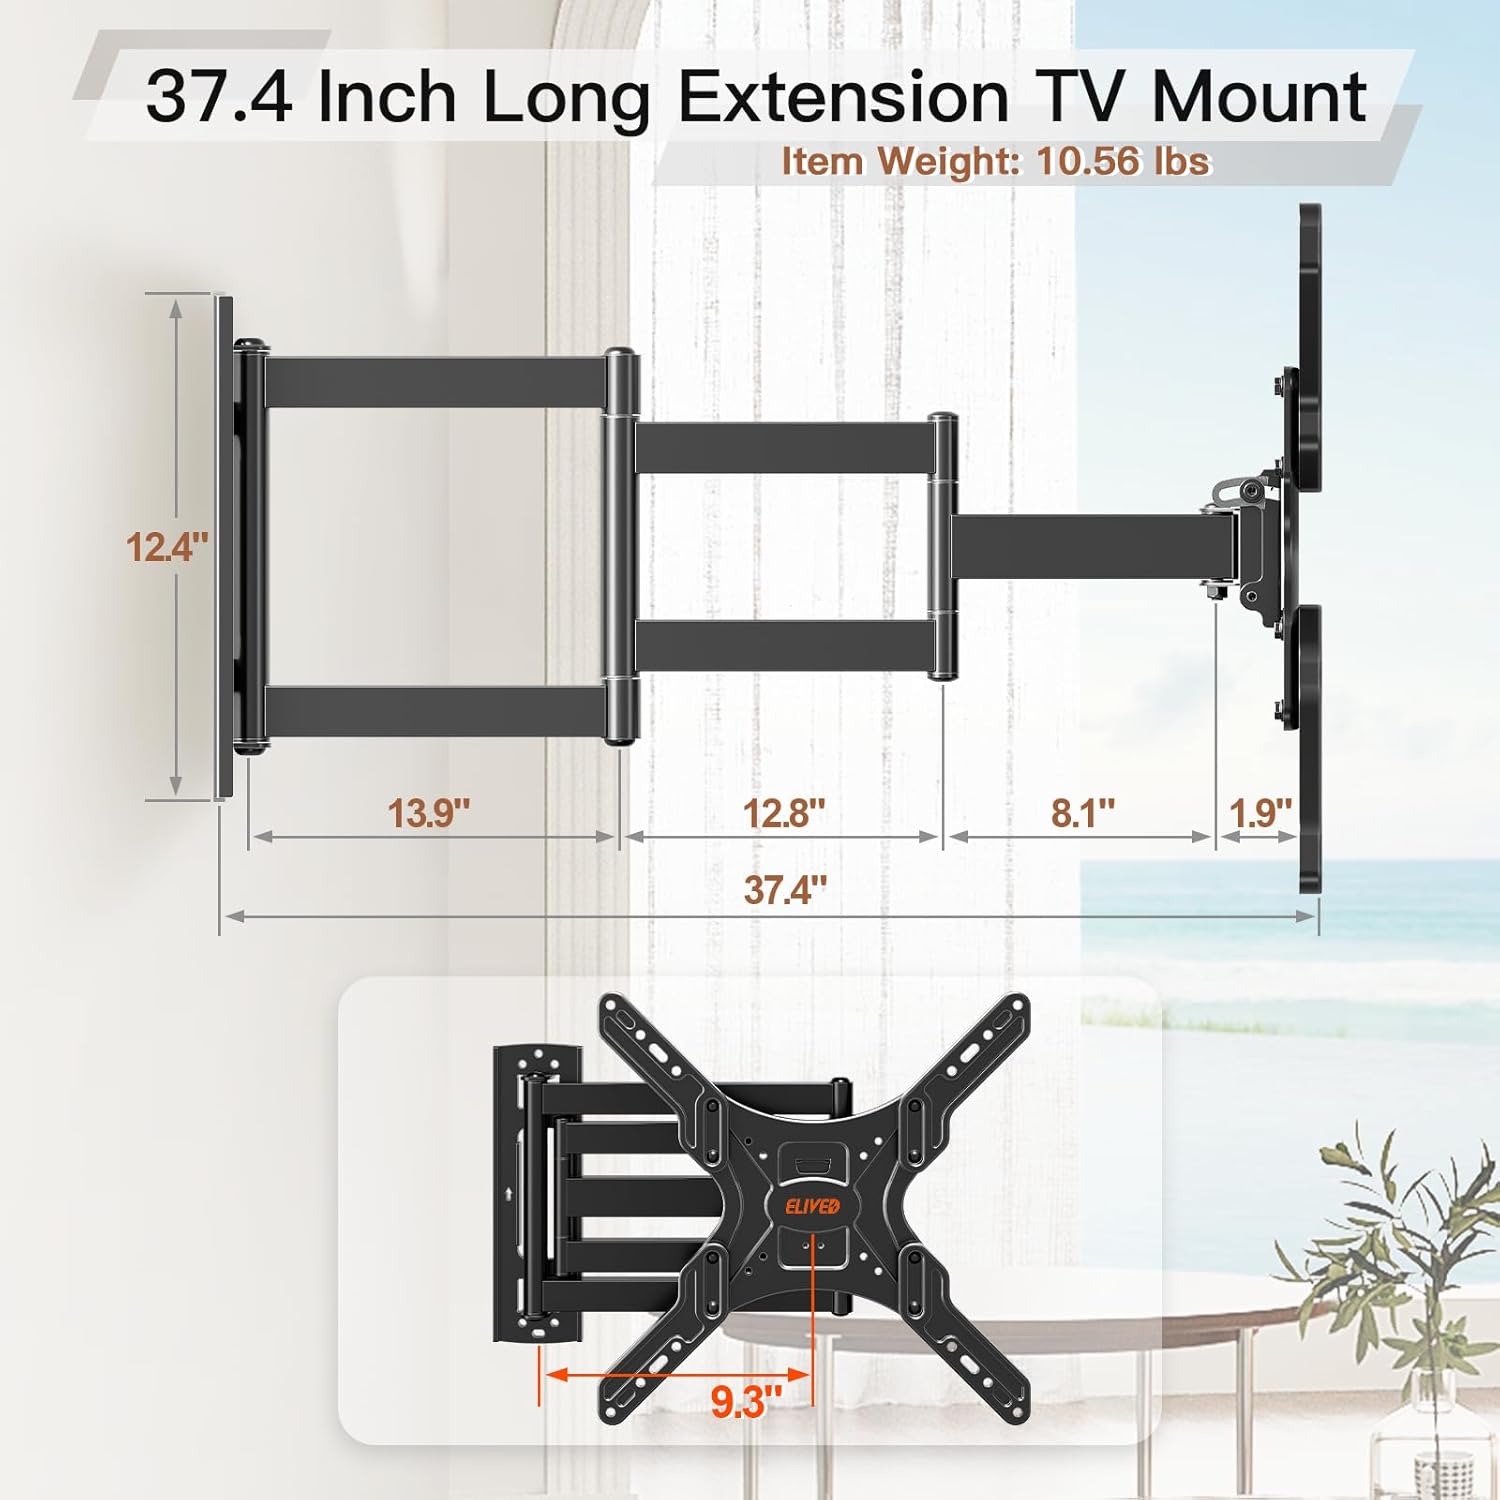
Image: Detailed dimensions of the ELIVED Long Arm TV Wall Mount, showing extension and retraction capabilities.

Image: Guide to suitable and unsuitable VESA patterns for the mount.
5. Setup and Installation
5.1 Pre-Installation Checks
Before beginning installation, ensure your TV meets the following criteria:
- TV Weight: Your TV must weigh no more than 77 lbs (35 kg).
- TV Size: Compatible with TVs between 26 and 65 inches.
- VESA Pattern: Check the back of your TV for the four mounting holes. Measure the horizontal and vertical distances between these holes. The VESA pattern must be between 100x100mm and 400x400mm.
- Input Access: Ensure the mount will not block any necessary input ports on your TV.
- Wall Type: This mount is suitable for wood studs, concrete, and brick walls. Do NOT install into drywall alone.

Image: Visual guide for checking TV weight, size, VESA pattern, and potential cable blockage.
5.2 Attaching the TV Plate to Your TV
- Carefully place your TV face down on a soft, clean surface to prevent scratches.
- Select the correct screws, washers, and spacers from the provided hardware kit that fit your TV's VESA holes.
- Attach the TV plate (the part with the ELIVED logo) to the back of your TV using the selected hardware. Ensure it is securely fastened.
- If your TV's VESA pattern is larger than 200x200mm, attach the extension adapter arms to the TV plate using the provided nuts, bolts, and wrench.
5.3 Wall Plate Installation (Wood Stud)
- Use a stud finder to locate the center of a wood stud at your desired mounting height.
- Place the wall plate template against the wall, aligning it with the center of the stud. Use the included bubble level to ensure it is perfectly horizontal.
- Mark the pilot hole locations through the template.
- Drill pilot holes using a 5.5mm (7/32") drill bit.
- Attach the wall plate to the wall using the provided lag bolts and washers. Tighten them securely with a wrench.
5.4 Wall Plate Installation (Concrete/Brick Wall)
- Determine your desired mounting height.
- Place the wall plate template against the wall. Use the included bubble level to ensure it is perfectly horizontal.
- Mark the pilot hole locations through the template.
- Drill pilot holes using a 10mm (3/8") masonry drill bit.
- Insert the concrete anchors into the drilled holes. Tap them gently with a hammer until they are flush with the wall surface.
- Attach the wall plate to the wall using the provided lag bolts and washers. Tighten them securely with a wrench.
5.5 Hanging the TV
- With assistance, carefully lift the TV (with the attached TV plate) and hook it onto the wall plate.
- Secure the TV to the mount by tightening the safety screws located on the bottom of the TV plate.
5.6 Installation Video Guide
Video: ELIVED Long Arm TV Wall Mount YD3018 Installation Guide. This video provides a visual walkthrough of the installation process for the TV wall mount.
Video: Installation Guide - Long Arm TV Wall Mount YD3017. This video demonstrates the installation steps for a similar ELIVED TV wall mount model.
6. Operating Instructions
The ELIVED Long Arm TV Wall Mount offers versatile adjustments to achieve your desired viewing angle.
6.1 Extension and Retraction
Gently pull the TV away from the wall to extend the arm up to 37.4 inches. Push the TV back towards the wall to retract it to a minimum distance of 3 inches. Ensure smooth movement and avoid sudden forceful actions.

Image: Demonstrates the mount's ability to retract to 2.6 inches and pull out to 37.4 inches from the wall.
6.2 Swivel Adjustment
The mount allows for a ±90° swivel (left or right) to position your TV for optimal viewing from various locations, including corners.

Image: Illustrates the ±90° swivel capability for optimizing viewing experience.

Image: Example of the mount providing a great view from anywhere, including corner placement.

Image: Demonstrates the mount's suitability for corner mounting, allowing the TV to be positioned optimally.
6.3 Tilt Adjustment
Adjust the tilt angle from +5° (upward) to -15° (downward) to reduce glare and achieve a comfortable viewing angle, helping to avoid neck pain and eye strain.

Image: Shows the tilt adjustment range (+5°/-15°) to prevent neck pain and eye strain.
6.4 Screen Level Adjustment
The mount includes a ±3° screen level adjustment capability to ensure your TV is perfectly horizontal after installation.

Image: Comprehensive diagram illustrating the extend, retract, tilt, and swivel functionalities of the mount.
7. Maintenance
- Periodically check that all screws and bolts are securely tightened.
- Clean the mount with a soft, dry cloth. Avoid abrasive cleaners or solvents.
- Ensure cables are properly managed and not pinched by the moving parts of the mount.
8. Troubleshooting
8.1 TV is not level after installation.
Use the ±3° screen level adjustment feature to fine-tune the horizontal alignment of your TV.
8.2 Mount feels stiff or difficult to move.
Check the tension of the joints. Some joints may have adjustable screws that can be loosened slightly to allow for smoother movement. Refer to the detailed installation instructions for specific adjustment points.
8.3 Cables are too short when extending the TV.
Ensure you use cables of appropriate length to accommodate the full extension of the mount. Consider cable management ties to keep cables organized and prevent snagging.
9. Warranty and Support
For warranty information or technical support, please contact ELIVED customer service. Keep your purchase receipt as proof of purchase.
Contact Information: Refer to the contact details provided with your product packaging or visit the official ELIVED website.


