1. Introduction
Thank you for choosing the Acquaer 1/2HP Submersible Sump Pump and 1-1/2" x 50 FT Pool Backwash Hose. This product combination is designed for efficient removal of clean or dirty water from various applications such as garden pools, basements, flooded areas, hot tubs, and for irrigation purposes. The sump pump features a powerful 1/2 HP motor and an automatic float switch for reliable operation, while the durable backwash hose ensures effective water discharge. Please read this manual thoroughly before installation and operation to ensure safe and optimal performance.

Figure 1: Multiple applications of the Acquaer Sump Pump and Backwash Hose.
2. Safety Information
Always observe the following safety precautions to reduce the risk of injury, electric shock, or fire.
- Electrical Safety: Ensure the power supply matches the pump's voltage (115V/60Hz). Always connect the pump to a properly grounded outlet. Do not operate the pump with a damaged cord or plug. Do not use extension cords.
- Water and Electricity: Never handle the pump or its power cord with wet hands. Avoid submerging the power plug or electrical connections in water.
- Personal Safety: Wear appropriate personal protective equipment (PPE) such as safety glasses and gloves during installation and maintenance. Keep children and pets away from the operating area.
- Placement: Ensure the pump is placed on a stable, level surface, free from debris that could obstruct the intake. Do not run the pump dry.
- Thermal Protection: The pump is equipped with thermal overload protection. If the motor overheats, it will automatically shut off. Allow the pump to cool down before restarting.
- Intended Use: This pump is designed for clean and dirty water. Do not use it for flammable liquids, corrosive chemicals, or sewage.
3. Package Contents
Verify that all items are present and undamaged upon unpacking.
- Acquaer 1/2HP Submersible Sump Pump with Adjustable Float Switch
- 1-1/2" x 50 FT Pool Backwash Hose
- 2 Hose Clamps
- Hose Connector

Figure 2: Acquaer 1/2HP Sump Pump components.

Figure 3: Acquaer 1-1/2" x 50 FT Pool Backwash Hose with accessories.
4. Specifications
Key technical specifications for the Acquaer Sump Pump and Backwash Hose.
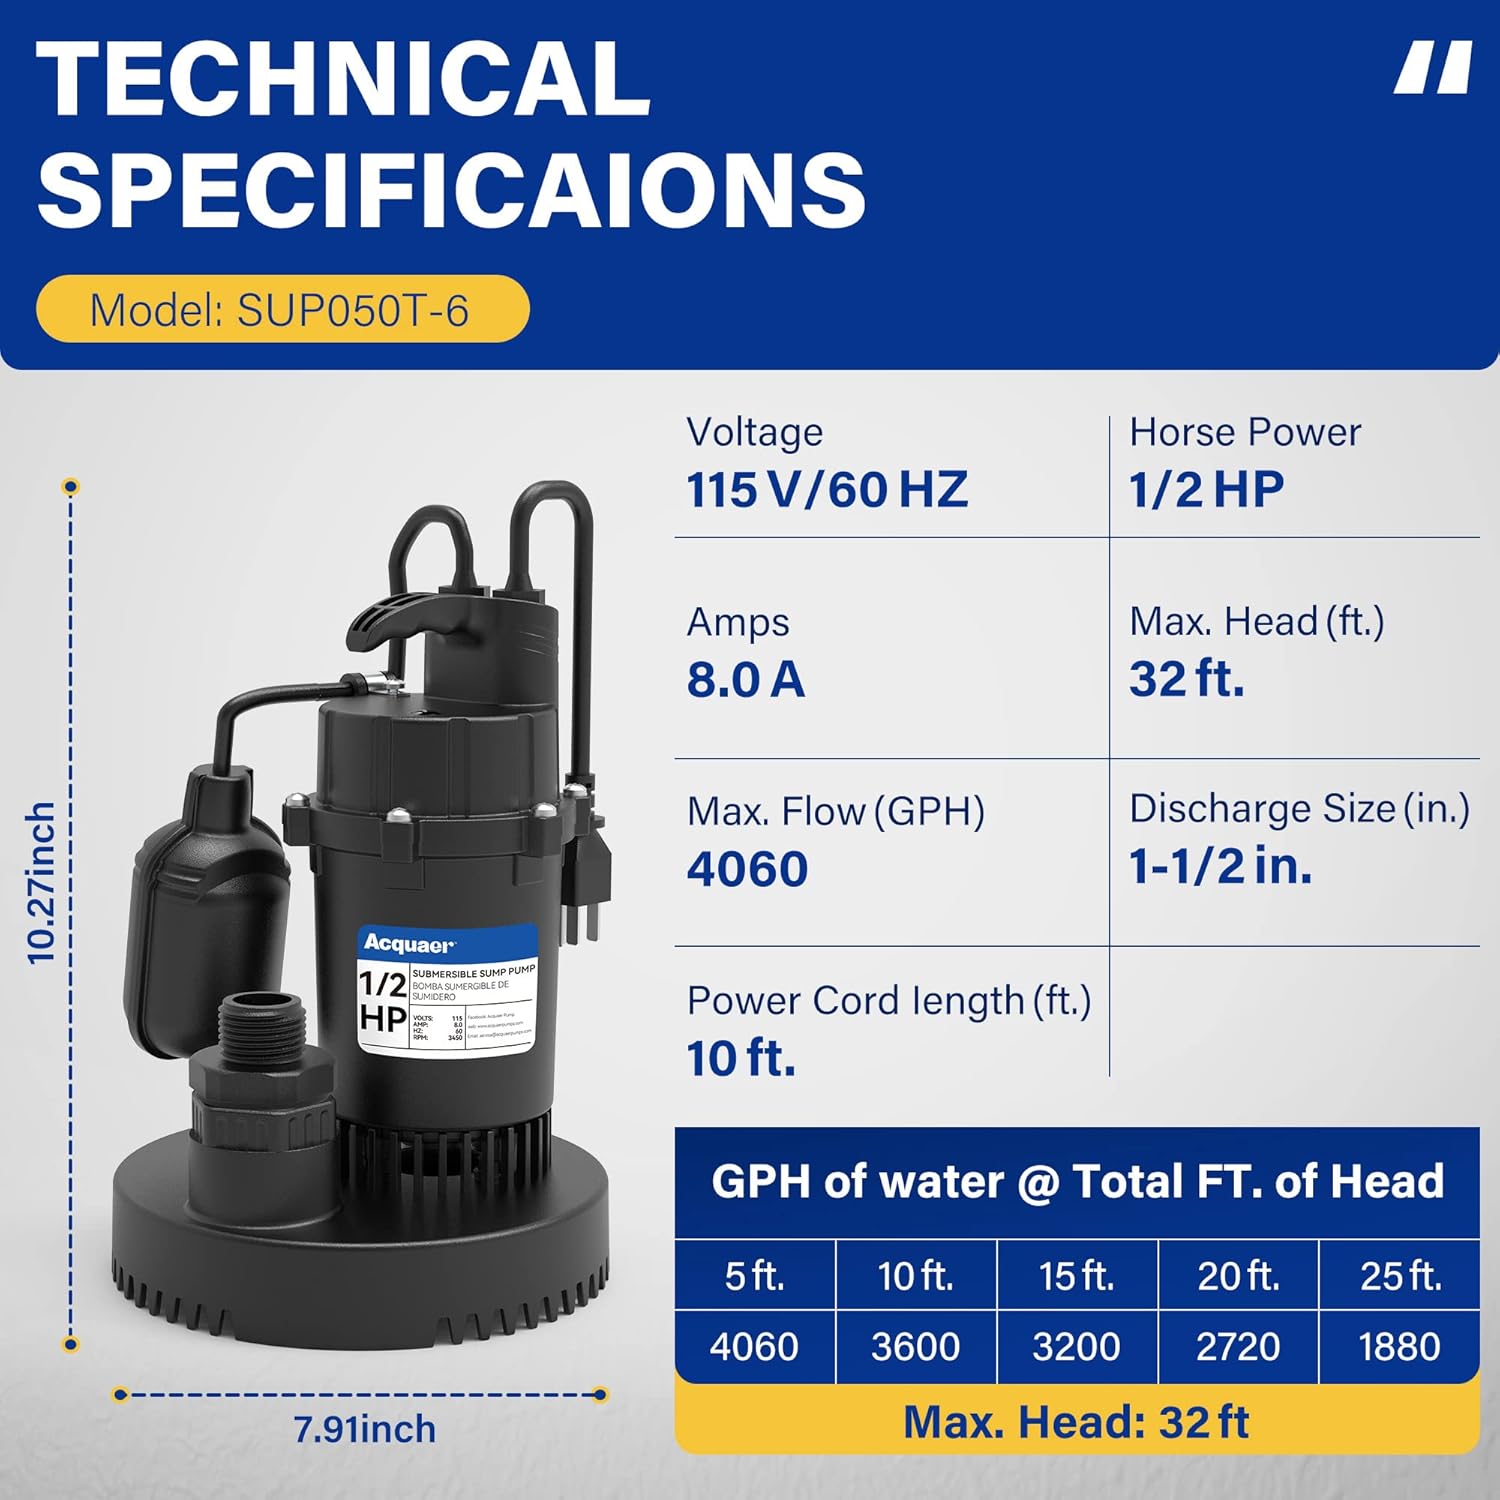
Figure 4: Sump Pump Technical Specifications.
| Feature | Specification |
|---|---|
| Model | SUP050T-6 |
| Voltage | 115 V / 60 Hz |
| Horse Power | 1/2 HP |
| Amps | 8.0 A |
| Max. Head | 32 ft (9.75 m) |
| Max. Flow | 4060 GPH (15368 LPH) |
| Discharge Size | 1-1/2 in |
| Power Cord Length | 10 ft (3.05 m) |
| Dimensions (Height x Base Diameter) | 10.27 in x 7.91 in |
| Feature | Specification |
|---|---|
| Hose Length | 50 ft (15.24 m) |
| Inner Diameter | 1-1/2 inch (38 mm) |
| Flat Width | 2.6 inch (66 mm) |
| Material | Reinforced PVC Fiber |
| Working Pressure | 4 bar |
| Temperature Range | 23°F to 149°F (-5°C to 65°C) |

Figure 5: Backwash Hose Dimensions.
5. Setup
5.1 Sump Pump Installation
- Placement: Position the sump pump on a stable, level surface in the area to be drained. Ensure the pump intake is clear of any large debris that could clog it.
- Discharge Hose Connection: Connect the 1-1/2 inch backwash hose to the pump's discharge outlet. Use the provided hose connector and secure it firmly with the hose clamps. Ensure a tight seal to prevent leaks.
- Float Switch Adjustment: The pump features an adjustable float switch for automatic operation. Adjust the float switch to the desired ON and OFF levels. The pump will activate when the water level rises above approximately 10.23 inches (26 cm) and deactivate when the water level drops below approximately 2.75 inches (7 cm). Ensure the float switch can move freely without obstruction.
- Electrical Connection: Plug the pump's power cord into a properly grounded 115V/60Hz electrical outlet. Do not use extension cords.

Figure 6: Automatic Float Switch Operation.
5.2 Backwash Hose Connection and Routing
- Connect to Pump: As mentioned above, connect one end of the 1-1/2" x 50 FT backwash hose to the pump's discharge outlet using the provided connector and clamps.
- Route Hose: Lay the hose flat and route it to a suitable discharge area. Ensure the discharge area is away from your property, foundations, or any place where water accumulation could cause damage. Avoid kinks or sharp bends in the hose that could restrict water flow.
- Secure Connections: Double-check all connections to ensure they are secure and leak-free before operating the pump.

Figure 7: Examples of hose connections to outlets.
6. Operating Instructions
Once the pump and hose are properly installed, operation is straightforward.
- Automatic Operation: With the pump plugged in and the float switch adjusted, the pump will automatically turn ON when the water level reaches the set activation point (approx. 10.23 inches) and turn OFF when the water level drops to the deactivation point (approx. 2.75 inches).
- Monitoring: Periodically check the pump's operation to ensure it is functioning correctly and that the discharge hose is effectively directing water away.
- High Flow Rate: The 1/2 HP motor provides a maximum flow rate of 4060 GPH, ensuring rapid water removal.
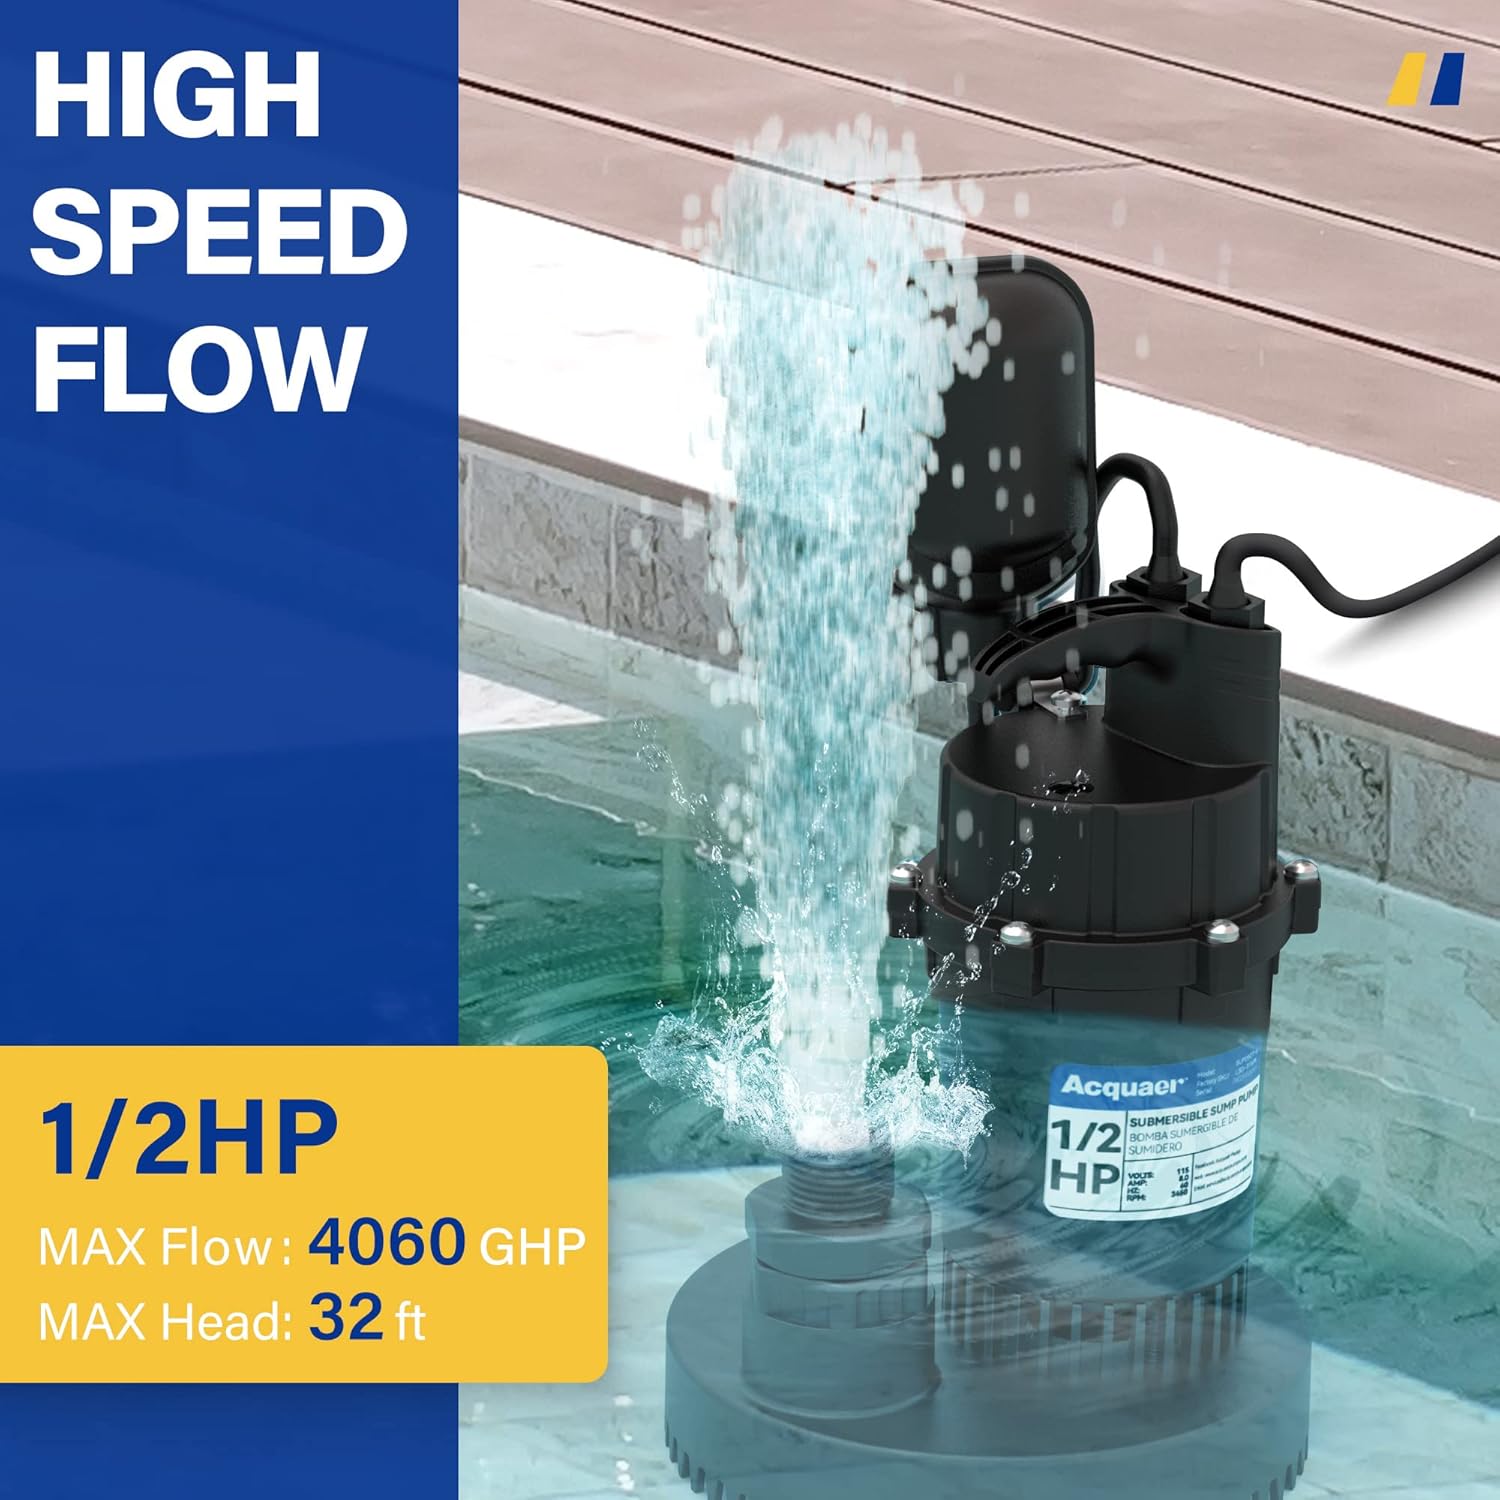
Figure 8: High-speed water discharge from the sump pump.
7. Maintenance
Regular maintenance ensures the longevity and efficient operation of your pump and hose.
- Clean Pump Intake: Periodically inspect and clean the pump's intake screen to remove any debris (leaves, sediment, etc.) that could restrict water flow or damage the impeller.
- Inspect Float Switch: Ensure the float switch moves freely and is not obstructed by debris or tangled cords.
- Check Power Cord and Plug: Inspect the power cord and plug for any signs of damage, fraying, or corrosion. Replace if damaged.
- Hose Inspection: Check the backwash hose for any punctures, tears, or excessive wear. Ensure hose clamps are tight.
- Winterization (if applicable): In freezing temperatures, remove the pump from service, drain all water, clean it thoroughly, and store it in a dry, frost-free location. Drain and coil the backwash hose for storage.
8. Troubleshooting
Refer to the following table for common issues and their solutions.
| Problem | Possible Cause | Solution |
|---|---|---|
| Pump does not start | No power; Float switch stuck; Thermal overload activated; Clogged intake. | Check power connection and circuit breaker. Ensure float switch moves freely. Allow pump to cool down. Clean intake screen. |
| Pump runs but no water or low flow | Clogged intake/discharge; Air lock; Water level too low; Kinked hose. | Clean intake screen and discharge. Ensure pump is fully submerged. Check hose for kinks. |
| Pump runs continuously | Float switch stuck in ON position; Continuous water inflow. | Check float switch for obstructions. Verify water source is not continuously feeding the area. |
| Pump cycles too frequently | Float switch set too low; Small pit/basin. | Adjust float switch to allow for a larger water level differential. Consider a larger basin if possible. |
9. Warranty and Support
Acquaer products are manufactured to high-quality standards. For warranty information, technical support, or assistance with parts, please contact Acquaer customer service. Keep your purchase receipt as proof of purchase.
Contact information can typically be found on the product packaging or the official Acquaer website.