
1. Introduction
This manual provides essential information for setting up, operating, maintaining, and troubleshooting your Beelink SER3 Mini PC. Please read it thoroughly before using the device.
The Beelink SER3 Mini PC is a compact and powerful desktop solution, ideal for office tasks, 4K video playback, and general computing. It features an AMD Ryzen 3 3200U processor, 8GB DDR4 RAM, and a 480GB NVMe M.2 SSD, pre-installed with Windows 11 Pro.

Image: Front view of the Beelink SER3 Mini PC, showcasing its compact design and front ports.
2. Package Contents
Verify that all items are present in the package:
- 1x Beelink SER3 Mini PC
- 1x Power Adapter (19V 3.42A)
- 1x HDMI Cable (100CM)
- 1x Wall-Mounted Bracket
- 1x User Manual (this document)
3. Device Layout and Ports
Familiarize yourself with the ports and features of your Mini PC:

Image: Diagram illustrating the front and rear ports of the Beelink SER3 Mini PC.
Front Panel:
- CLR CMOS Button: Used to clear CMOS settings.
- USB 3.2 10Gbps Ports (x2): For connecting peripherals like keyboards, mice, or external storage.
- Audio Jack (HP&MIC): For headphones and microphone.
- Power Button: To turn the device on/off.
Rear Panel:
- LAN (1000Mbps) Port: For wired network connection.
- USB 3.2 10Gbps Ports (x2): Additional ports for peripherals.
- HDMI (4K 60Hz) Ports (x2): For connecting to displays.
- DC Jack: For connecting the power adapter.
4. Setup Guide
- Connect to Power: Plug the power adapter into the DC Jack on the rear panel of the Mini PC, then plug the adapter into a power outlet.
- Connect to Display: Connect your monitor(s) to the HDMI ports on the rear panel using the provided HDMI cable or other compatible cables. The Mini PC supports dual 4K@60Hz displays.
- Connect Peripherals: Connect your keyboard and mouse to the available USB 3.2 ports.
- Network Connection: For a wired connection, connect an Ethernet cable to the LAN port. For wireless, the device supports WiFi 5 (802.11ac) and Bluetooth 5.0.
- Power On: Press the power button on the front panel to turn on the Mini PC.
- Initial Windows Setup: Follow the on-screen instructions to complete the Windows 11 Pro setup.

Image: Beelink SER3 Mini PC connected to two monitors, demonstrating dual display capability.
5. Operating Instructions
5.1 Basic Operation
- Power On/Off: Press the power button once to turn on. To shut down, use the Windows Start menu. A short press while on will put the PC to sleep. A long press (5 seconds) will force a shutdown.
- Restart: Use the Windows Start menu to restart the system.
- BIOS Access: To enter BIOS settings, press the Delete key repeatedly immediately after powering on.
- Boot Options Menu: To access the boot options menu, press the F7 key repeatedly immediately after powering on.
5.2 Dual Display Setup
The Beelink SER3 Mini PC supports dual 4K@60Hz displays via its two HDMI ports. Connect two monitors to the HDMI ports on the rear panel. Windows will automatically detect the displays. You can configure display settings (extend, duplicate, etc.) through the Windows Display Settings.
5.3 Storage Expansion
The Mini PC comes with an installed 480GB M.2 PCIe NVMe 2280 SSD. You can expand storage by adding a 2.5-inch 7mm SATA HDD (not included) into the available slot.

Image: Internal view of the Beelink SER3 Mini PC, highlighting the M.2 PCIe slot and the 2.5-inch SATA HDD slot for storage expansion.
6. Maintenance
- Keep Clean: Regularly clean the exterior of the Mini PC with a soft, dry cloth. Ensure ventilation openings are free from dust and obstructions to prevent overheating.
- Software Updates: Keep your Windows operating system and drivers updated to ensure optimal performance and security.
- Environmental Conditions: Operate the Mini PC within the recommended temperature range of -10°C to 45°C and humidity of 30% to 90%. Store it between -20°C and 60°C with 10% to 90% humidity.
- Power Supply: Use only the original power adapter provided with the device.
7. Troubleshooting
- Q: What to do if a problem occurs while using the computer?
- A: Please contact Beelink support for assistance. Refer to the "Warranty and Support" section for contact details.
- Q: How to enter the BIOS?
- A: Press the Delete key repeatedly immediately after booting to enter the BIOS settings.
- Q: How to enter the boot options menu?
- A: Press the F7 key repeatedly immediately after booting to enter the boot options menu.
- Q: The Mini PC does not power on.
- A: Ensure the power adapter is securely connected to both the Mini PC and a working power outlet. Try a different outlet if necessary. If the issue persists, contact support.
- Q: No display output.
- A: Check that the HDMI cable is securely connected to both the Mini PC and the monitor. Ensure the monitor is powered on and set to the correct input source. Try a different HDMI port or cable if available.
8. Specifications
| Feature | Specification |
|---|---|
| Brand | Beelink |
| Model | SER3/3200U/8G/480G |
| Operating System | Windows 11 Pro |
| CPU Model | AMD Ryzen 3 3200U (2C/4T, 2.6GHz up to 3.5GHz) |
| Graphics Coprocessor | AMD Radeon Vega 3 Graphics (1200 MHz) |
| RAM Memory | 8GB DDR4 (Expandable up to 32GB) |
| Storage | 480GB M.2 PCIe NVMe 2280 SSD (Expandable with 2.5" SATA HDD) |
| Wireless Connectivity | WiFi 5 (802.11ac), Bluetooth 5.0 |
| LAN | 1000Mbps Gigabit Ethernet RJ45 |
| Video Output | 2x HDMI (4K@60Hz) |
| USB Ports | 4x USB 3.2 10Gbps |
| Audio | 1x Audio Jack (HP&MIC) |
| Dimensions | 124 x 113 x 42 mm |
| Operating Environment | -10°C to 45°C, 30% to 90% Humidity |
| Storage Environment | -20°C to 60°C, 10% to 90% Humidity |
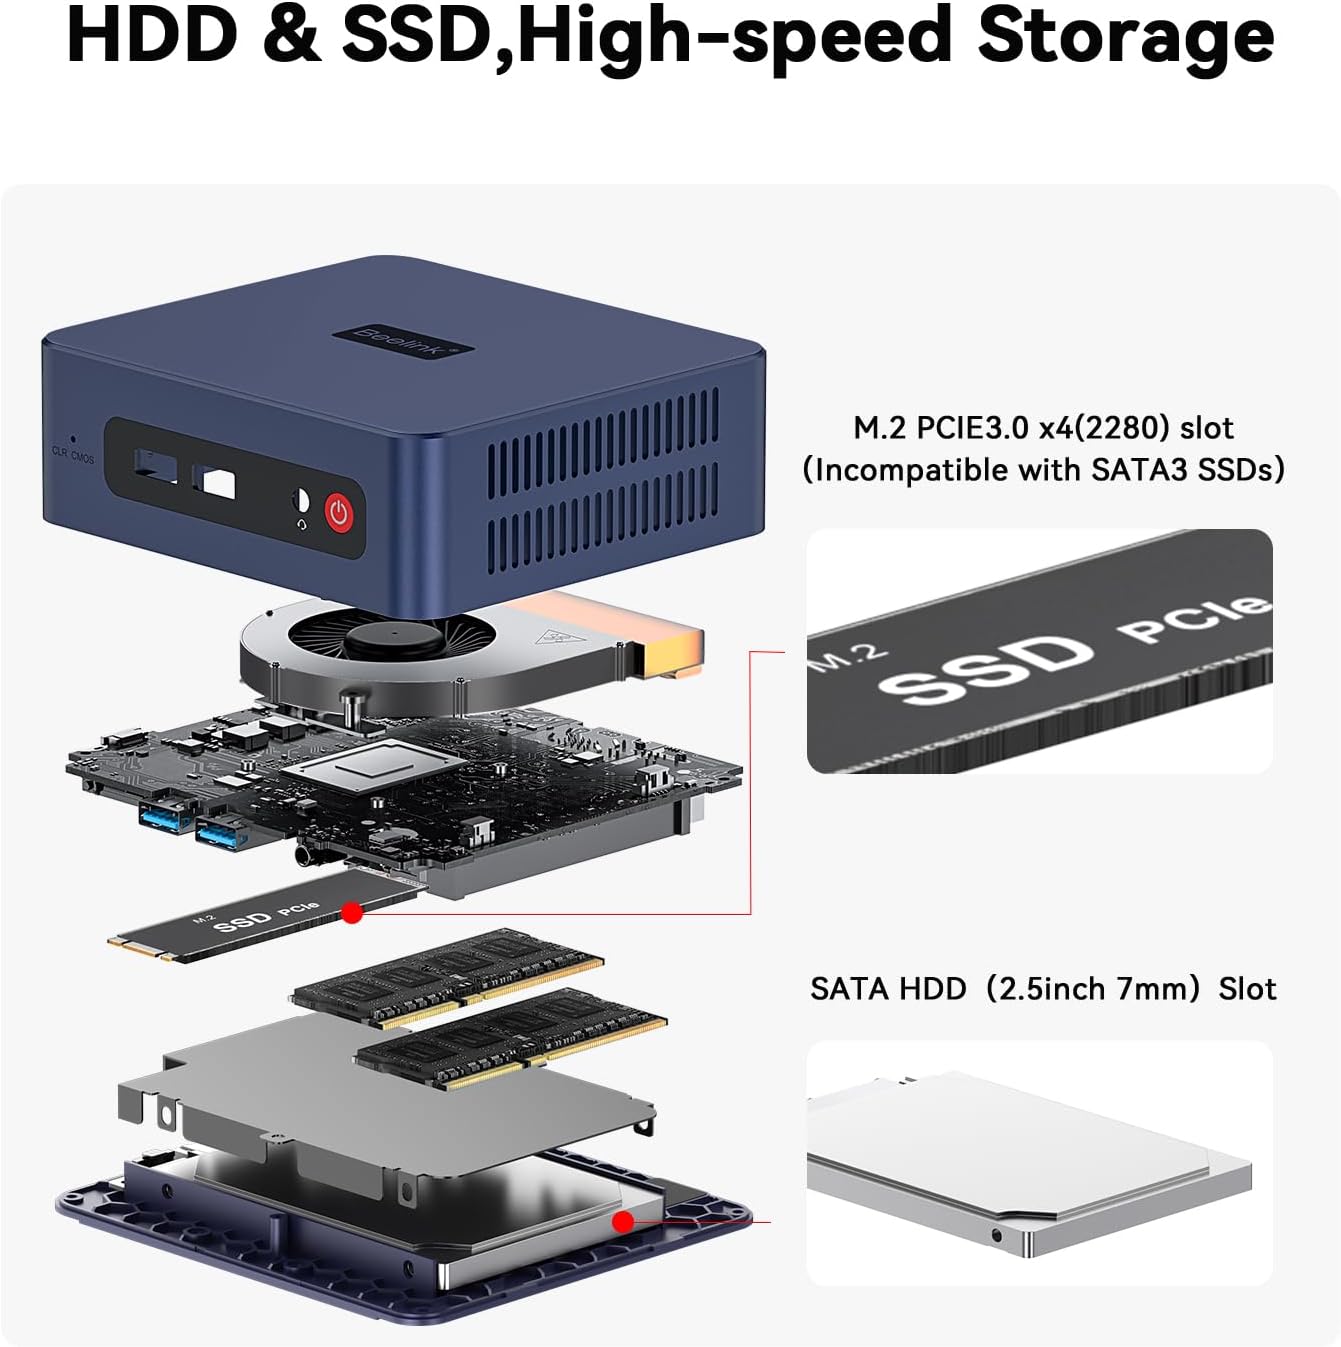
Image: Detailed product specification table for the Beelink SER3 Mini PC.
9. Warranty and Support
Beelink offers a 3-year warranty for this product. All Beelink Mini PCs have obtained FCC, CE, and RoHS certifications and have passed strict inspection before shipping.
For technical support or any questions regarding your Mini PC, please do not hesitate to contact Beelink customer service. We offer lifetime technical support and one-on-one customer service.
You can find more information and contact details on the official Beelink website or through your purchase platform.


