
1. Introduction
This manual provides instructions for the installation, configuration, and operation of the TP-Link TL-SX3206HPP 6-Port 10G L2+ Managed PoE Switch. This device is designed to provide high-speed network connectivity with Power over Ethernet (PoE++) capabilities, suitable for various network environments.
2. Safety Information
Please read and follow all safety instructions carefully before operating the device.
- Do not expose this device to water or excessive humidity.
- Do not attempt to disassemble, repair, or modify the device.
- Ensure proper ventilation around the device to prevent overheating.
- Use only the power adapter provided with the device.
- Install the device in a stable location, away from strong electromagnetic fields.
3. Package Contents
Verify that your package contains the following items:
- TL-SX3206HPP Switch
- Power Cord
- Installation Guide
- Rackmount Kit
- Rubber Feet
4. Physical Overview
4.1 Front Panel
The front panel of the TL-SX3206HPP features network ports, console ports, and LED indicators for status monitoring.

Image Description: This image displays the front panel of the TP-Link TL-SX3206HPP switch. It shows four RJ45 ports (1-4) supporting 100Mbps/1G/2.5G/5G/10G speeds with PoE++ capabilities, and two SFP+ slots (5-6) for 10G fiber connections. LED indicators for Power, PoE Max, System, and Fan status are visible, along with individual Speed, PoE, and Activity LEDs for each port. A console port (RJ45) and a Micro-USB console port are also present.
4.2 Rear Panel
The rear panel includes the power input and a grounding screw.

Image Description: This image shows the rear panel of the TP-Link TL-SX3206HPP switch. It features the AC power inlet (100-240V~ 50/60Hz 4.0A) and a grounding screw terminal. A Kensington lock slot is also visible on the left side.
4.3 Dimensions and Port Layout
Understanding the physical layout and dimensions is crucial for proper installation.

Image Description: This image provides a detailed view of the TP-Link TL-SX3206HPP switch, highlighting its dimensions and port types. The switch measures 294 mm in width, 180 mm in depth, and 44 mm in height. It clearly labels the four 10GE RJ45 802.3bt PoE++ ports (auto-negotiating 5-speed: 100Mbps/1G/2.5G/5G/10G), one RJ45 Console Port, one Micro-USB Console Port, and two 10G SFP+ slots.
5. Setup
5.1 Mounting the Switch
The TL-SX3206HPP can be placed on a desktop or mounted in a rack.
- Desktop Placement: Attach the included rubber feet to the bottom of the switch to prevent scratching and ensure stability.
- Rack Mounting: Use the provided rackmount kit to secure the switch in a standard 19-inch equipment rack.
5.2 Connecting the Power
Connect the provided power cord to the AC power inlet on the rear panel of the switch and then to a power outlet. Ensure the power source matches the voltage requirements (100-240V~ 50/60Hz).
5.3 Network Connections
- RJ45 Ports (1-4): Connect network devices such as computers, servers, or PoE-powered devices (e.g., Wi-Fi 6/6E/7 access points, IP cameras) using Ethernet cables. These ports support speeds up to 10 Gbps and provide PoE++ power (up to 60W per port, 200W total budget).
- SFP+ Slots (5-6): Insert compatible 10G SFP+ modules for fiber optic connections to other high-speed network devices or backbone infrastructure.
- Console Ports (RJ45/Micro-USB): Use these ports for command-line interface (CLI) management and initial configuration via a terminal emulator.
6. Operating Instructions
6.1 LED Indicators
Monitor the status of the switch using the front panel LEDs:
- PWR (Power): Indicates power status.
- SYS (System): Indicates system operational status.
- FAN: Indicates fan status.
- PoE Max: Indicates if the total PoE power budget is nearing its limit.
- Speed/Activity (per port): Indicates link speed and data activity.
- PoE/PoE Fault (per port): Indicates PoE status or fault condition.
6.2 Management Options
The TL-SX3206HPP offers flexible management:
- Web-based GUI: Access the switch's management interface via a web browser for graphical configuration.
- Command Line Interface (CLI): Use the console ports for advanced configuration via CLI.
- Omada SDN Integration: The switch can be managed centrally through TP-Link's Omada Software Defined Networking (SDN) platform. This allows for unified management of switches, access points, and gateways via an Omada Hardware Controller, Software Controller, or Cloud-based Controller. Standalone mode is also supported.

Image Description: This diagram illustrates the Omada SDN platform, showing how JetStream Switches, Omada Access Points (Wi-Fi 6, Ceiling Mount, Wall Plate, Outdoor), and Omada Routers can be centrally managed. The management options include a Unified Management Interface, Controllers (hardware or software), and Cloud Access, providing flexible control over the entire network.
7. Advanced Features
The TL-SX3206HPP supports a range of L2+ features for enhanced network control and security:
- 802.1Q VLAN: Segment your network into smaller, isolated broadcast domains to improve security and performance.
- IP-MAC-Port Binding: Enhance security by binding specific IP addresses and MAC addresses to individual ports.
- Access Control List (ACL): Define rules to filter network traffic based on various criteria.
- Port Security: Limit the number of MAC addresses allowed on a port to prevent unauthorized access.
- DoS Defend: Protect the network from Denial of Service attacks.
- Storm Control: Prevent network performance degradation caused by broadcast, multicast, or unknown unicast storms.
- DHCP Snooping: Prevent unauthorized DHCP servers from providing IP addresses.
- 802.1X Radius Authentication: Provide centralized authentication for network access.
- IPv6 & Static Routing: Support for modern network protocols and basic routing capabilities.
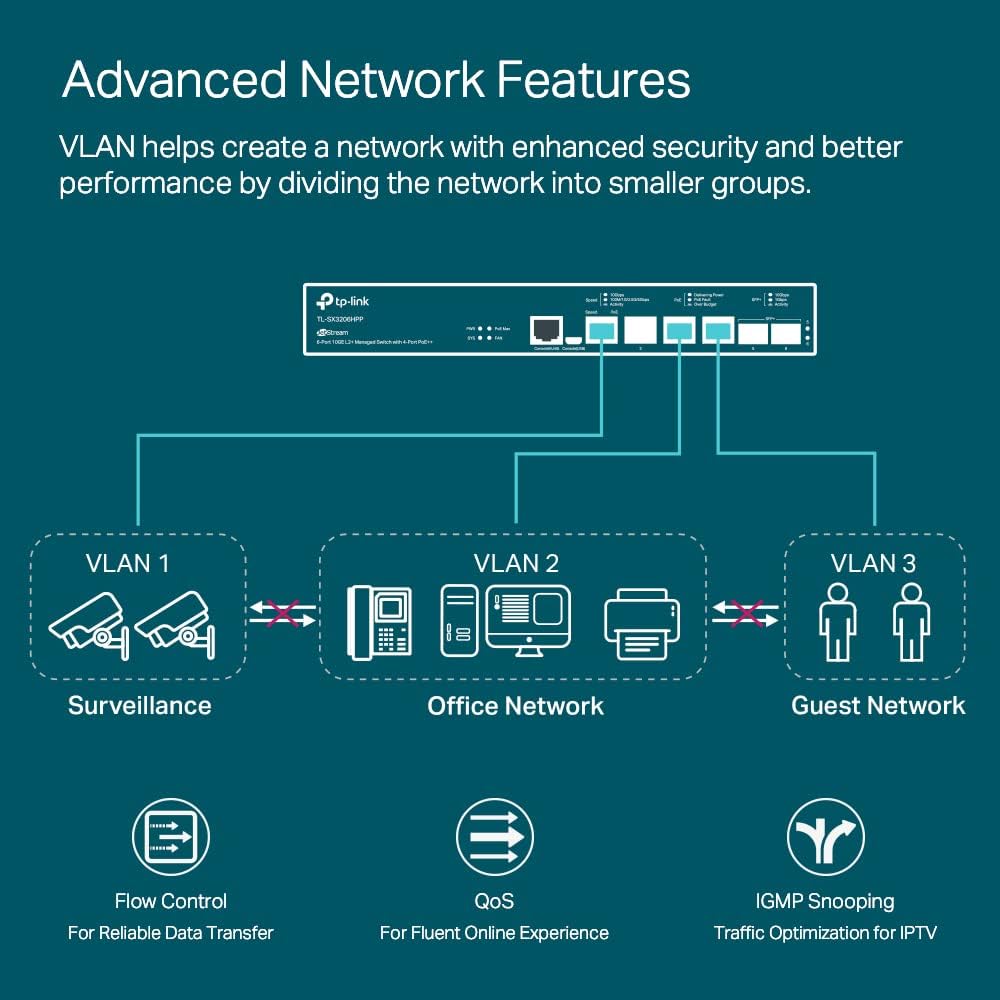
Image Description: This diagram illustrates advanced network features, specifically VLANs. It shows a network divided into three VLANs (VLAN 1 for Surveillance, VLAN 2 for Office Network, VLAN 3 for Guest Network), demonstrating how VLANs enhance security and performance by segmenting traffic. Additional icons represent Flow Control, QoS, and IGMP Snooping.
8. Maintenance
- Cleaning: Regularly clean the device with a dry, soft cloth. Do not use liquid or aerosol cleaners.
- Firmware Updates: Check the TP-Link official website periodically for firmware updates to ensure optimal performance and security.
- Environmental Conditions: Ensure the operating environment stays within the specified temperature (0–45°C) and humidity ranges.
9. Troubleshooting
- No Power: Ensure the power cord is securely connected to both the switch and a working power outlet. Verify the power outlet is active.
- No Link/Activity LED: Check the Ethernet cable connections. Ensure the connected device is powered on and functioning correctly. Verify port settings in the management interface.
- PoE Device Not Powering On: Confirm the connected device is PoE compatible and within the PoE++ power budget (60W per port, 200W total). Check the PoE LED for any fault indications.
- Fan Noise: The switch may produce audible fan noise, especially during startup or under heavy load. This is normal operation. If fan noise is excessive or constant at idle, ensure proper ventilation and check for obstructions.
- Accessing Management Interface: If unable to access the web GUI, verify your computer's IP address is in the same subnet as the switch. Try clearing your browser's cache or using a different browser. For CLI access, ensure correct serial port settings.
10. Specifications
| Feature | Specification |
|---|---|
| Model Number | TL-SX3206HPP |
| Number of Ports | 6 (4x 10Gbps RJ45 PoE++, 2x 10G SFP+ Slots) |
| PoE Standard | 802.3bt/at/af (PoE++) |
| Max PoE Power per Port | 60W |
| Total PoE Budget | 200W |
| Data Transfer Rate | 10 Gigabits Per Second |
| Interface Type | PoE, RJ45, SFP+ |
| Dimensions (L x W x H) | 11.57 x 7.09 x 1.73 inches (294 x 180 x 44 mm) |
| Item Weight | 4.07 pounds (1.85 Kilograms) |
| Case Material | Metal |
| Voltage | 100-240 Volts (AC) |
| Operating Temperature | 0–45 Degrees Celsius |
| UPC | 840030702570 |
11. Warranty and Support
11.1 Manufacturer Warranty
This TP-Link TL-SX3206HPP switch comes with a 5-year manufacturer warranty. Please refer to the official TP-Link website for detailed warranty terms and conditions.
11.2 Technical Support
For technical assistance, product registration, or to download the latest firmware and user manuals, please visit the official TP-Link support website or contact their support team:
- Support Website: TP-Link Support
- User Manual (PDF): Download User Manual
- Installation Manual (PDF): Download Installation Manual


