
Yottamaster PS500RU3-RAID
Yottamaster 5-Bay RAID Hard Drive Enclosure
Model: PS500RU3-RAID
Brand: Yottamaster
Introduction
This manual provides comprehensive instructions for the installation, operation, and maintenance of your Yottamaster 5-Bay RAID Hard Drive Enclosure (Model: PS500RU3-RAID). This device is designed to provide a reliable and flexible external storage solution for both 2.5-inch and 3.5-inch SATA HDDs and SSDs, supporting various RAID configurations for data management and protection.
Please read this manual thoroughly before using the product to ensure proper setup and optimal performance.
Package Contents
- Yottamaster 5-Bay RAID Hard Drive Enclosure (PS500RU3-RAID)
- USB 3.0 Type-B to Type-A Cable
- 12V/6.5A Power Adapter
- Screws for HDD/SSD installation
- Screwdriver
- User Manual (this document)
Setup
1. Hard Drive Installation
- Open the Enclosure Door: Press the push latch located in the middle of the right side of the front panel to open the enclosure door. This design allows for easy access to the drive bays.

Image: Demonstrates the 'Push to Open Door Latch' mechanism on the Yottamaster enclosure.
- Insert Hard Drives: Pull out the empty drive trays. Place your 2.5-inch or 3.5-inch SATA HDD/SSD into the tray, aligning the screw holes. Secure the drive to the tray using the provided screws and screwdriver. Slide the loaded tray back into the enclosure until it clicks into place.

Image: Illustrates the installation of 2.5-inch SSDs and 3.5-inch HDDs into the removable trays of the 5-bay enclosure.
2. RAID Mode Configuration (Hardware RAID)
The enclosure supports hardware RAID configuration using DIP switches located at the rear. Before configuring RAID, ensure all hard drives are unformatted and back up any existing data, as this process will erase all data on the drives.
- Identify RAID Switch: Locate the RAID DIP switch block on the rear panel of the enclosure.
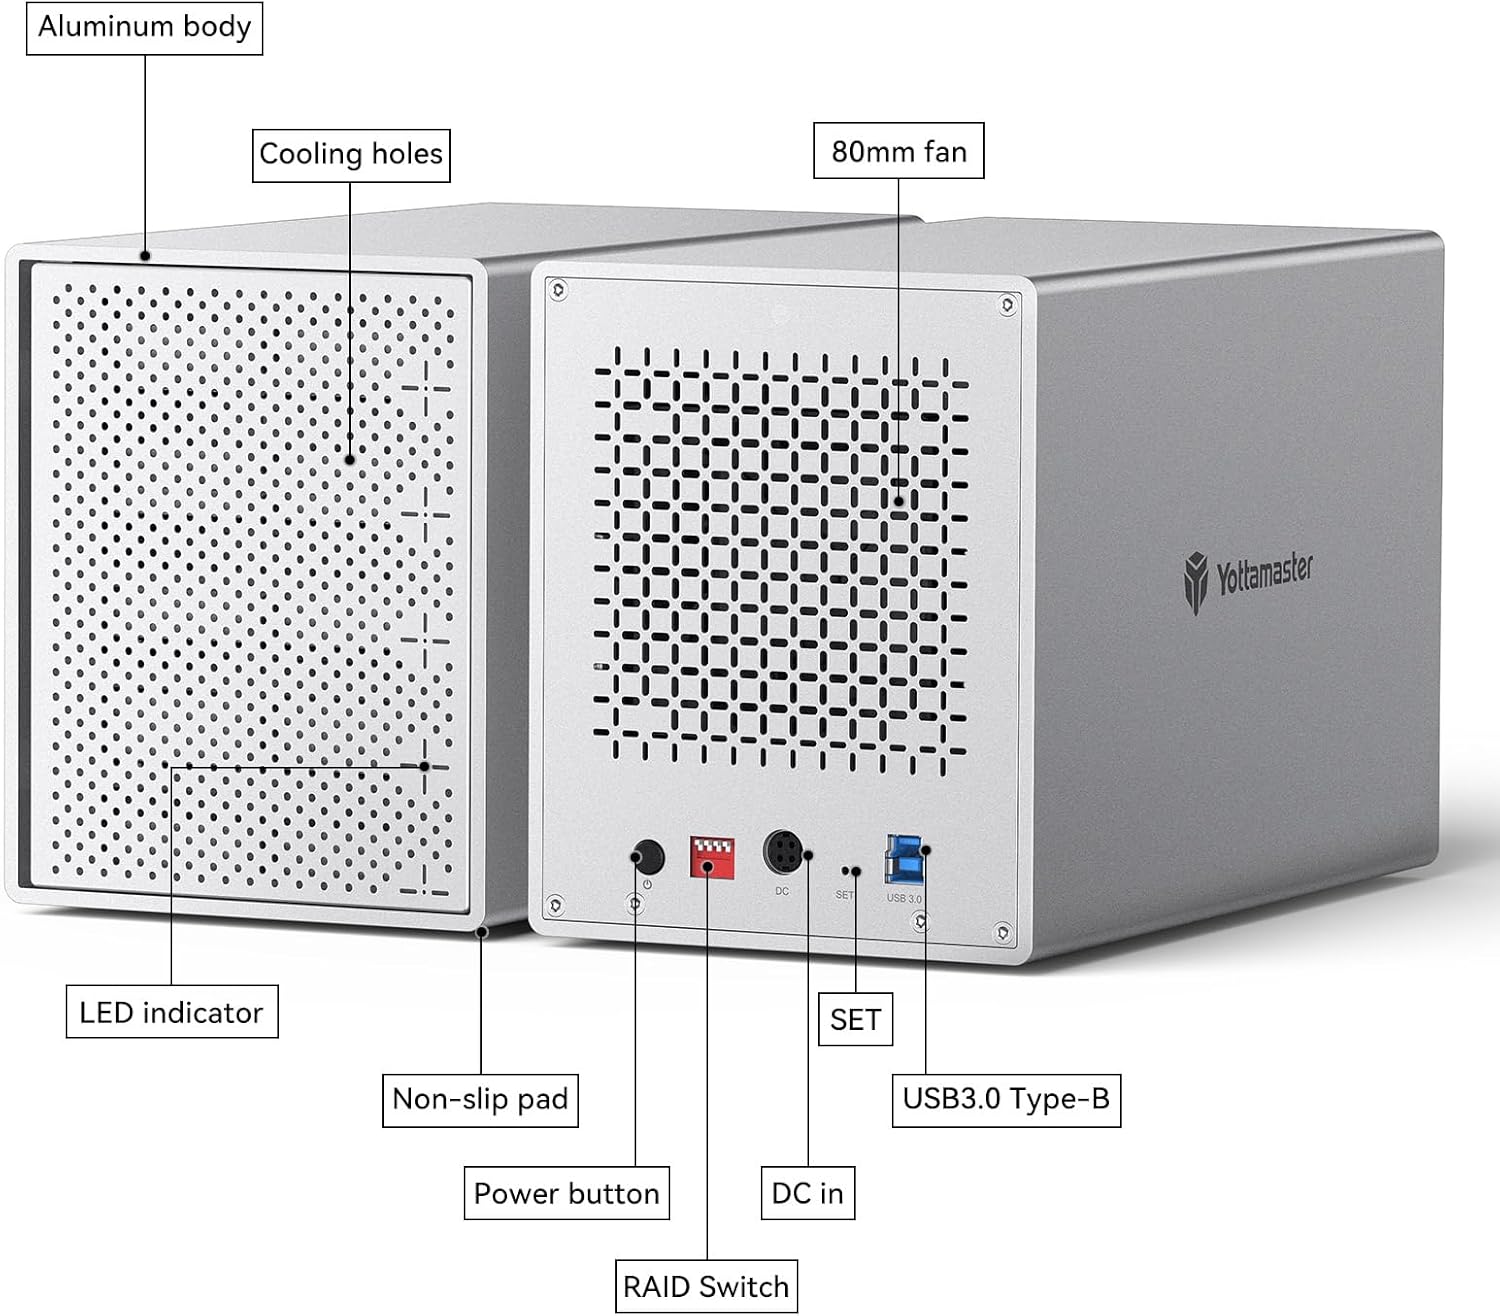
Image: Detailed rear view of the Yottamaster enclosure, highlighting the RAID switch, power button, DC input, and USB 3.0 Type-B port.
- Set Desired RAID Mode: Refer to the diagram below to set the DIP switches (1-4) to your desired RAID mode. Each mode offers different levels of security and speed.

Image: Visual guide on how to configure different RAID modes (RAID 0, 1/10, 3, 5, Span, Normal/Clear) using the DIP switches.
Image: Table illustrating RAID modes with their minimum disk requirements, security levels, and relative speeds.
- Activate RAID Setting:

Image: Step-by-step instructions for setting up hardware RAID, including toggling switches, holding the SET button during power-on, and formatting the drive.
- Toggle the RAID MODE Switch to the desired RAID mode.
- While holding the "SET" key, power on the device.
- Approximately 15 seconds later, the indicator light will flash red and blue alternately.
- Release the "SET" key.
- Connect the enclosure to your computer and use Disk Management (Windows) or Disk Utility (Mac) to format and partition your hard drive(s).
3. Connection
- Connect Power Adapter: Plug the 12V/6.5A power adapter into the DC IN port on the rear of the enclosure and then into a power outlet.

Image: Demonstrates connecting the 12V/6.5A external power supply to the Yottamaster enclosure.
- Connect to Computer: Use the provided USB 3.0 Type-B to Type-A cable to connect the enclosure's USB 3.0 Type-B port to a USB port on your computer.

Image: The Yottamaster enclosure connected to a MacBook Pro, illustrating its 5Gbps transfer speed capability.
Operating Instructions
Power On/Off
- To power on the enclosure, press the power button on the rear panel. The LED indicator will illuminate.
- To power off, press and hold the power button until the device shuts down.
Data Transfer
Once connected and recognized by your computer, the enclosure will appear as an external drive. You can now drag and drop files, or use your preferred backup software to transfer data to and from the enclosure. The USB 3.0 interface provides transfer speeds up to 5Gbps.
Compatibility
The Yottamaster PS500RU3-RAID is compatible with most Windows, Mac, and Linux operating systems.
Maintenance
Cooling System
The enclosure features an 80mm intelligent temperature control fan and a rugged aluminum-alloy shell with cooling holes to ensure optimal heat dissipation and stable operation. The fan adjusts its speed automatically based on the hard drive's temperature, providing efficient cooling with low noise.

Image: Depicts the internal 80mm cooling fan and improved airflow pattern within the Yottamaster enclosure.
Cleaning
To clean the exterior of the enclosure, use a soft, dry cloth. Do not use liquid cleaners or aerosols, as they may damage the device. Ensure the device is powered off and disconnected from all power sources before cleaning.
Troubleshooting
- Enclosure not recognized by computer:
- Ensure the power adapter is securely connected and the enclosure is powered on.
- Verify the USB cable is properly connected to both the enclosure and the computer. Try a different USB port or cable.
- If using a brand new hard drive, it may need to be formatted and partitioned before it can be recognized by the operating system. Access Disk Management (Windows) or Disk Utility (Mac) to initialize and format the drive(s). Remember to back up any data on existing drives before formatting.
- Check the RAID mode settings. Incorrect RAID configuration or uninitialized drives can prevent recognition.
- Slow transfer speeds:
- Ensure you are connected to a USB 3.0 (or higher) port on your computer. Connecting to a USB 2.0 port will limit speeds.
- The actual transfer speed can be affected by the performance of the installed hard drives/SSDs and the computer's system resources.
- Drives not appearing after RAID setup:
- After setting the hardware RAID mode, you must initialize and format the drives through your operating system's disk management utility.
- Ensure the RAID mode was set correctly according to the DIP switch diagram and the 'SET' button procedure was followed.
Specifications
| Feature | Detail |
|---|---|
| Model | PS500RU3-RAID |
| Brand | Yottamaster |
| Number of Bays | 5 |
| Compatible Drives | 2.5" / 3.5" SATA HDD/SSD |
| Max Capacity Supported | 90TB (5 x 18TB) |
| RAID Modes | RAID 0, 1, 3, 5, 10, JBOD (SPAN), CLONE, Normal/Clear |
| Interface | USB 3.0 (USB 3.1 protocol) Type-C |
| Transfer Rate | Up to 5Gbps |
| Cooling System | 80mm Intelligent Temperature Control Fan |
| Material | Aluminum-Alloy |
| Power Supply | 12V/6.5A External Power Adapter |
| Compatible OS | Windows, Mac, Linux |
| Item Weight | 7.83 pounds |
| Package Dimensions | 12.13 x 11.02 x 7.4 inches |
Warranty Information
This Yottamaster product comes with a 2-year limited warranty from the date of purchase. This warranty covers defects in materials and workmanship under normal use. It does not cover damage caused by accident, misuse, abuse, neglect, improper installation, or unauthorized repair or modification.
For warranty claims or service, please retain your proof of purchase.

Image: A shield graphic indicating a 2-year warranty.
Customer Support
For further assistance, technical support, or to explore other Yottamaster products, please visit the official Yottamaster store or contact their customer service.
Yottamaster Official Store: Visit Store
Related documentsPS500RU3-RAID


Ask a question about this manual
Ask about setup, troubleshooting, compatibility, parts, safety, or missing instructions. Manuals+ will review the question and use this page’s manual context to help answer it.