
1. Introduction
This manual provides detailed instructions for the setup, operation, and maintenance of your Riworal Wireless Microphone System. This dual-channel UHF wireless microphone system is designed for various audio applications, including karaoke, public speaking, meetings, and performances. It features Bluetooth connectivity, independent volume controls, and echo adjustment for an enhanced audio experience.

Image 1.1: The Riworal Wireless Microphone System, featuring two handheld microphones and the main receiver unit.
2. Package Contents
Verify that all items listed below are included in your package. If any items are missing or damaged, please contact customer support.
- 1 x Receiver Box
- 2 x Wireless Microphones
- 2 x Antennas
- 1 x USB Power Adapter
- 1 x USB to Type-C Charging Cable
- 1 x 3.5mm to 3.5mm Audio Cable
- 1 x 3.5mm to RCA R/L Cable
- 2 x Antiskid Rings (for microphones)
- 1 x Coaxial Cable
- 2 x Optical Cables
- 1 x User Manual (this document)
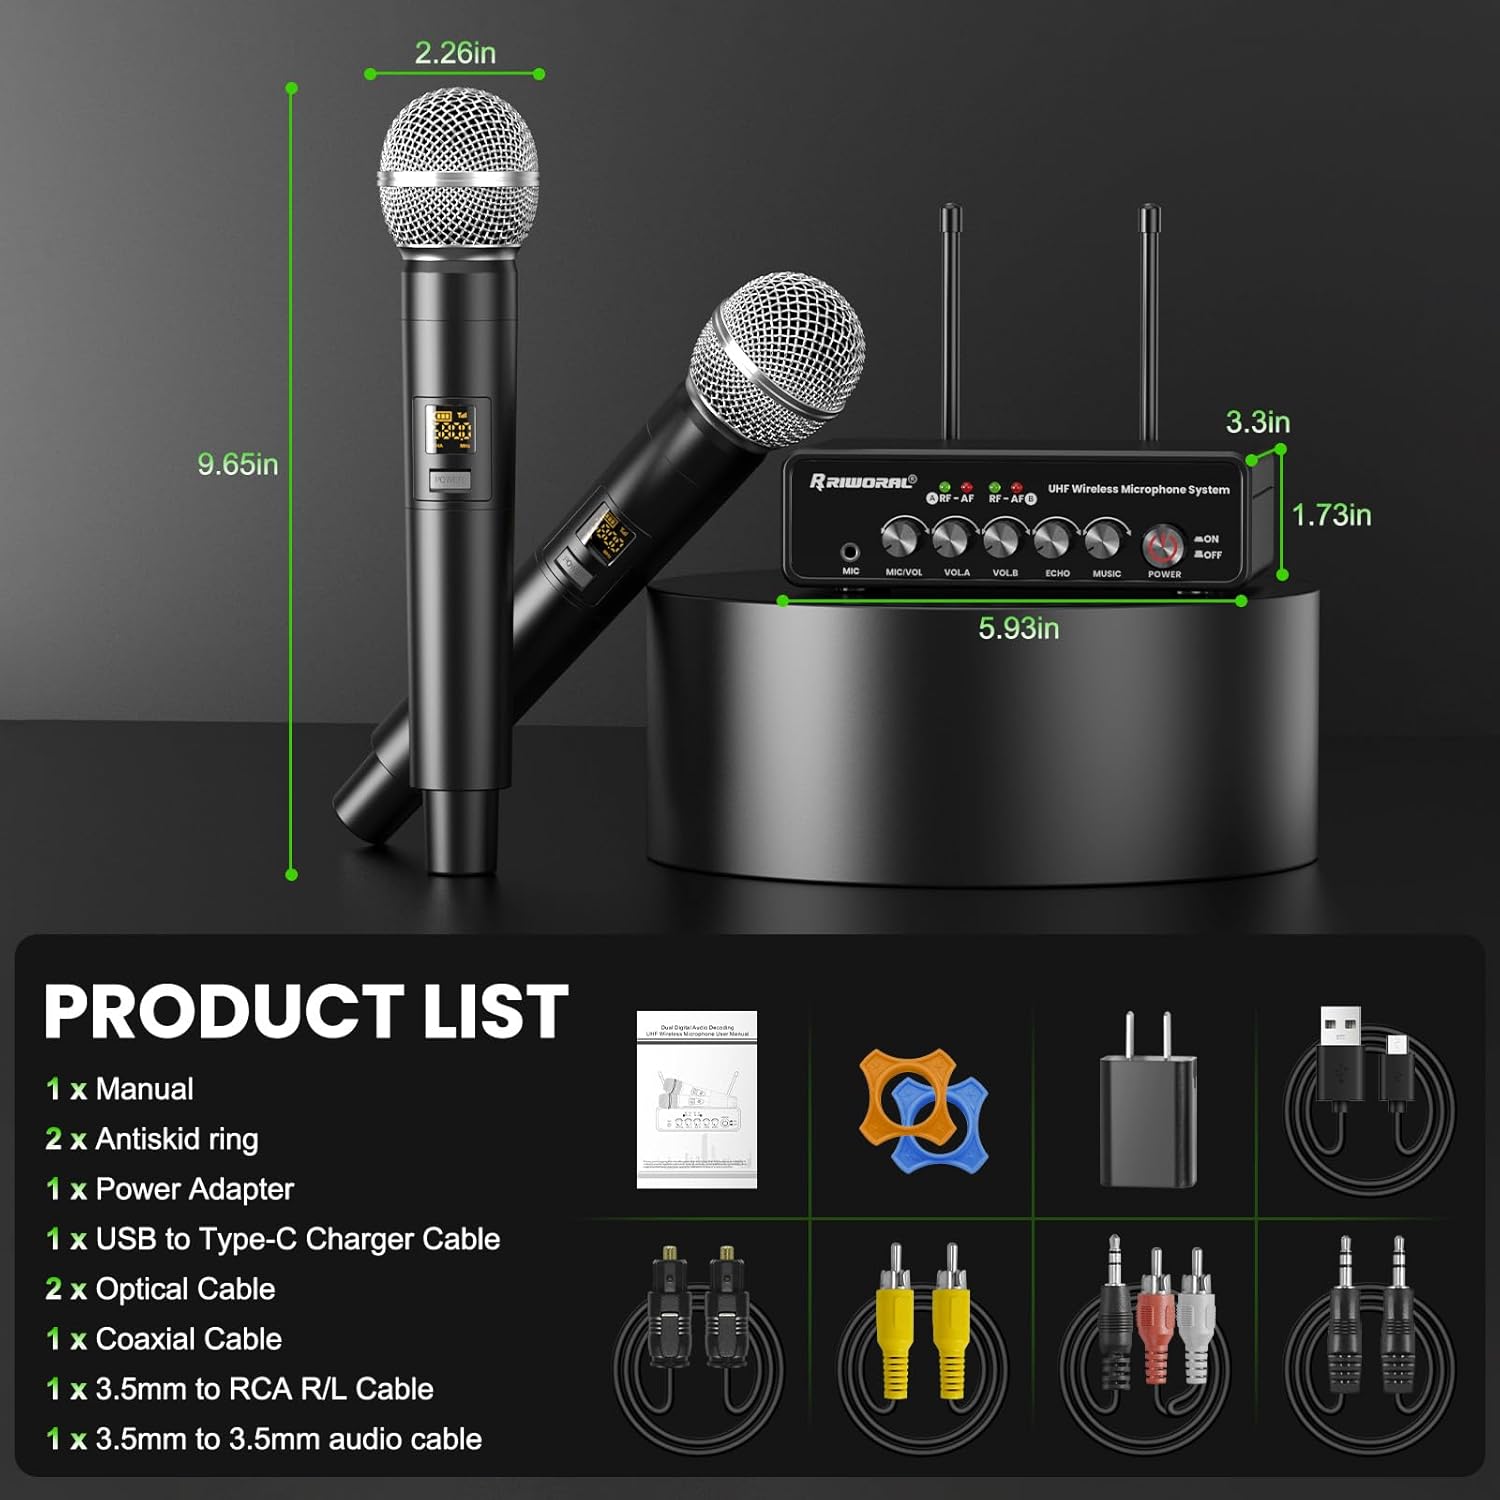
Image 2.1: Visual representation of all components included in the Riworal Wireless Microphone System package.
3. Product Overview
3.1 Receiver Box
The receiver box is the central unit for managing microphone signals and audio inputs/outputs. It features various ports and controls for connectivity and sound adjustment.
- DC 5V Input: Power connection port.
- Audio Input: 3.5mm jack for external audio sources.
- Coaxial Input: For digital audio input.
- Optical Input: For digital audio input from devices like Smart TVs.
- Audio Output: For connecting to amplifiers or speakers.
- Optical Output: For digital audio output.
- Antenna Ports (ANT.A, ANT.B): For connecting the wireless antennas.
- MIC/VOL Knob: Adjusts the volume of a wired microphone (if connected).
- VOL.A Knob: Adjusts the volume of Wireless Microphone A.
- VOL.B Knob: Adjusts the volume of Wireless Microphone B.
- ECHO Knob: Adjusts the echo effect level.
- MUSIC Knob: Adjusts the volume of background music.
- POWER Button: Turns the receiver unit on or off.
- AF/RF Indicators: Signal indicators for audio frequency (AF) and radio frequency (RF).
3.2 Wireless Microphones
The system includes two handheld wireless microphones, each with its own controls and display.
- Metal Grill: Protects the microphone capsule.
- Frequency Band Display: Shows current frequency and battery level.
- ON/OFF Switch: Powers the microphone on or off.
- Frequency Button: Used for changing the microphone's operating frequency.
- Battery Cover: Access for AA battery installation.

Image 3.1: Detailed view of a wireless microphone, highlighting its metal grill, display, power switch, frequency button, and battery compartment.
4. Setup Instructions
Follow these steps to set up your Riworal Wireless Microphone System.
4.1 Initial Connection
- Connect the two antennas to the ANT.A and ANT.B ports on the rear of the receiver box.
- Connect the USB power adapter to the DC 5V input on the receiver box, then plug it into a power outlet.
- Press the POWER button on the receiver box to turn it on. The power indicator light will illuminate.
- Install two AA batteries (not included) into each wireless microphone. Ensure correct polarity.
- Turn on each wireless microphone using its ON/OFF switch. The display will show the frequency and battery level.
4.2 Connecting to Audio Devices
The system offers multiple ways to connect to your audio output device (e.g., amplifier, soundbar, home theater system) and input devices (e.g., smartphone, PC, Smart TV).

Image 4.1: Connection diagrams for power, audio input, and audio output.
4.2.1 Audio Output Connection
- Using 3.5mm Audio Output: Connect the 3.5mm to 3.5mm cable or 3.5mm to RCA R/L cable from the receiver's AUDIO OUTPUT to your amplifier or speaker's audio input.
- Using Optical Output: Connect an optical cable from the receiver's OPTICAL OUTPUT to your active speaker, home theater, or Smart TV's optical input.
4.2.2 Audio Input Connection (for background music)
You can play background music through the system using Bluetooth or wired connections. Only one wired input method can be used at a time.
- Bluetooth Connection:
- Ensure the receiver box is powered on.
- On your Bluetooth device (smartphone, PC, Smart TV, tablet), search for Bluetooth devices.
- Select the device named "X7" to pair. Once paired, you can play music from your device through the system.
- Wired Audio Input:
- 3.5mm Audio Port: Connect a 3.5mm audio cable from your mobile phone, PC, or tablet to the receiver's AUDIO INPUT.
- Coaxial Port: Connect a coaxial cable from your DVD player, Smart TV, or set-top box to the receiver's COAXIAL INPUT.
- Optical Port: Connect an optical cable from your Smart TV or set-top box to the receiver's OPTICAL INPUT.

Image 4.2: Compatibility chart for various audio input and output devices.
5. Operating Instructions
5.1 Power On/Off Sequence
- Optimum Boot Order: Audio Mixer > Audio Amplifier > Speaker > Receiver > Microphone
- Optimum Shutdown Order: Microphone > Receiver > Speaker > Audio Amplifier > Audio Mixer
5.2 Volume Adjustment
Use the corresponding knobs on the receiver box to adjust audio levels:
- VOL.A: Adjusts the volume of Wireless Microphone A.
- VOL.B: Adjusts the volume of Wireless Microphone B.
- MIC/VOL: Adjusts the volume of an optional third wired microphone (if connected to the 3.5mm MIC input).
- MUSIC: Adjusts the volume of the background music playing via Bluetooth or wired input.
5.3 Echo Effect
Rotate the ECHO knob on the receiver box to increase or decrease the echo effect applied to the microphone audio.
5.4 Microphone Frequency Adjustment
The wireless microphones operate on UHF frequencies. The system supports approximately 15 channels and allows up to 8 sets of microphone systems to be used together without significant interference. If you experience interference, press the Frequency Button on the microphone to change its operating channel.
6. Maintenance
- Cleaning: Use a soft, dry cloth to clean the receiver box and microphones. Do not use liquid cleaners or solvents.
- Battery Replacement: Replace AA batteries in the microphones when the battery indicator on the microphone display shows low power. Always use fresh, high-quality batteries for optimal performance and longevity.
- Storage: When not in use for extended periods, remove batteries from the microphones and store the system in a cool, dry place away from direct sunlight and extreme temperatures.
7. Troubleshooting
- No Sound from Microphones:
- Ensure microphones are powered on and have fresh batteries.
- Check if the receiver box is powered on.
- Verify that the antennas are properly connected to the receiver.
- Adjust VOL.A and VOL.B knobs on the receiver.
- Ensure the audio output cable from the receiver is securely connected to your amplifier/speaker and the amplifier/speaker is on and set to the correct input.
- Try changing the microphone frequency using the Frequency Button on the microphone.
- No Background Music:
- If using Bluetooth, ensure your device is paired with "X7" and Bluetooth is enabled.
- If using wired input, ensure the cable is securely connected to the correct input port (Audio, Coaxial, or Optical) and the source device is playing audio.
- Adjust the MUSIC knob on the receiver.
- Interference or Poor Sound Quality:
- Ensure microphones are within the operating range (160-260ft).
- Change the microphone frequency.
- Ensure no other strong wireless signals are nearby.
- Check battery levels in microphones. Low batteries can affect signal strength.
- Bluetooth Connectivity Issues with Apple Devices:
- Some users have reported Bluetooth connectivity issues with Apple devices. Ensure your Apple device's Bluetooth is updated and try restarting both the device and the microphone system. If issues persist, consider using a wired audio input connection for music.
8. Specifications
| Feature | Specification |
|---|---|
| Model Number | Karaoke Portable Systems |
| Item Weight | 2.92 pounds |
| Product Dimensions | 11.61 x 10.04 x 2.44 inches |
| Wireless Microphone Frequency | 560 MHz |
| Wireless Range | 160ft (50m) - 260ft (80m) |
| Bluetooth Connection Distance | 32.8ft (10m) |
| Microphone Power Source | 2 x AA Batteries (per mic, not included) |
| Receiver Power Source | USB 5V |
| Compatible Devices | Amplifier, Smart TV, PC, Mobile Phone, Tablet, DVD Player, Karaoke Machine, Set-top Box, Active Speaker, Home Theater |
| Material Type | Metal, Plastic |
9. Safety Information
- Do not expose the device to rain or moisture.
- Avoid placing the device near heat sources or in direct sunlight.
- Do not disassemble or attempt to repair the device yourself. Refer all servicing to qualified personnel.
- Use only the provided power adapter or a certified equivalent.
- Dispose of batteries properly according to local regulations.
10. Support
For any questions, concerns, or technical assistance regarding your Riworal Wireless Microphone System, please contact Riworal customer support directly. Your feedback is valuable for product improvement.
Please refer to the contact information provided with your purchase or visit the official Riworal website for support details.
