
1. Introduction
This manual provides detailed instructions for the safe and effective use of your LMVVC MAS-501 Pet Grooming Kit with Vacuum Suction. Please read this manual thoroughly before operation and retain it for future reference.
2. Safety Instructions
- Always ensure the device is unplugged before cleaning or performing maintenance.
- Do not immerse the main unit in water or other liquids.
- Keep out of reach of children and pets when not in use.
- Use only the provided attachments and accessories.
- Do not operate the device if it is damaged or malfunctioning. Contact customer support.
- Ensure your pet is calm and comfortable before grooming to prevent injury.
- Avoid grooming sensitive areas of your pet without proper care.
3. Package Contents
Verify that all items are present in your package:
- Main Vacuum Unit with 2.3L Dust Cup
- Flexible Hose
- Electric Clipper with 4 Clipper Guards (3mm, 9mm, 16mm, 24mm)
- Slicker Brush
- Deshedding Tool/Comb
- Cleaning Brush (for fabric/upholstery)
- Crevice Tool (for cleaning gaps)
- Power Adapter
- User Manual (this document)
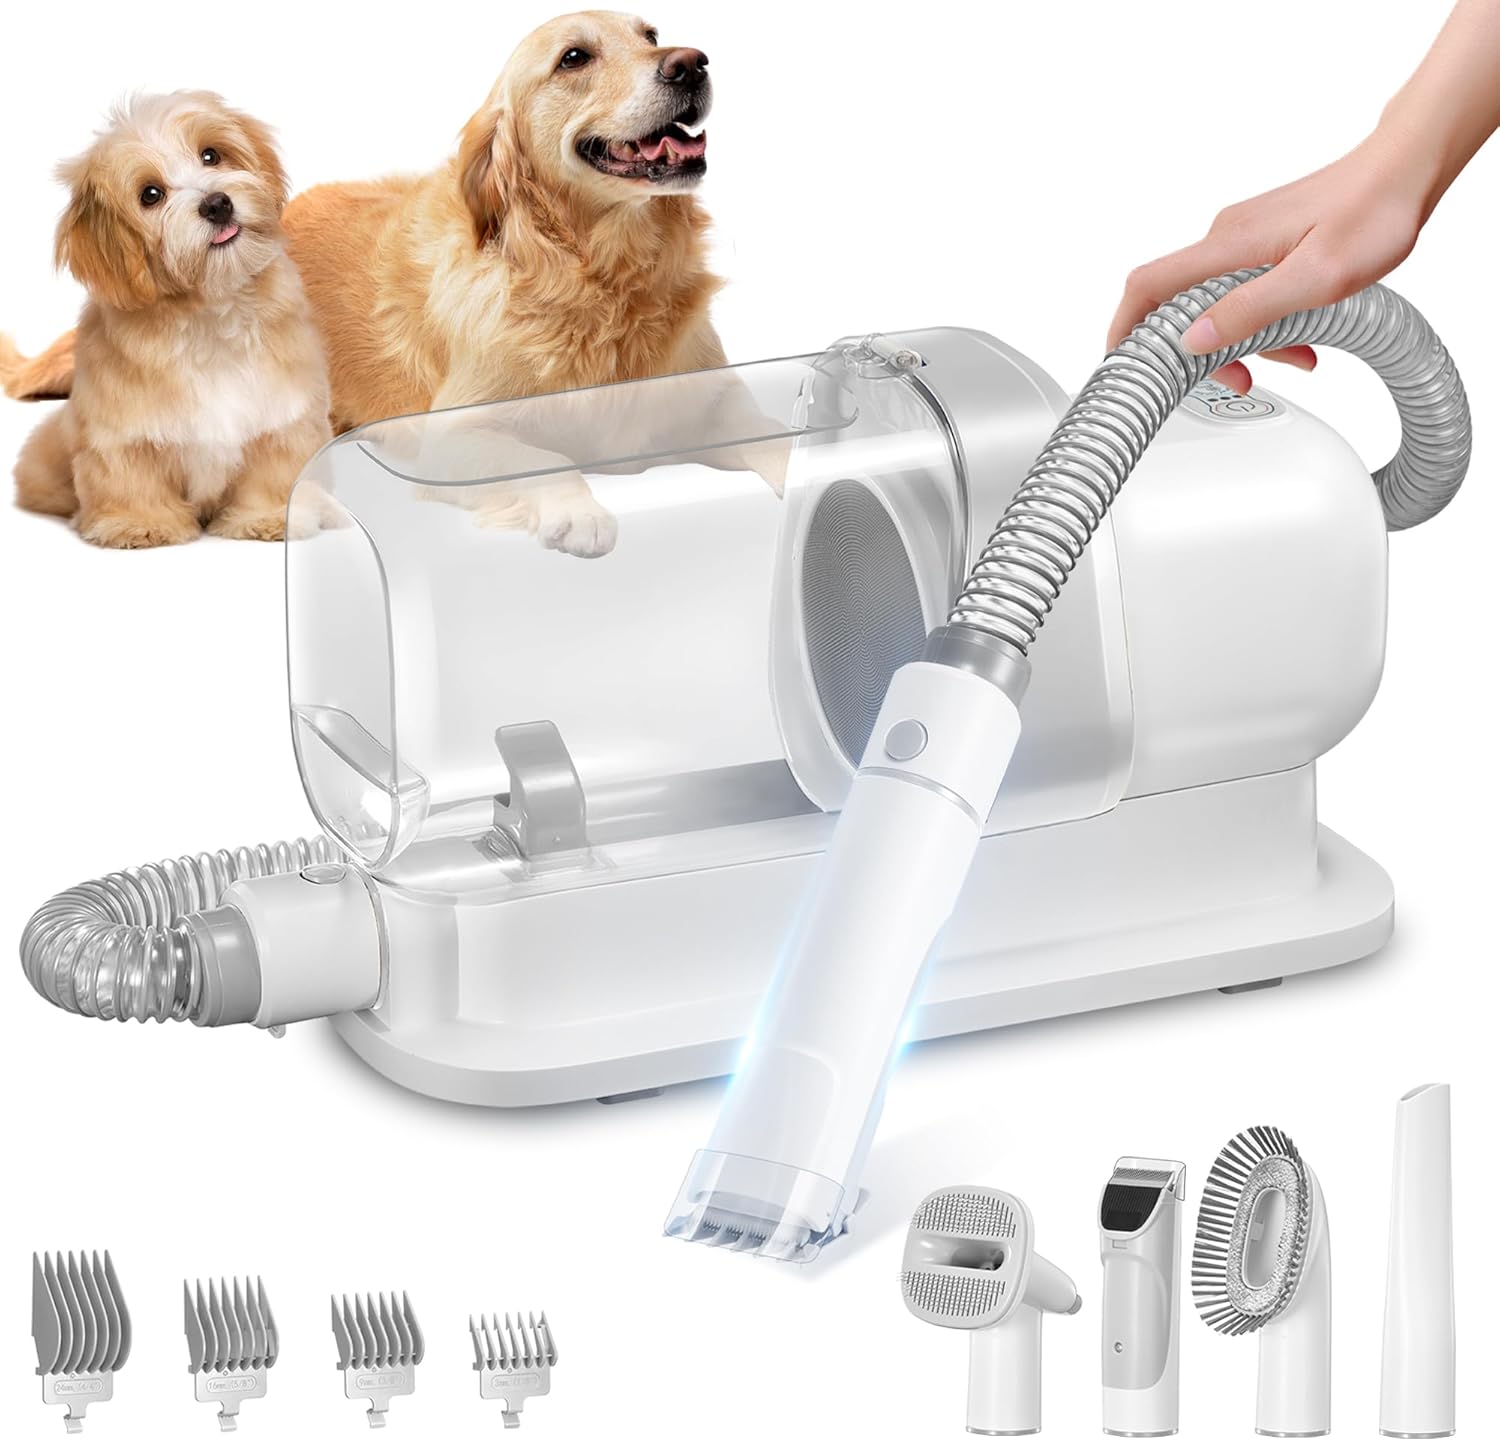
Figure 3.1: Overview of the LMVVC Pet Grooming Kit and its components.
4. Product Overview
The LMVVC MAS-501 is a comprehensive pet grooming system designed to capture up to 99% of pet hair during grooming, minimizing mess. It features a low-noise vacuum unit and multiple interchangeable tools for various grooming tasks.

Figure 4.1: Illustration of the vacuum suction mechanism and low-noise operation.
4.1 Main Unit Features
- 2.3L Dust Cup: Large capacity for extended grooming sessions without frequent emptying.
- Low Noise Operation: Engineered to be quieter than a typical hairdryer, reducing pet anxiety.
- Adjustable Suction: Multiple power levels to suit different grooming needs and pet sensitivities.
4.2 Attachment Descriptions
- Electric Clipper: For trimming and cutting pet hair to desired lengths. Comes with various guard sizes.
- Slicker Brush: Ideal for removing loose hair, tangles, and mats, promoting a healthy coat.
- Deshedding Tool: Effectively removes undercoat and loose hair, reducing shedding.
- Cleaning Brush: For vacuuming pet hair from furniture, carpets, and clothing.
- Crevice Tool: Designed for cleaning tight spaces and corners where pet hair accumulates.

Figure 4.2: The five primary grooming and cleaning attachments.
5. Setup and Assembly
Follow these steps to prepare your grooming kit for use:
- Unpack all components from the packaging.
- Place the main vacuum unit on a stable, flat surface.
- Connect the flexible hose to the designated port on the main unit. Ensure it clicks securely into place.
- Select the desired grooming tool (e.g., slicker brush, clipper) and attach it firmly to the end of the flexible hose.
- If using the electric clipper, select the appropriate clipper guard (3mm, 9mm, 16mm, or 24mm) and attach it to the clipper head.
- Connect the power adapter to the main unit and then plug it into a standard electrical outlet.

Figure 5.1: Attaching clipper guards for various hair lengths.
6. Operating Instructions
Before starting, ensure your pet is calm and accustomed to the sound of the vacuum. You may want to introduce the device gradually.
6.1 Powering On and Adjusting Suction
- Press the power button on the main unit to turn on the device.
- Adjust the suction level using the control buttons (usually indicated by +/- or speed settings) to a comfortable level for your pet and the task. Start with the lowest setting and increase as needed.
6.2 Using Grooming Tools
- Slicker Brush / Deshedding Tool: Gently brush your pet's coat in the direction of hair growth. The vacuum will automatically collect loose hair.
- Electric Clipper:
- Ensure the desired clipper guard is attached.
- Hold the clipper flat against your pet's coat and move it smoothly against the direction of hair growth for an even cut.
- For best results, groom a clean, dry pet.
- Cleaning Brush / Crevice Tool: Use these attachments to vacuum pet hair from furniture, carpets, pet beds, and hard-to-reach areas.

Figure 6.1: The grooming brush effectively collects loose hair.
7. Maintenance and Cleaning
Regular cleaning ensures optimal performance and extends the life of your grooming kit.
7.1 Emptying the Dust Cup
- Turn off and unplug the main unit.
- Detach the dust cup from the main unit.
- Open the dust cup and empty the collected pet hair into a waste bin.
- Clean the interior of the dust cup and the filter with a damp cloth if necessary. Ensure it is completely dry before reattaching.

Figure 7.1: The 2.3L dust cup capacity and cleanliness after use.
7.2 Cleaning Attachments
- Brushes and Combs: Remove any trapped hair manually. You can rinse these under running water, but ensure they are completely dry before reattaching to the hose or storing.
- Electric Clipper:
- Carefully remove hair from the blades using the small cleaning brush provided (if included).
- Apply a small amount of clipper oil to the blades regularly to maintain sharpness and smooth operation.
- Do not rinse the clipper head directly under water unless specified as waterproof.
- Hose and Main Unit: Wipe the exterior surfaces with a soft, damp cloth. Do not use abrasive cleaners.
8. Troubleshooting
Refer to this section for common issues and their solutions.
| Problem | Possible Cause | Solution |
|---|---|---|
| Device does not turn on. | Not plugged in; power outlet issue; damaged cord. | Ensure power cord is securely plugged in. Test outlet with another device. Inspect cord for damage. |
| Low suction power. | Dust cup full; filter clogged; hose/attachment blockage. | Empty dust cup. Clean filter. Check hose and attachments for obstructions. |
| Clipper not cutting effectively. | Blades dull; hair tangled in blades; insufficient oil. | Clean blades thoroughly. Apply clipper oil. Consider blade replacement if dull. |
| Pet is scared of the device. | Unfamiliarity with noise/vibration. | Introduce gradually. Start with low suction. Offer treats and praise. Allow pet to sniff the device. |
9. Specifications
| Feature | Detail |
|---|---|
| Model Number | MAS-501 |
| Brand | LMVVC |
| Dust Cup Capacity | 2.3 Liters |
| Power Source | Corded Electric |
| Material | Plastic |
| Item Weight | 3.62 Kilograms (approx. 7.98 pounds) |
| Package Dimensions | 16.85 x 13.82 x 7.8 inches |
10. Warranty and Customer Support
LMVVC is committed to providing quality products and excellent customer service. This product typically comes with a manufacturer's warranty. Please refer to your purchase documentation for specific warranty terms and duration.
For any questions, technical support, or warranty claims, please contact LMVVC customer service. Professional customer quick email replies are available to solve pre-purchase and after-sales questions.
Contact Information: Refer to the contact details provided with your product packaging or visit the official LMVVC website.

Figure 10.1: LMVVC Customer Support is available for assistance.