
1. Introduction
Thank you for choosing the TUSK Folding Lever Set. This manual provides essential information for the proper installation, operation, and maintenance of your new clutch and brake levers. Designed for durability and performance, these levers feature a folding mechanism to reduce damage during impacts and adjustability for personalized comfort. Please read this manual thoroughly before installation and use.
The Tusk Folding Clutch & Brake Lever Set is constructed from durable, billet aluminum. The CNC machined lever incorporates a spring-loaded folding design and is finished with hard anodizing to enhance protection against impacts. The levers also feature rounded edges and grip-distance adjustability for optimal comfort and control.
2. Safety Information
- Professional Installation Recommended: If you are not experienced with motorcycle maintenance, it is highly recommended to have these levers installed by a qualified technician.
- Proper Torque: Ensure all fasteners are tightened to the manufacturer's specified torque settings. Overtightening or undertightening can lead to component failure.
- Functionality Check: After installation, always check the full range of motion and proper operation of both the clutch and brake systems before riding. Ensure no binding or interference occurs.
- Regular Inspection: Periodically inspect levers for wear, damage, or loose components. Replace damaged parts immediately.
- Brake Fluid: When working with brake components, use appropriate brake fluid and avoid contact with painted surfaces.
3. Package Contents
Your TUSK Folding Lever Set package should contain the following items:
- 1x TUSK Folding Clutch Lever
- 1x TUSK Folding Brake Lever

Image 1: The TUSK Folding Clutch and Brake Lever Set, showcasing both levers in their standard, unfolded position.
4. Compatibility
The TUSK Folding Lever Set (Model 209-5200-017) is compatible with a range of KTM, Husqvarna, and GASGAS motorcycle models. Please refer to the tables below to confirm compatibility with your specific make, model, and year range.

Image 2: Part 1 of the compatibility chart, detailing compatible GASGAS and Husqvarna models and their respective year ranges.

Image 3: Part 2 of the compatibility chart, detailing compatible KTM and additional Husqvarna models and their respective year ranges.
Detailed Compatibility List:
| Make | Model | Year Range |
|---|---|---|
| GASGAS | EX 250 (Fuel Injected) | 2021-2023 |
| GASGAS | EX 300 (Fuel Injected) | 2021-2023 |
| GASGAS | EX 350F | 2021-2023 |
| GASGAS | EX 450F | 2021-2023 |
| GASGAS | MC 125 | 2022-2023 |
| GASGAS | MC 250 | 2022-2023 |
| GASGAS | MC 250F | 2022-2023 |
| GASGAS | MC 250F Factory Edition | 2023-2025 |
| GASGAS | MC 350F | 2022-2023 |
| GASGAS | MC 450F | 2022-2023 |
| GASGAS | MC 450F Factory Edition | 2023-2025 |
| GASGAS | MC 450F Troy Lee Designs | 2022 |
| Husqvarna | FC 250 | 2020-2025 |
| Husqvarna | FC 250 Factory Edition | 2025 |
| Husqvarna | FC 250 Rockstar Edition | 2022, 2024 |
| Husqvarna | FC 350 | 2020-2025 |
| Husqvarna | FC 350 Heritage | 2023, 2025 |
| Husqvarna | FC 450 | 2020-2025 |
| Husqvarna | FC 450 Factory Edition | 2025 |
| Husqvarna | FC 450 Rockstar Edition | 2020-2024 |
| Husqvarna | FE 250 | 2014-2016 |
| Husqvarna | FE 350 | 2014-2016 |
| Husqvarna | FE 350 S | 2015-2016 |
| Husqvarna | FE 450 | 2016 |
| Husqvarna | FE 501 S | 2015-2016 |
| Husqvarna | FX 350 | 2022-2025 |
| Husqvarna | FX 350 Heritage | 2023 |
| Husqvarna | FX 450 | 2022-2025 |
| Husqvarna | TC 125 | 2022 |
| Husqvarna | TC 125 (Fuel Injected) | 2023-2025 |
| Husqvarna | TC 125 Heritage (Fuel Injected) | 2023, 2025 |
| Husqvarna | TC 150 (Fuel Injected) | 2025 |
| Husqvarna | TC 150 Heritage (Fuel Injected) | 2025 |
| Husqvarna | TC 250 | 2014-2016, 2022 |
| Husqvarna | TC 250 (Fuel Injected) | 2023-2025 |
| Husqvarna | TC 250 Heritage (Fuel Injected) | 2023, 2025 |
| Husqvarna | TC 300 (Fuel Injected) | 2025 |
| Husqvarna | TC 300 Heritage (Fuel Injected) | 2025 |
| Husqvarna | TE 150 (Fuel Injected) | 2025 |
| Husqvarna | TE 250 | 2014-2016 |
| Husqvarna | TE 250 (Fuel Injected) | 2025 |
| Husqvarna | TE 300 | 2014-2016 |
| Husqvarna | TE 300 (Fuel Injected) | 2025 |
| Husqvarna | TE 300 Heritage (Fuel Injected) | 2025 |
| Husqvarna | TE 300i Pro | 2024-2025 |
| Husqvarna | TE 300 Rockstar Edition (Fuel Injected) | 2022 |
| Husqvarna | TX 300 (Fuel Injected) | 2022-2023 |
| Husqvarna | TX 300 Heritage (Fuel Injected) | 2023 |
| KTM | 125 SX | 2016-2022 |
| KTM | 125 XC | 2023-2025 |
| KTM | 150 SX | 2014-2022 |
| KTM | 150 SX (Fuel Injected) | 2025 |
| KTM | 150 XC-W (E-Start) | 2017-2019 |
| KTM | 150 XC-W (Fuel Injected) | 2020-2025 |
| KTM | 250 SX | 2014-2022 |
| KTM | 250 SX (Fuel Injected) | 2023-2025 |
| KTM | 250 SX-F | 2014-2025 |
| KTM | 250 SX-F Factory Edition | 2015-2017, 2022, 2024-2025 |
| KTM | 250 SX-F Troy Lee Designs | 2021 |
| KTM | 250 XC | 2014-2019 |
| KTM | 250 XC (Fuel Injected) | 2020-2025 |
| KTM | 250 XC-F | 2023-2025 |
| KTM | 250 XC-W (E-Start) | 2014-2016 |
| KTM | 250 XC-W (Fuel Injected) | 2024-2025 |
| KTM | 250 XCF-W | 2014-2016 |
| KTM | 300 SX (Fuel Injected) | 2023-2025 |
| KTM | 300 XC | 2014-2016 |
| KTM | 300 XC (Fuel Injected) | 2023-2025 |
| KTM | 300 XC-W (E-Start) | 2014-2016 |
| KTM | 300 XC-W (Fuel Injected) | 2019-2025 |
| KTM | 300 XC-W Champion Edition | 2025 |
| KTM | 300 XC-W Erzbergrodeo (Fuel Injected) | 2020-2023 |
| KTM | 300 XC-W Hardenduro (Fuel Injected) | 2024-2025 |
| KTM | 300 XC-W Six Days | 2014-2018 |
| KTM | 300 XC-W Six Days (Fuel Injected) | 2019-2020 |
| KTM | 350 SX-F | 2014-2025 |
| KTM | 350 XC-F | 2017-2025 |
| KTM | 350 XC-F Factory Edition | 2023-2025 |
| KTM | 450 SX-F | 2014-2025 |
| KTM | 450 SX-F Factory Edition | 2022-2025 |
| KTM | 450 XC-F | 2014-2025 |
| KTM | 450 XCF-W | 2014-2016 |
| KTM | 500 XC-W | 2014-2016 |
| Husqvarna | FE 350 S | 2025 |
| Husqvarna | FE 350 S Heritage | 2025 |
| Husqvarna | FE 450 | 2025 |
| Husqvarna | FE 450 Heritage | 2025 |
| Husqvarna | FE 501 S | 2025 |
| Husqvarna | FE 501 S Heritage | 2025 |
5. Setup and Installation
This section outlines the general steps for installing your TUSK Folding Lever Set. Always refer to your motorcycle's service manual for specific torque values and procedures.
5.1 Tools Required
- Appropriate wrenches or sockets for lever pivot bolts.
- Torque wrench.
- Brake fluid (DOT 4 or as specified by your motorcycle manufacturer) for brake lever installation.
- Clean rags.
- Grease (for pivot points).
5.2 Clutch Lever Installation
- Carefully remove the existing clutch lever from its perch. Note the orientation of all components, including washers and bushings.
- Clean the clutch perch thoroughly.
- Apply a small amount of appropriate grease to the pivot bolt and any bushings.
- Install the TUSK Folding Clutch Lever onto the perch, ensuring all components are correctly seated.
- Insert and tighten the pivot bolt to the manufacturer's specified torque.
- Reconnect the clutch cable or hydraulic line, ensuring proper routing and adjustment.
- Verify smooth operation of the clutch lever and ensure the clutch engages and disengages correctly.
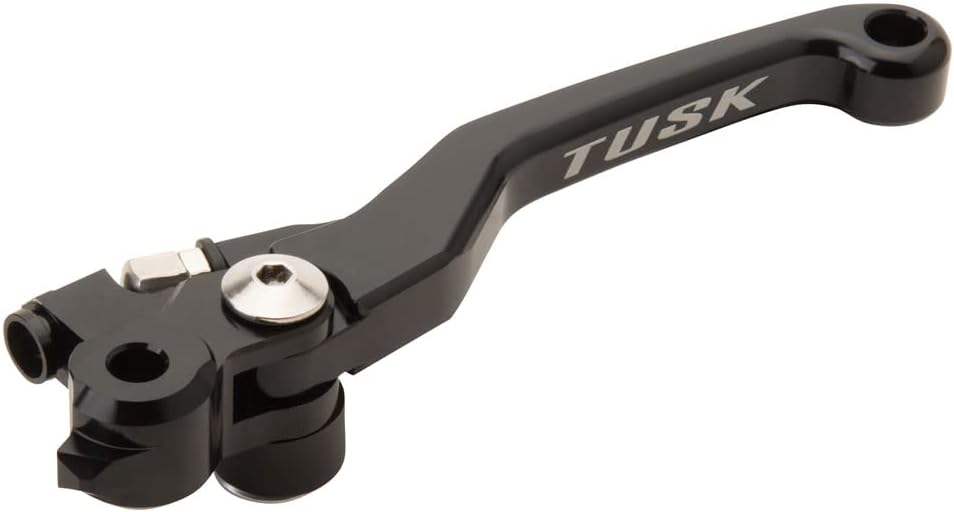
Image 4: Close-up view of the TUSK Folding Clutch Lever, showing its design and pivot point.
5.3 Brake Lever Installation
- Carefully remove the existing brake lever from its master cylinder. Be mindful of brake fluid if it's a hydraulic system.
- Clean the master cylinder lever pivot area.
- Apply a small amount of appropriate grease to the pivot bolt and any bushings.
- Install the TUSK Folding Brake Lever onto the master cylinder, ensuring all components are correctly seated.
- Insert and tighten the pivot bolt to the manufacturer's specified torque.
- If hydraulic, ensure the brake fluid reservoir is full and bleed the brake system as per your motorcycle's service manual to remove any air.
- Verify firm brake feel and proper operation of the brake lever. Ensure the brake light switch (if applicable) functions correctly.

Image 5: Close-up view of the TUSK Folding Brake Lever, highlighting its design and pivot point.
6. Operating Instructions
6.1 Folding Mechanism
The TUSK Folding Levers are designed to pivot upwards in the event of an impact, reducing the likelihood of breakage. The spring-loaded mechanism allows the lever to fold away from the handlebar and then return to its original position. No special action is required for this feature; it operates automatically upon impact.

Image 6: The TUSK Folding Clutch Lever demonstrated in its folded position, showcasing the protective pivot mechanism.

Image 7: The TUSK Folding Brake Lever demonstrated in its folded position, illustrating how it pivots to prevent damage.
6.2 Grip-Distance Adjustability
Both the clutch and brake levers feature grip-distance adjustability, allowing you to customize the lever's reach to your hand size and preference. This adjustment is typically made via a small screw or dial located near the lever pivot point. Consult your motorcycle's service manual or the lever's specific design for the exact adjustment method.
- To Adjust: Locate the adjustment mechanism. Turn it incrementally to move the lever closer to or further from the handlebar.
- Test: After each adjustment, test the lever's feel and ensure full engagement/disengagement of the clutch and brake without binding.
- Safety: Ensure the adjustment is secure and does not interfere with other controls or the throttle.
7. Maintenance
Regular maintenance will ensure the longevity and proper function of your TUSK Folding Lever Set.
- Cleaning: Clean the levers regularly with mild soap and water. Avoid harsh chemicals that could damage the anodized finish.
- Lubrication: Periodically apply a small amount of waterproof grease to the pivot points of both the main lever and the folding mechanism. This ensures smooth operation and prevents corrosion.
- Inspection: Regularly check for any signs of wear, cracks, bends, or loose fasteners. Pay close attention to the pivot areas and the folding mechanism.
- Fastener Torque: Verify that all mounting bolts are tightened to the correct torque specifications.
8. Troubleshooting
- Lever feels stiff or sticky:
- Check for dirt or debris in the pivot points. Clean and re-lubricate.
- Ensure pivot bolt is not overtightened.
- Inspect for any bending or damage to the lever or perch.
- Clutch/Brake not fully engaging/disengaging:
- Verify proper cable tension (for cable clutch) or hydraulic fluid level and bleeding (for hydraulic systems).
- Check the grip-distance adjustment.
- Ensure the lever is fully returning to its resting position.
- Lever does not fold smoothly:
- Clean and lubricate the folding mechanism's pivot points.
- Check for any foreign objects obstructing the folding action.
If you encounter issues not covered here, or if troubleshooting steps do not resolve the problem, please contact TUSK customer support or consult a professional motorcycle mechanic.
9. Specifications
| Feature | Detail |
|---|---|
| Model Number | 209-5200-017 |
| Material | Billet Aluminum |
| Finish | Hard Anodized |
| Design | Folding, Spring-Loaded |
| Adjustability | Grip-Distance Adjustable |
| Compatibility | Fits OEM perch (refer to compatibility tables for specific models) |
| Color | Black |
| Product Dimensions | Approximately 9"L x 4"W (overall set) |
| Item Weight | Approximately 16 ounces (1 pound) |
10. Warranty and Support
For warranty information or technical support regarding your TUSK Folding Lever Set, please refer to the official TUSK website or contact your authorized TUSK dealer. Keep your proof of purchase for any warranty claims.
Contact Information: Please visit the TUSK Powersports Store for further assistance and product information.