1. Introduction
Thank you for purchasing the Leadfan Double Din Car Stereo. This manual provides detailed instructions for installation, operation, and maintenance of your new car stereo system. Please read this manual thoroughly before use to ensure proper functionality and safety.
What's in the Box:
- Double Din Car Stereo Unit
- Remote Control
- Wiring Harness
- Backup Camera
- User Manual (this document)

Figure 1.1: Leadfan Double Din Car Stereo and its components, including the main unit, remote control, and backup camera.
2. Safety Information
Always prioritize safety. Improper installation or operation can lead to accidents, injury, or damage to the device or vehicle.
- Do not operate the device in a way that distracts you from driving.
- Ensure all wiring is correctly connected to prevent short circuits or electrical hazards.
- Consult a professional for installation if you are unsure about any steps.
- Keep the device away from water and excessive heat.
- Do not attempt to disassemble or modify the unit. This will void the warranty.
3. Installation Guide
3.1 Wiring Instructions
Refer to the following diagram for proper wiring connections. Ensure all connections are secure and insulated.

Figure 3.1: Main wiring harness connections for the car stereo. Connect ACC to ignition switch, GND to ground, ANT to radio antenna, ILLUMINATION to illuminate, KEY1/KEY2 for steering wheel control, REVERSE for reversing camera, and BRAKE for parking brake cable. Speaker wires are also detailed.
3.2 Backup Camera Installation
The included backup camera enhances parking safety. Follow these steps for installation:
- Mount the backup camera securely at the rear of your vehicle.
- Connect the camera's video output (yellow RCA) to the "CAMIN" input on the car stereo.
- Connect the camera's power cable (red wire) to the vehicle's reversing lamp power (+).
- Connect the camera's ground wire (black) to a suitable ground point.
- Connect the pink wire from the stereo's wiring harness to the reversing lamp power (+) to trigger the camera display when reverse gear is engaged.

Figure 3.2: Diagram illustrating the connections for the backup camera, including video signal and power connections to the vehicle's reverse light circuit.
3.3 Mounting the Unit
This double din radio is a universal standard size. Ensure your vehicle's mounting slots match the dimensions: 173(L) x 98(W) x 65(H)mm / 6.81(L) x 3.86(W) x 2.56(H)in. Secure the unit using appropriate mounting brackets (not included, typically part of vehicle-specific installation kits).
4. Initial Setup
4.1 Power On
After successful installation, turn on your vehicle's ignition. The car stereo should power on automatically. If not, check your wiring connections.
4.2 Basic Settings
Upon first use, you may need to set the time, date, and language. Navigate through the settings menu on the touchscreen to adjust these preferences.
5. Operating Instructions
5.1 General Operation
The 7-inch HD capacitive touchscreen allows for intuitive control. Use the physical buttons on the left side for quick access to common functions like volume and mode selection.

Figure 5.1: The responsive 7-inch HD touchscreen for easy navigation and control.
5.2 Radio Function
Access the FM radio function from the main menu. You can scan for stations, save presets, and adjust settings for optimal reception.
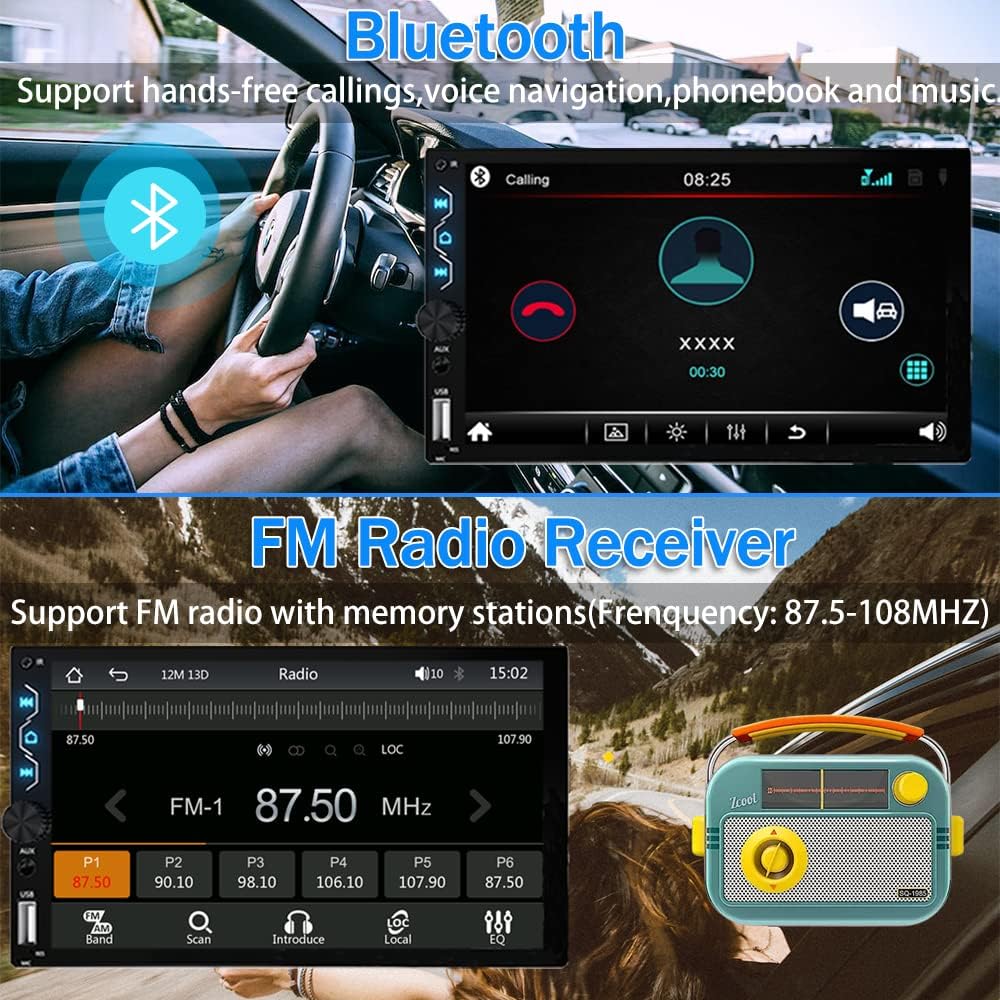
Figure 5.2: The FM Radio interface, showing frequency display and preset buttons.

Figure 5.3: Detailed view of the FM Radio interface, including frequency range and station presets.
5.3 Bluetooth Connectivity
The built-in Bluetooth 5.1 allows for hands-free calling and wireless audio streaming. To connect, simply enable Bluetooth on your mobile device and search for "CarKit" (or similar name) from the stereo's Bluetooth menu. Enter the PIN (default is 0000) if prompted.
Figure 5.4: Bluetooth interface showing hands-free calling functionality.

Figure 5.5: Bluetooth 5.1 pairing screen, demonstrating phone contact synchronization and audio streaming capabilities.
Video 5.1: Demonstration of Bluetooth connectivity and basic functions.
5.4 Smartphone Integration (CarPlay, Android Auto, Mirror Link)
Connect your smartphone via USB to access Apple CarPlay or Android Auto for navigation, calls, messages, and music. The Mirror Link function allows you to display your phone's screen directly on the stereo.

Figure 5.6: Apple CarPlay and Android Auto interfaces displayed on the car stereo.

Figure 5.7: Overview of Apple CarPlay and Android Auto features, including reverse camera, FM radio, touchscreen, GPS navigation, voice control, and more.

Figure 5.8: Apple CarPlay voice control functionality, allowing hands-free commands for calls, music, and navigation.

Figure 5.9: Apple CarPlay displaying GPS navigation on the car stereo screen.

Figure 5.10: Apple CarPlay interface for music playback with excellent sound quality.

Figure 5.11: Android Auto voice control functionality, enabling hands-free commands for various tasks.

Figure 5.12: Android Auto displaying GPS navigation on the car stereo screen.

Figure 5.13: Android Auto interface for music playback with excellent sound quality.

Figure 5.14: Mirror Link function displaying a smartphone screen on the car stereo.

Figure 5.15: Detailed explanation of the MirrorLink function, allowing full smartphone content synchronization via USB.
5.5 Sound Settings (EQ)
Adjust the audio output to your preference using the built-in equalizer (EQ). You can select from preset modes (Jazz, Classic, Rock, Pop, Soft, User) or customize the 10-band EQ settings manually.
Figure 5.16: The EQ settings interface, showing adjustable frequency bands and preset options.
Video 5.2: Tutorial on how to set EQ and sound settings.
5.6 Customization (Startup Logo, Wallpaper)
Personalize your car stereo by setting a custom startup logo or wallpaper. The best resolution for pictures is 1024x600. Create a folder named "LOGO" on a U disk and place your desired images inside. Insert the U disk into the radio, then navigate to Logo Settings to select your custom image.

Figure 5.17: Setting a customized boot logo for the car stereo.

Figure 5.18: Setting a customized wallpaper for the car stereo interface.
Video 5.3: Instructions on how to set a customized startup logo.
5.7 Backup Camera Operation
When the vehicle is shifted into reverse gear, the 7-inch touchscreen will automatically display the rear view from the backup camera, enhancing safety during parking and reversing maneuvers.

Figure 5.19: Display of the backup camera view on the car stereo screen.

Figure 5.20: The HD backup camera automatically activates when reversing, providing a clear view.
5.8 Steering Wheel Control
The unit supports original steering wheel control functions. This allows you to conveniently switch songs, adjust volume, and manage calls without taking your hands off the steering wheel.
Figure 5.21: Steering Wheel Control setup screen, showing options for button mapping.

Figure 5.22: Control the stereo using your vehicle's existing steering wheel buttons for convenience and safety.
5.9 External Device Connections (RCA)
The stereo features rich RCA expansion interfaces, allowing connection to various external devices such as a front camera, amplifier, subwoofer, or additional external displays. Note that only the rear camera is included; other accessories must be purchased separately.

Figure 5.23: Rear view of the stereo showing various RCA ports for connecting external audio and video components.
6. Troubleshooting
If you encounter issues with your Leadfan car stereo, refer to the following common problems and solutions:
| Problem | Possible Cause | Solution |
|---|---|---|
| No Power | Incorrect wiring, blown fuse, loose connection. | Check power and ground wires. Inspect vehicle's fuse box and stereo's fuse. Ensure all connections are secure. |
| No Sound | Speaker wires incorrectly connected, volume too low, mute activated, incorrect audio source. | Verify speaker wiring. Increase volume. Check if mute is on. Select correct audio source. |
| Bluetooth Not Connecting | Device not in pairing mode, incorrect PIN, interference. | Ensure Bluetooth is enabled on both devices and in pairing mode. Re-enter PIN. Try pairing in a different location. |
| CarPlay/Android Auto Not Working | Faulty USB cable, phone not compatible, app not installed/updated. | Use original or certified USB cable. Ensure phone OS and apps are updated. Restart phone and stereo. |
| Backup Camera Not Displaying | Incorrect camera wiring, reverse trigger wire not connected. | Check camera power and video connections. Ensure pink reverse trigger wire is connected to the vehicle's reverse light signal. |
7. Specifications
| Feature | Detail |
|---|---|
| Model Number | X5 |
| Screen Size | 7 Inch |
| Display Type | Full HD Capacitive Touchscreen |
| Connectivity | Bluetooth 5.1, USB, AUX |
| Smartphone Integration | Wired Apple CarPlay, Wired Android Auto, Mirror Link |
| Audio Output Mode | Stereo |
| Surround Sound Channel Configuration | 5.1 |
| Wattage | 240 watts |
| Product Dimensions | 7.01 x 2.56 x 3.94 inches (173 x 98 x 65 mm) |
| Item Weight | 1.94 pounds |
| Video Encoding Support | MP4, AVI, FLV, MKV, RMVB, MPEG, WMV9, VC, ASF, TS, QT |
8. Maintenance
To ensure the longevity and optimal performance of your car stereo, follow these maintenance guidelines:
- Cleaning the Screen: Use a soft, lint-free cloth to gently wipe the touchscreen. For stubborn smudges, slightly dampen the cloth with water or a screen-safe cleaner. Avoid abrasive materials or harsh chemicals.
- General Cleaning: Keep the unit free from dust and debris. Use a soft brush or compressed air to clean vents and button crevices.
- Temperature: Avoid exposing the unit to extreme temperatures, both hot and cold, for extended periods.
- Connections: Periodically check all wiring connections to ensure they remain secure.
9. Warranty and Support
Leadfan provides comprehensive support for your car stereo:
- Warranty: 12 months after-sales support.
- Money Back Guarantee: 30 days money back service.
- Technical Support: 24 hours after-sales technical support is available to assist with installation and operation issues.
For any questions or assistance, please contact Leadfan customer service by clicking "sold by Leadfan" and then "ask a question" on the product page.


