1. Product Overview
The STINGER Audio MT20001 is a 1-channel monoblock Class D amplifier designed to deliver 2000 Watts RMS of continuous power for car audio subwoofer systems. Its compact design and advanced features ensure high efficiency and precise sound control. This amplifier is engineered for robust performance and includes a remote bass knob for convenient level adjustments.

Figure 1: STINGER Audio MT20001 Monoblock Amplifier and Remote Bass Knob.
Video 1: Official video showcasing the STINGER Audio MT Amplifier Series, highlighting key features and design.
2. Safety Information
Please read all instructions carefully before installing and operating your amplifier. Failure to follow these guidelines may result in damage to the amplifier, speakers, or vehicle, and may void your warranty.
- Professional Installation Recommended: Due to the complexity of car audio systems, professional installation is highly recommended.
- Power Source: Ensure the vehicle's battery is disconnected before making any power connections to prevent electrical shorts.
- Proper Grounding: Always connect the amplifier's ground terminal securely to a clean, unpainted metal surface of the vehicle chassis.
- Ventilation: Mount the amplifier in a location that allows for adequate air circulation to prevent overheating. Avoid covering the amplifier with carpets or other materials.
- Wiring: Use appropriate gauge wiring for power, ground, and speaker connections as specified in the installation section. Incorrect wiring can lead to fire or equipment damage.
- Liquid Exposure: Keep the amplifier away from moisture and liquids.
- Hearing Protection: Prolonged exposure to high sound pressure levels can cause permanent hearing damage. Use caution when adjusting volume levels.
3. Installation and Setup
3.1 Wiring Connections
Proper wiring is crucial for optimal performance and safety. Refer to the diagrams and instructions below for correct connections.
- Power (+12V): Connect a 0/1 gauge power cable from the vehicle's positive battery terminal to the amplifier's +12V terminal. An inline fuse (not included) must be installed within 18 inches of the battery.
- Ground (GND): Connect a 0/1 gauge ground cable from the amplifier's GND terminal to a clean, unpainted metal point on the vehicle chassis. The ground cable should be as short as possible.
- Remote (REM): Connect a 18-gauge remote turn-on wire from your head unit's remote output to the amplifier's REM terminal. This wire turns the amplifier on and off with your head unit.
- RCA Input: Connect RCA cables from your head unit's subwoofer output to the amplifier's RCA INPUT terminals.
- RCA Bridge In/Out: Use the BRIDGE IN/OUT terminals to link multiple MT series amplifiers for a bridged system.
- Mono Output (Speakers): Connect your subwoofer(s) to the MONO OUTPUT terminals. This amplifier supports a minimum impedance of 1 Ohm. Use 8 gauge speaker wire for optimal performance.

Figure 2: Rear view of the amplifier showing power, ground, remote, and mono output terminals.
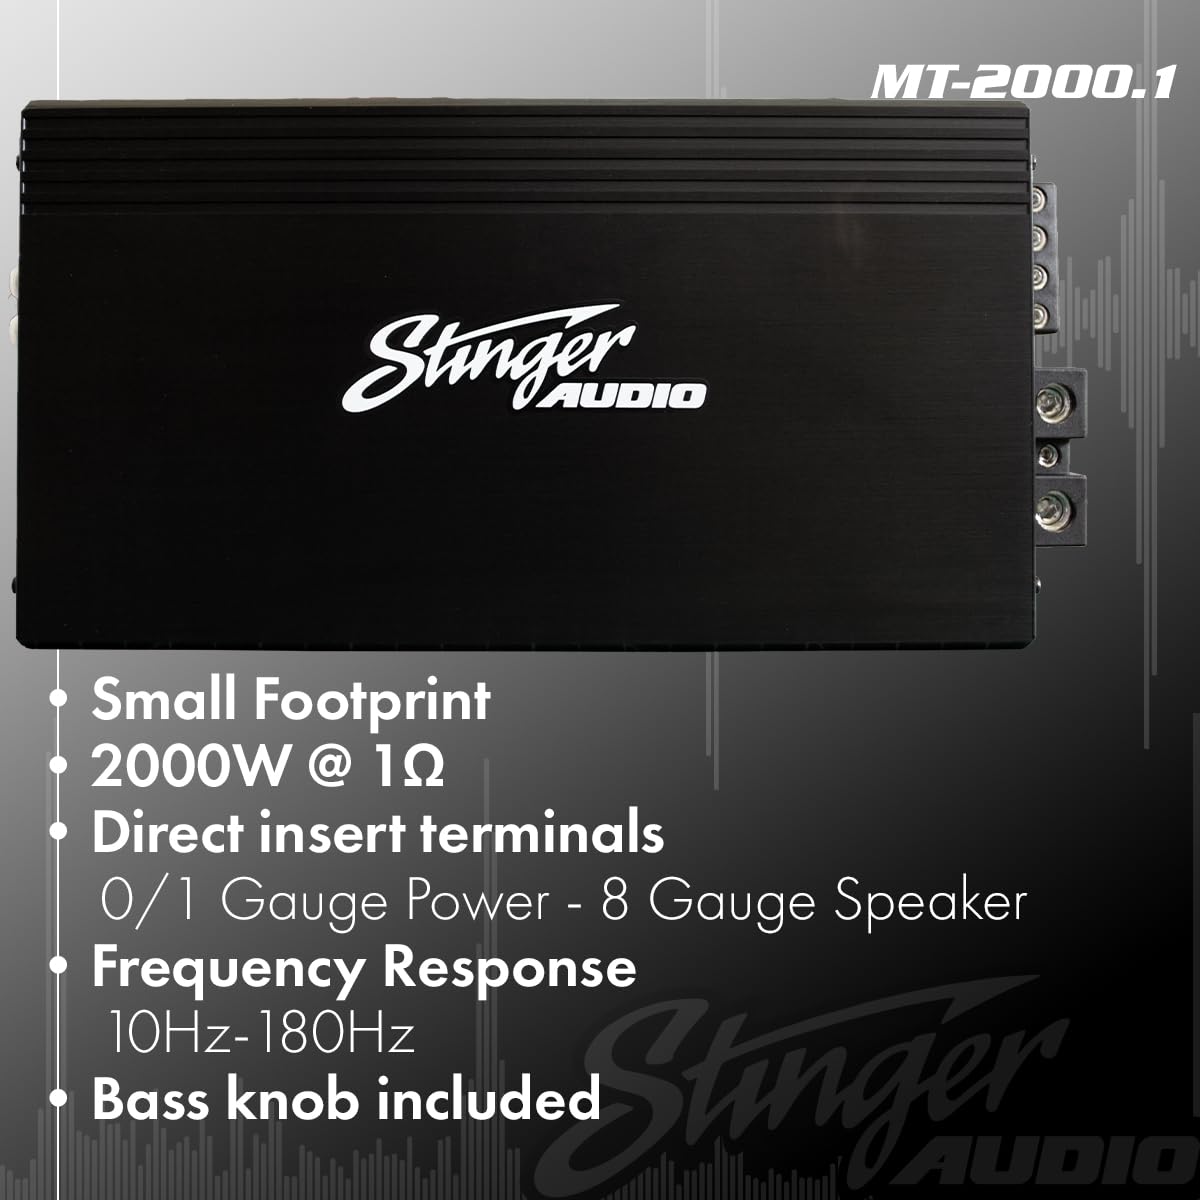
Figure 3: Amplifier features including terminal sizes for power (0/1 Gauge) and speaker (8 Gauge).
3.2 Controls and Adjustments
The MT20001 amplifier features several controls to fine-tune your audio system.
- Gain (Level): Adjusts the input sensitivity of the amplifier to match the output voltage of your head unit. Start with the gain at minimum and slowly increase until desired volume is achieved without distortion.
- Low Pass Filter (LPF): This filter allows frequencies below the set point to pass through to the subwoofer. Adjustable from 40Hz to 180Hz. Set this to match your subwoofer's frequency response and blend with your main speakers.
- Subsonic Filter: This filter removes ultra-low frequencies that are inaudible and can cause damage to your subwoofer. Adjustable from OFF to 50Hz.
- Bass Boost Q: Provides a variable bass boost from 0dB to 12dB at a selectable frequency (30Hz or 80Hz). Use sparingly to avoid distortion.
- Remote Bass Knob: The included remote bass knob allows for convenient adjustment of the bass level from your listening position.

Figure 4: Amplifier control panel showing input, gain, LPF, subsonic, frequency, and bass boost settings.

Figure 5: The remote bass knob for convenient bass level adjustment.
Video 2: Detailed feature overview video for the STINGER Audio MT Amplifier Series, demonstrating its capabilities.
4. Operating Instructions
Once the amplifier is correctly installed and wired, follow these steps for operation:
- Power On: Turn on your vehicle's ignition and head unit. The amplifier's power indicator should illuminate.
- Initial Volume Setting: Start with the head unit's volume at a low level.
- Gain Adjustment: Slowly increase the amplifier's gain control (Level) until the desired volume is reached without any audible distortion. If distortion occurs, reduce the gain.
- Filter Adjustment: Adjust the Low Pass Filter (LPF) and Subsonic Filter to optimize the subwoofer's performance and blend with your other speakers. Experiment with settings to find the best sound for your system.
- Bass Boost: If additional bass impact is desired, carefully adjust the Bass Boost Q. Excessive boost can lead to distortion and potential damage.
- Remote Bass Knob: Use the remote bass knob for quick and easy adjustments to the subwoofer's output level while listening.
5. Maintenance
Regular maintenance helps ensure the longevity and performance of your amplifier.
- Cleaning: Periodically clean the amplifier's exterior with a soft, dry cloth. Avoid using harsh chemicals or abrasive cleaners.
- Ventilation: Ensure that the amplifier's cooling fins are free from dust and debris. Blocked fins can lead to overheating.
- Connection Check: Annually, inspect all power, ground, remote, and speaker connections to ensure they are secure and free from corrosion. Loose connections can cause performance issues or damage.
- Environmental Factors: Protect the amplifier from extreme temperatures and direct sunlight.
6. Troubleshooting
If you experience issues with your amplifier, consult the following troubleshooting guide before contacting support.
| Problem | Possible Cause | Solution |
|---|---|---|
| No Power / No Indicator Light | Blown fuse; Loose power/ground/remote connection; Faulty wiring. | Check and replace fuse; Verify all connections are secure; Test wiring for continuity. |
| No Sound Output | RCA cables disconnected; Speaker wires disconnected/shorted; Gain set too low; Head unit not providing signal. | Check RCA and speaker connections; Increase gain; Verify head unit output. |
| Distorted Sound | Gain set too high; Improper filter settings; Speaker impedance mismatch; Damaged speaker. | Reduce gain; Adjust LPF/Subsonic filters; Verify speaker impedance (min 1 Ohm); Inspect speakers for damage. |
| Amplifier Overheating | Insufficient ventilation; Speaker impedance too low; Prolonged high volume use. | Ensure proper airflow around amplifier; Verify speaker impedance; Reduce volume or allow cooling time. |
| Remote Bass Knob Not Working | Cable disconnected; Faulty knob. | Check connection cable; Contact support if knob is faulty. |
7. Specifications
Key technical specifications for the STINGER Audio MT20001 Monoblock Amplifier.
| Feature | Detail |
|---|---|
| Brand | STINGER |
| Model Number | MT20001 |
| Product Dimensions (L x W x H) | 12.16 x 6.1 x 2.09 inches (309 x 155 x 53 mm) |
| Weight | 8 Pounds |
| Voltage | 9 Volts (DC) |
| Mounting Type | Flush Mount |
| Power Output | 2000W @ 1 Ohm (Continuous) |
| Frequency Response | 10Hz-180Hz |
| Topology | Digital Class-D |
| MOSFET Technology | HEXFET Power MOSFET |
| Included Accessories | Remote Control Bass Knob |

Figure 6: Detailed dimensions of the STINGER Audio MT20001 Amplifier.

Figure 7: Internal components of the amplifier, showcasing robust power supplies and HEXFET MOSFET technology.

Figure 8: Side profile illustrating the Digital Class-D and compact design of the amplifier.
8. Warranty and Support
For warranty information, technical support, or service inquiries, please refer to the official STINGER Audio website or contact their customer service department. Keep your purchase receipt as proof of purchase for any warranty claims.
For additional resources and product information, visit the STINGER Store on Amazon.


