1. Introduction
This manual provides detailed instructions for the installation, operation, and maintenance of your eRapta Solar Wireless Backup Camera System. Please read this manual thoroughly before using the product to ensure proper function and safety. This system is designed to enhance rear visibility for various vehicles, including cars, trucks, trailers, and RVs.
2. Package Contents
Verify that all items listed below are present in your package:
- Monitor (1)
- Solar Camera (1)
- Suction Cup Mount (1)
- Antenna (1)
- Car Charger (1)
- USB Cable (1)
- Pairing Button (1)
- Instruction Manual (1)
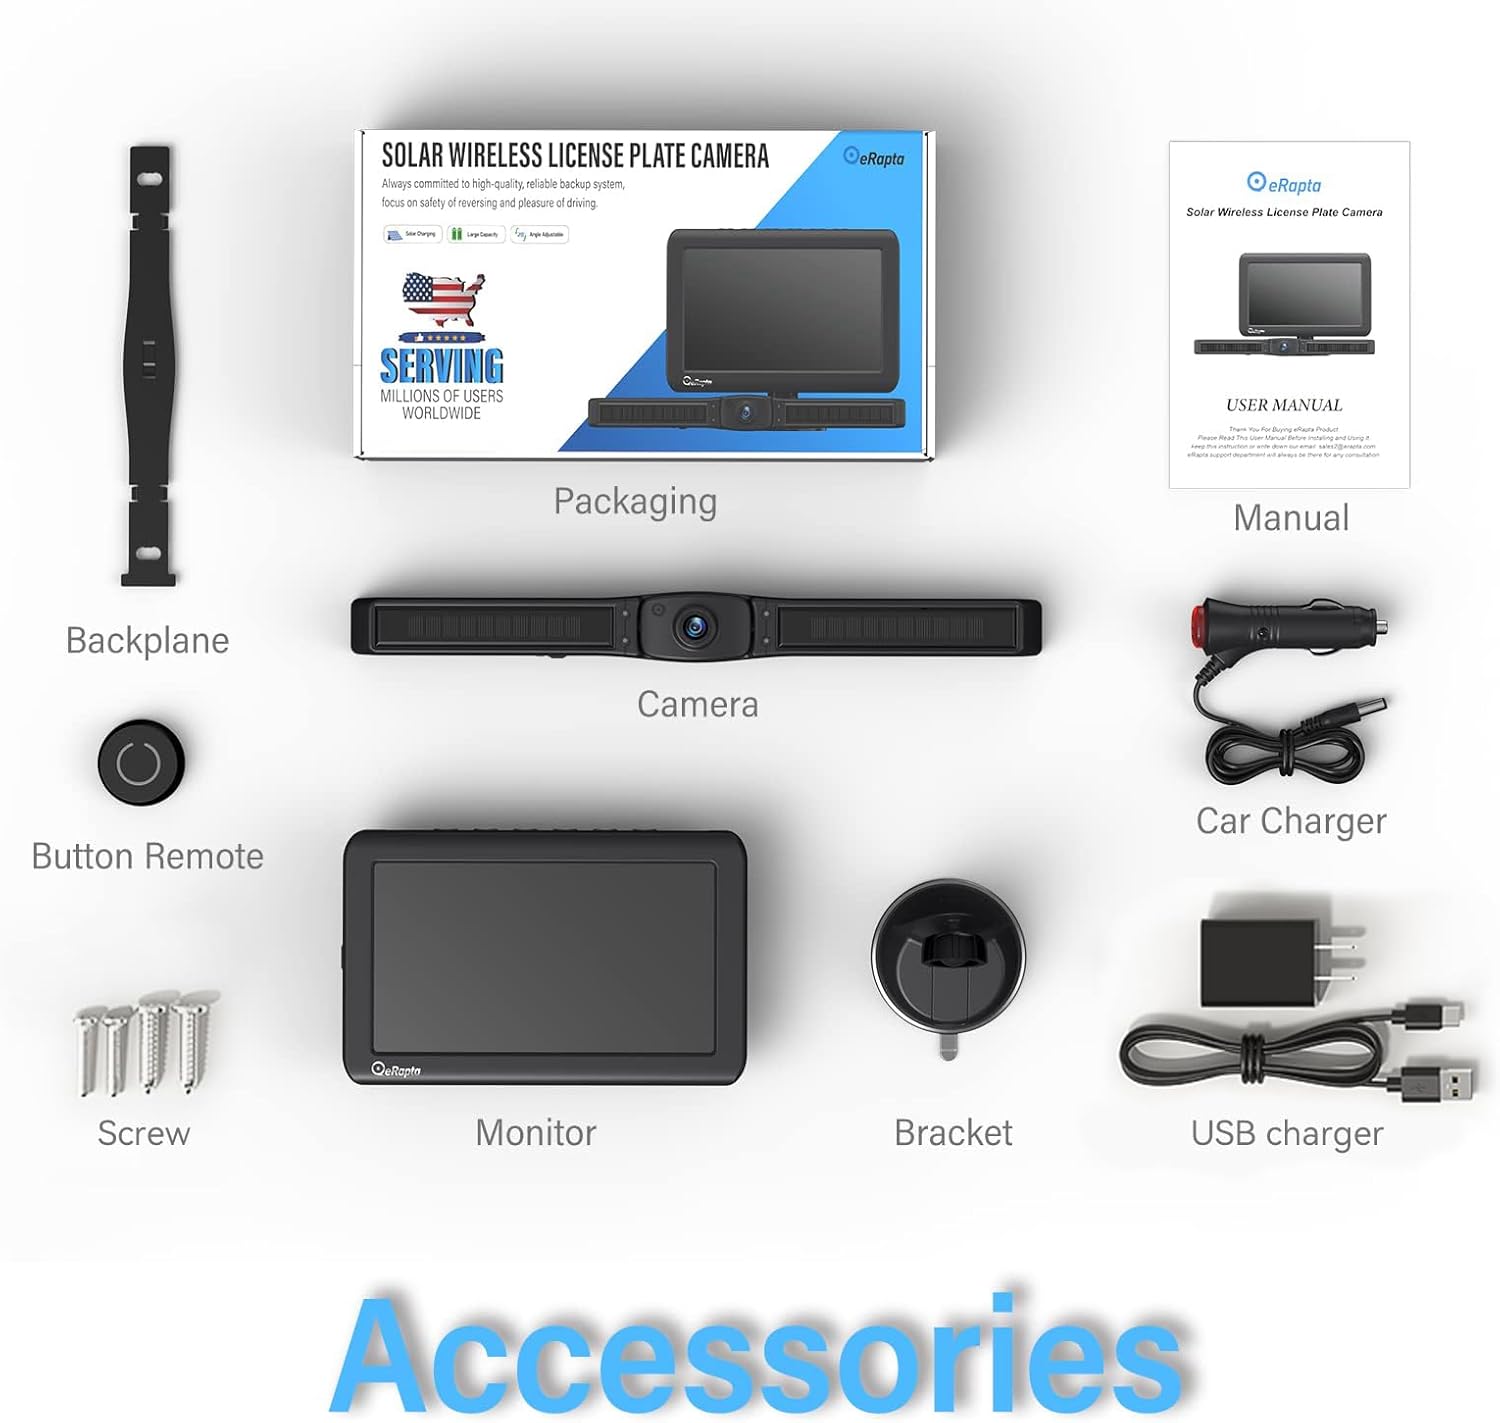
Image: All components included in the eRapta Solar Wireless Backup Camera System package.
3. Product Overview
The eRapta Solar Wireless Backup Camera System features a 7-inch 1080P monitor and a solar-powered, IP69K waterproof camera with IR night vision. It is designed for quick and easy installation without complex wiring.
Key Features:
- Solar Charging: Integrated double-wing solar panels and a 4800mAh battery provide continuous power.
- Wireless Transmission: Stable, real-time signal transmission up to 40 feet.
- High-Resolution Display: 7-inch 1080P monitor for clear rear view.
- Night Vision: Infrared (IR) night vision for improved visibility in low-light conditions.
- Durability: IP69K waterproof and dustproof camera for all-weather performance.
- Adjustable Camera: Camera angle can be adjusted by 60 degrees (up and down).
- Quick Installation: Designed for a 3-minute DIY installation process.

Image: Internal view highlighting the eRapta chip, powerful antenna, high storage efficiency, and double-wing solar panel.
4. Setup and Installation
The eRapta system is designed for a quick and straightforward installation.
4.1 Camera Installation
- Prepare the License Plate: Ensure your vehicle's license plate area is clean and free of obstructions.
- Fix the Bracket: Attach the camera bracket to your vehicle's license plate mounting holes using the provided screws. Ensure it is securely fastened.
- Mount the Camera: Slide the solar camera unit onto the fixed bracket until it clicks into place.
- Adjust Camera Angle: The camera can be adjusted 60 degrees vertically to achieve the optimal viewing angle.

Image: Visual guide for the 3-minute DIY installation process: fix the bracket, push the camera, and done.

Image: Illustration of the camera's 60-degree vertical adjustment capability.
4.2 Monitor Installation
- Attach Suction Cup Mount: Secure the suction cup mount to a clean, smooth surface on your dashboard or windshield.
- Mount the Monitor: Attach the 7-inch monitor to the suction cup mount.
- Connect Power: Plug the car charger into your vehicle's 12V power outlet and connect it to the monitor.
- Attach Antenna: Screw the antenna onto the designated port on the monitor.

Image: The 7-inch 1080P monitor installed in a vehicle, showing a clear rear view.
4.3 Pairing (If Necessary)
The camera and monitor are typically pre-paired at the factory. If no image appears on the monitor after installation, manual pairing may be required:
- Ensure both the camera and monitor are powered on.
- Press the pairing button on the camera (usually located near the charging port) for a few seconds until an indicator light flashes.
- On the monitor, navigate to the pairing menu (refer to the monitor's on-screen display for specific instructions).
- Confirm pairing on the monitor. The image from the camera should now appear.
5. Operation
5.1 Powering On/Off
- The monitor will automatically power on when connected to a power source and the vehicle is started.
- To manually turn off the monitor, use the power button on the monitor or the provided remote button.
- The camera is solar-powered and will activate automatically when the vehicle is in reverse or when the monitor is powered on.
5.2 Monitor Functions
The 7-inch monitor offers various settings and display options:
- Display Modes: Switch between normal, mirror, flip, and mirror-flip views.
- Guidelines: Enable or disable parking guidelines and adjust their position.
- Brightness/Contrast: Adjust display settings for optimal viewing.
- Channel Selection: If using multiple cameras (system supports up to 4 channels), switch between camera views.
5.3 Charging the Camera
The camera is primarily charged via its integrated solar panels. For situations with insufficient sunlight, a Type-C charging port is available.
- Solar Charging: The double-wing solar panels efficiently convert sunlight into energy, charging the internal 4800mAh battery. This provides continuous power under normal conditions.
- Type-C Fast Charging: If solar charging is insufficient, connect the camera to a Type-C charger using the provided USB cable. A full charge via Type-C takes approximately 4 hours, compared to 40 hours via standard USB.

Image: Illustration of the camera's high-capacity 4800mAh battery, designed for extended use.

Image: Visual comparison of charging times for the camera using standard USB versus Type-C.
5.4 Night Vision
The camera is equipped with infrared (IR) night vision, providing clear images in low-light or dark conditions. This feature activates automatically when ambient light levels are low.

Image: A vehicle utilizing the IR night vision feature of the backup camera in a dark, snowy setting.
6. Maintenance
6.1 Cleaning
- Camera Lens: Regularly clean the camera lens with a soft, damp cloth to ensure a clear view. Avoid abrasive materials.
- Solar Panels: Keep the solar panels free of dirt, dust, and snow to maximize charging efficiency.
- Monitor Screen: Use a screen-safe cleaner and a microfiber cloth to clean the monitor display.
6.2 Battery Care
- While the solar panel provides continuous charging, ensure the camera receives adequate sunlight, especially during prolonged periods of non-use or in areas with limited sun exposure.
- If the vehicle is stored indoors or in a shaded area for an extended time, periodically charge the camera via the Type-C port to maintain battery health.
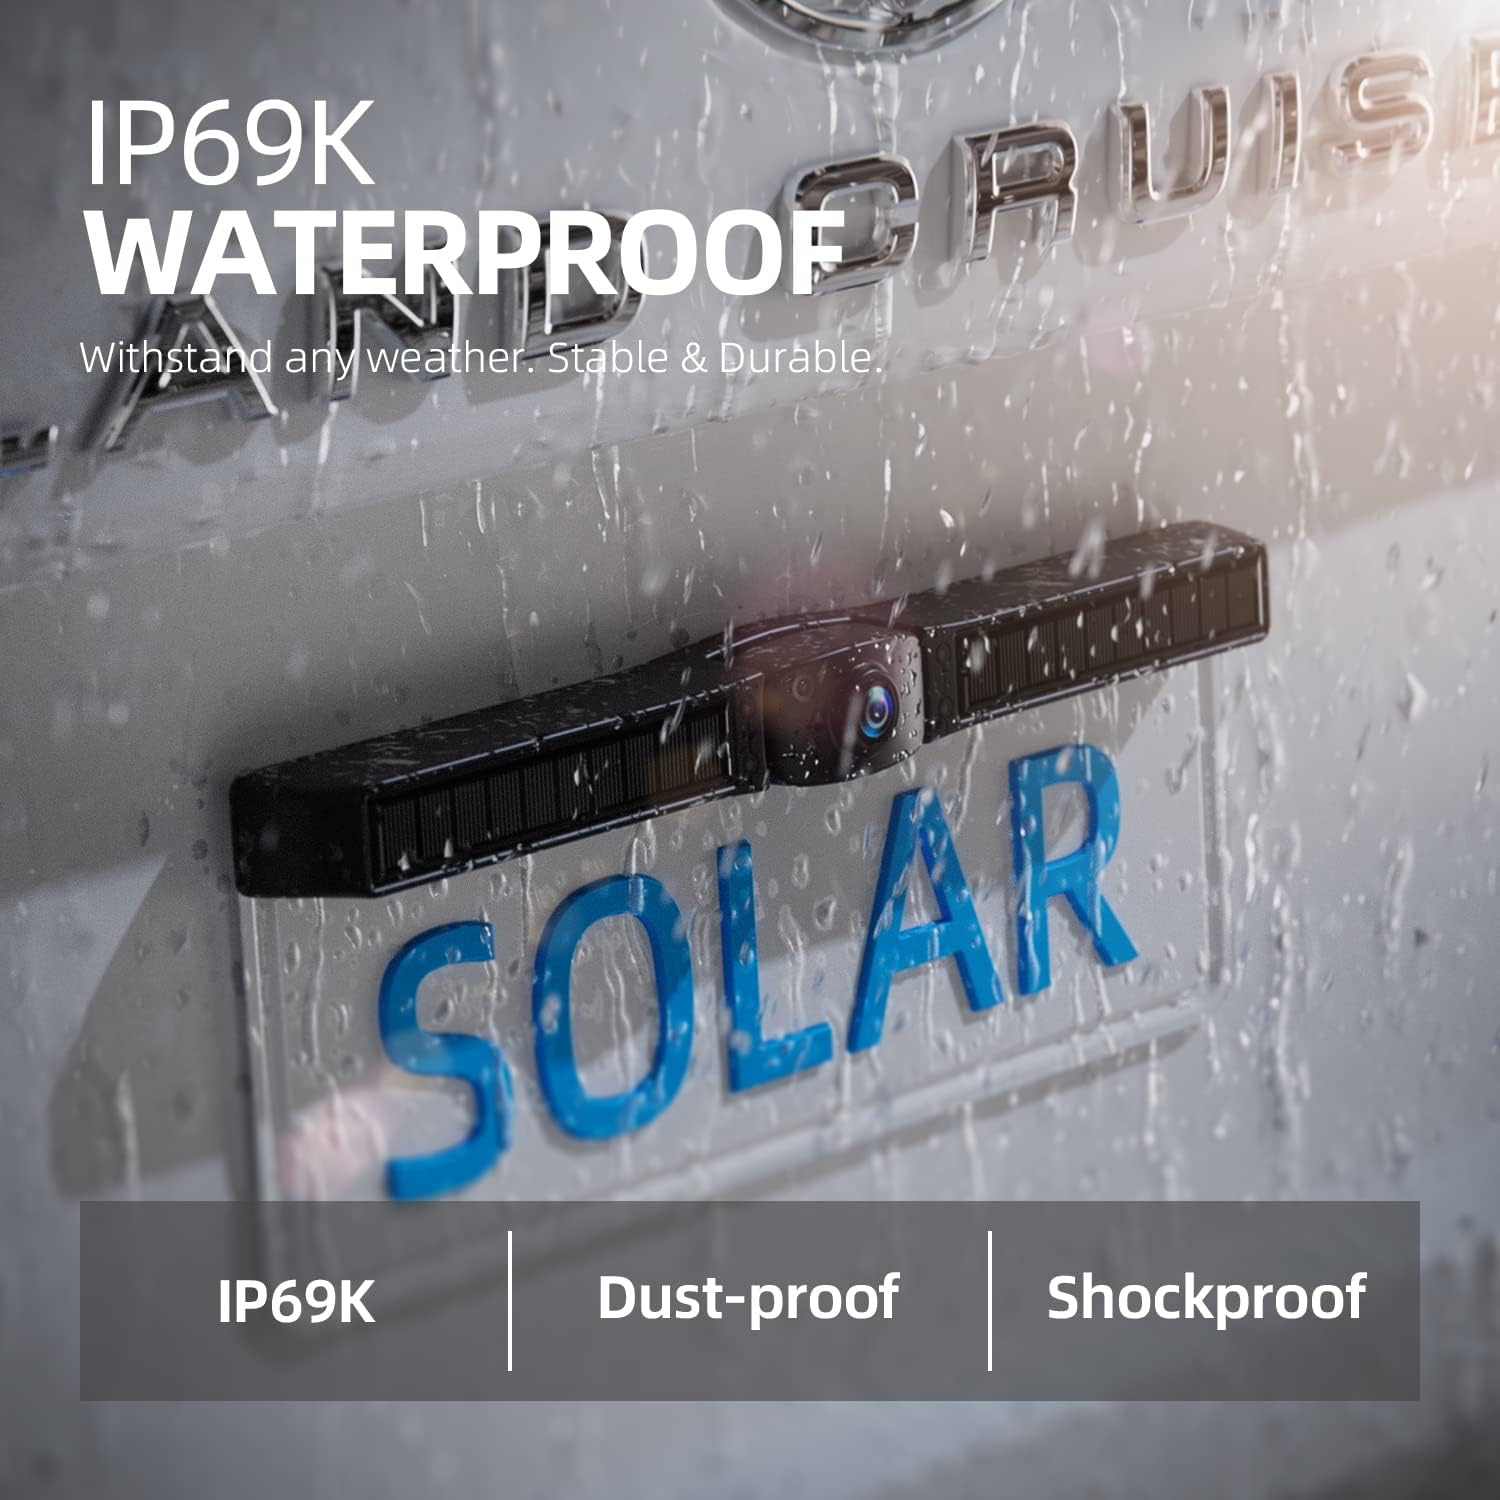
Image: The IP69K waterproof camera unit on a license plate, demonstrating its resilience to water exposure.
7. Troubleshooting
If you encounter issues with your eRapta Solar Wireless Backup Camera System, refer to the following common problems and solutions:
| Problem | Possible Cause | Solution |
|---|---|---|
| No image on monitor | Monitor not powered; Camera not powered; Camera and monitor not paired; Signal interference. | Check power connections; Ensure camera battery is charged; Perform manual pairing (Section 4.3); Relocate antenna or reduce obstructions. |
| Image flickering or unstable | Weak signal; Interference from other wireless devices. | Ensure camera and monitor are within range (max 40ft); Minimize obstructions between camera and monitor; Check antenna connection. |
| Camera not charging via solar | Solar panels dirty or obstructed; Insufficient sunlight. | Clean solar panels; Park in direct sunlight; Charge via Type-C cable. |
| Monitor not turning on | No power from car charger; Faulty car charger/cable. | Check car charger connection and vehicle's 12V outlet; Try a different USB cable or car charger. |
8. Specifications
| Feature | Specification |
|---|---|
| Model Number | ATYZX7 |
| Monitor Screen Size | 7 Inches |
| Display Resolution | 1080P |
| Camera Battery Capacity | 4800 mAh |
| Wireless Transmission Range | Up to 40 feet |
| Camera Waterproof Rating | IP69K |
| Camera Adjustment Angle | 60 Degrees (vertical) |
| Night Vision Type | Infrared (IR) |
| Power Input | 12 Volts (Car Charger), Type-C (Camera) |
| Product Dimensions | 13.4 x 6.7 x 2.3 inches |
| Item Weight | 2.16 pounds |
9. Warranty and Support
eRapta provides comprehensive support for its products:
- Lifetime Support: Customers are eligible for lifetime technical support for the product.
- 720-Day Replacement Warranty: The product is covered by a 720-day (approximately 2-year) replacement warranty from the date of purchase. Please retain your proof of purchase for warranty claims.
For further assistance or warranty claims, please contact eRapta customer service through their official channels.


