1. Introduction and System Overview
The TZJZ Home Alarm System is a DIY wireless 4G WiFi burglar alarm system designed for comprehensive home security. This self-monitoring system requires no monthly fees, installation fees, or contracts. It features a 4.3-inch touch screen panel and operates on a dual network (WIFI + 4G) for reliable communication.
Key features include:
- Dual Network Connectivity: Utilizes both WIFI and 4G networks to ensure continuous protection and timely alerts, even during power outages.
- Smart Life APP Integration: Full control over alarm modes, remote arming/disarming, and monitoring of all connected accessories via the Smart Life or Tuya Smart application.
- Voice Assistant Compatibility: Seamlessly connects with Google Assistant and Amazon Alexa for voice-activated control.
- One-Button SOS Function: Provides immediate assistance in emergencies by triggering the alarm system and notifying pre-set contacts.
- Intrusion Prevention: Triggers an alarm and sends notifications/calls upon detection of unauthorized entry.
- Expandable System: Supports up to 100 accessories, including wireless door/window sensors, motion sensors, remote controllers, and additional alarms, operating at 433MHz/EV1527.
- Adjustable Delay Timers: Customizable entry/exit delays for convenience and security.
2. Package Contents
Upon unboxing, please verify that all components listed below are present and in good condition:

Image: Complete TZJZ Home Alarm System kit, including the main panel, solar siren, motion sensor, door/window sensors, remote controls, RFID tags, and power adapter.
- 1 x 4.3-inch Touch Screen Control Panel
- 1 x Solar Audible and Visual Alarm Siren
- 1 x Wireless Motion Sensor
- 5 x Wireless Door/Window Sensors
- 2 x Remote Controls
- 2 x RFID Tags
- 1 x SOS Button
- 1 x Power Adapter
- Mounting Hardware (screws, adhesive pads)
3. Setup Guide
3.1 Initial Power-Up and Network Connection
- Connect the main control panel to a power outlet using the provided power adapter.
- The panel will power on and display the main interface.
- Wi-Fi Connection: Navigate to the network settings on the touch screen. Select your 2.4GHz Wi-Fi network and enter the password. Note: Only 2.4GHz Wi-Fi networks are supported.
- 4G Connection: Insert a compatible 4G SIM card (not included) into the designated slot on the panel. Ensure the SIM card has an active data plan for 4G functionality.
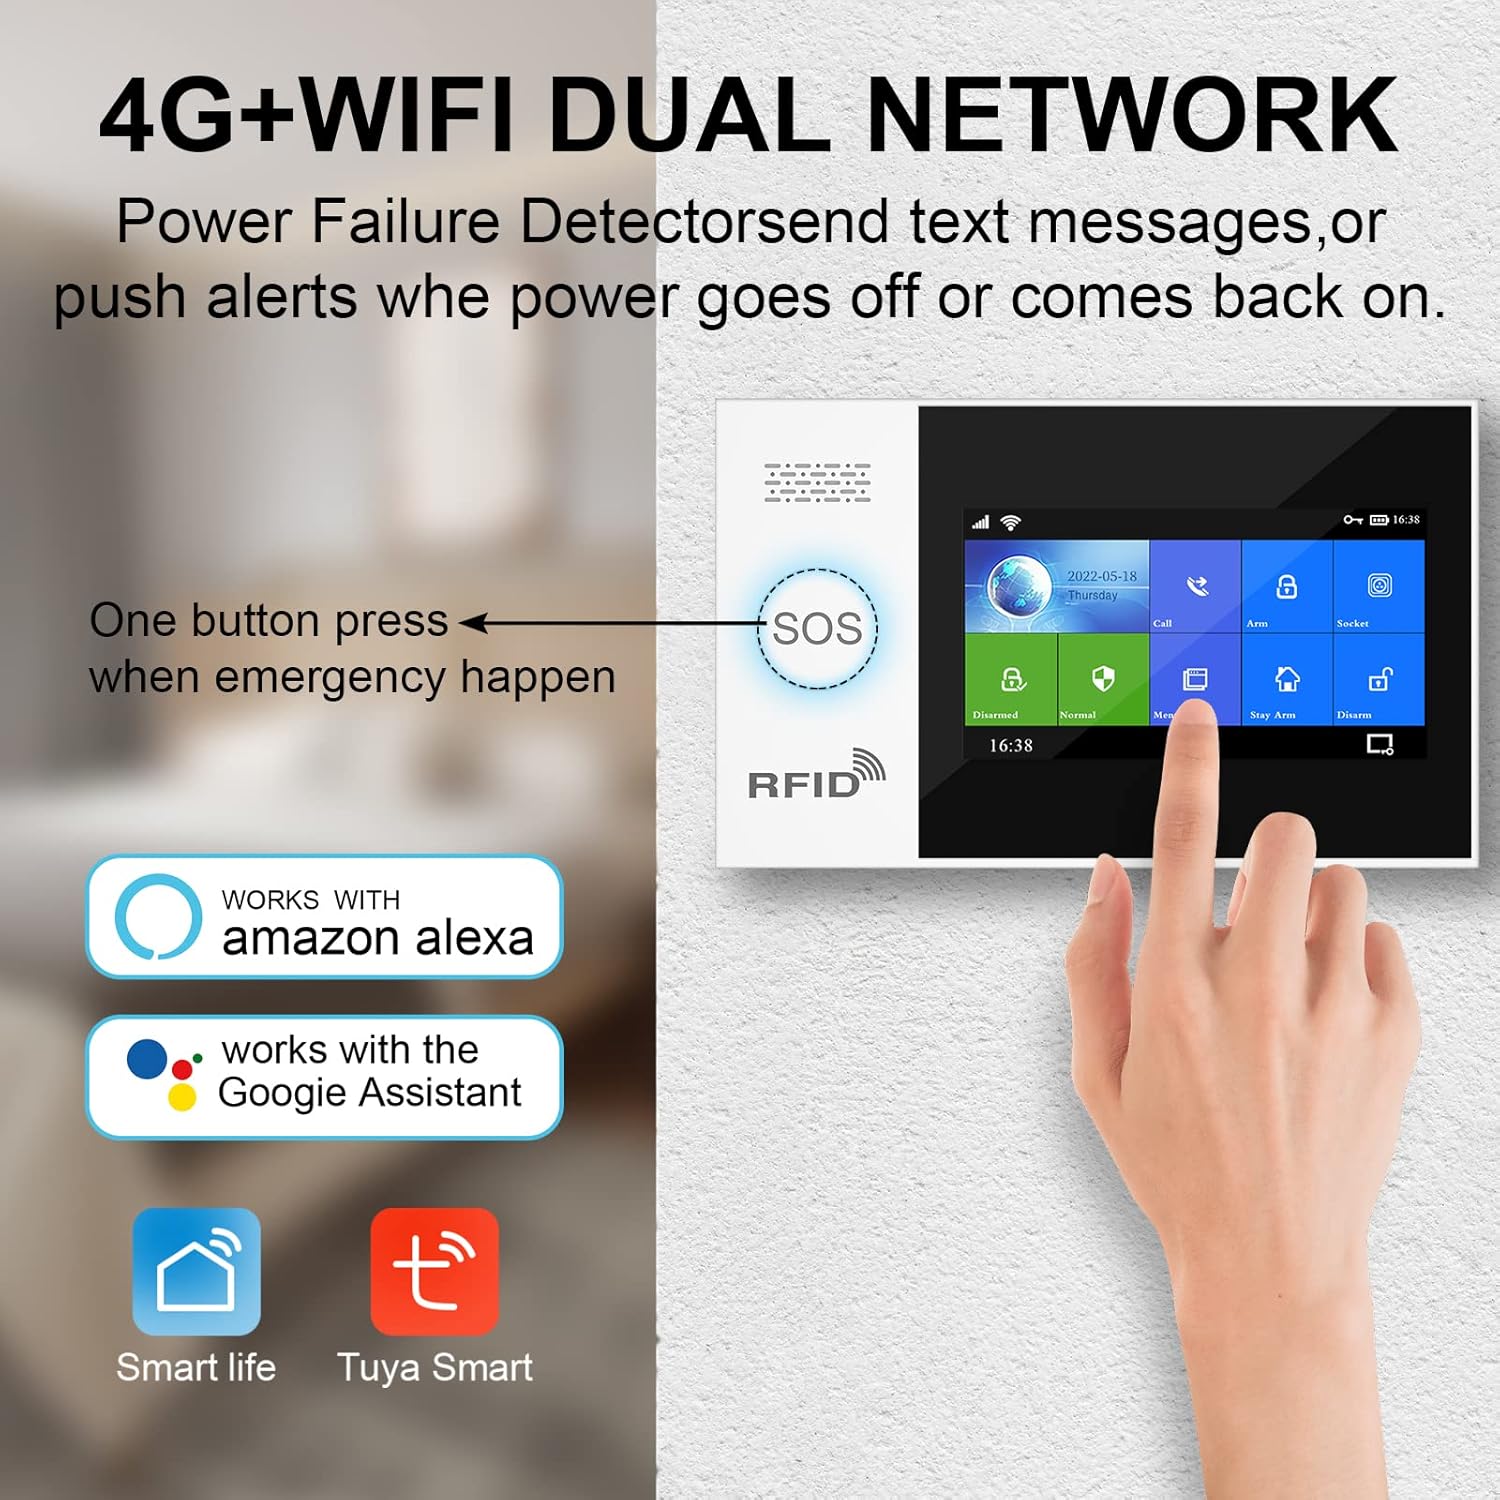
Image: The alarm panel highlighting its 4G+WiFi dual network capability, ensuring power failure detection and alerts.

Image: A hand interacting with the alarm panel, emphasizing compatibility with Google Home and Alexa, and a note that only 2.4GHz Wi-Fi networks are supported.
3.2 App Download and Pairing
- Download the Smart Life or Tuya Smart app from your smartphone's app store (iOS or Android).
- Register for a new account or log in if you already have one.
- In the app, follow the instructions to add a new device. Select the alarm system from the list of available devices.
- Follow the on-screen prompts to pair the control panel with your app. This typically involves scanning a QR code on the panel or entering a device ID.
3.3 Installing and Pairing Accessories
Each accessory (sensors, remotes) comes with adhesive pads or screws for easy installation. Place sensors strategically on doors, windows, or in areas requiring motion detection.

Image: An illustration of a house with various security sensors (door/window, motion, siren) strategically placed around the perimeter and interior.
- On the control panel, navigate to the 'Accessories' or 'Add Device' menu.
- Follow the panel's instructions to put it into pairing mode.
- Activate each accessory (e.g., open a door sensor, press a button on a remote, trigger a motion sensor) to send a signal to the panel.
- The panel will confirm successful pairing. Assign a name and zone to each accessory for easy identification in the app.

Image: A close-up view of the wireless door/window sensors, showing their compact design.

Image: A close-up view of the wireless motion sensor, designed for detecting movement within a room.
4. Operating Instructions
4.1 Arming and Disarming the System
The system can be armed or disarmed using the control panel, remote controls, RFID tags, or the Smart Life/Tuya Smart app.
- Control Panel: Tap the 'Arm' or 'Disarm' icons on the touch screen.
- Remote Control: Press the 'Arm' button (usually a closed padlock icon) to arm, and the 'Disarm' button (open padlock icon) to disarm.
- RFID Tag: Swipe the RFID tag over the designated RFID reader area on the control panel to disarm the system.
- Mobile App: Open the Smart Life/Tuya Smart app, select your alarm system, and tap the 'Arm' or 'Disarm' buttons.
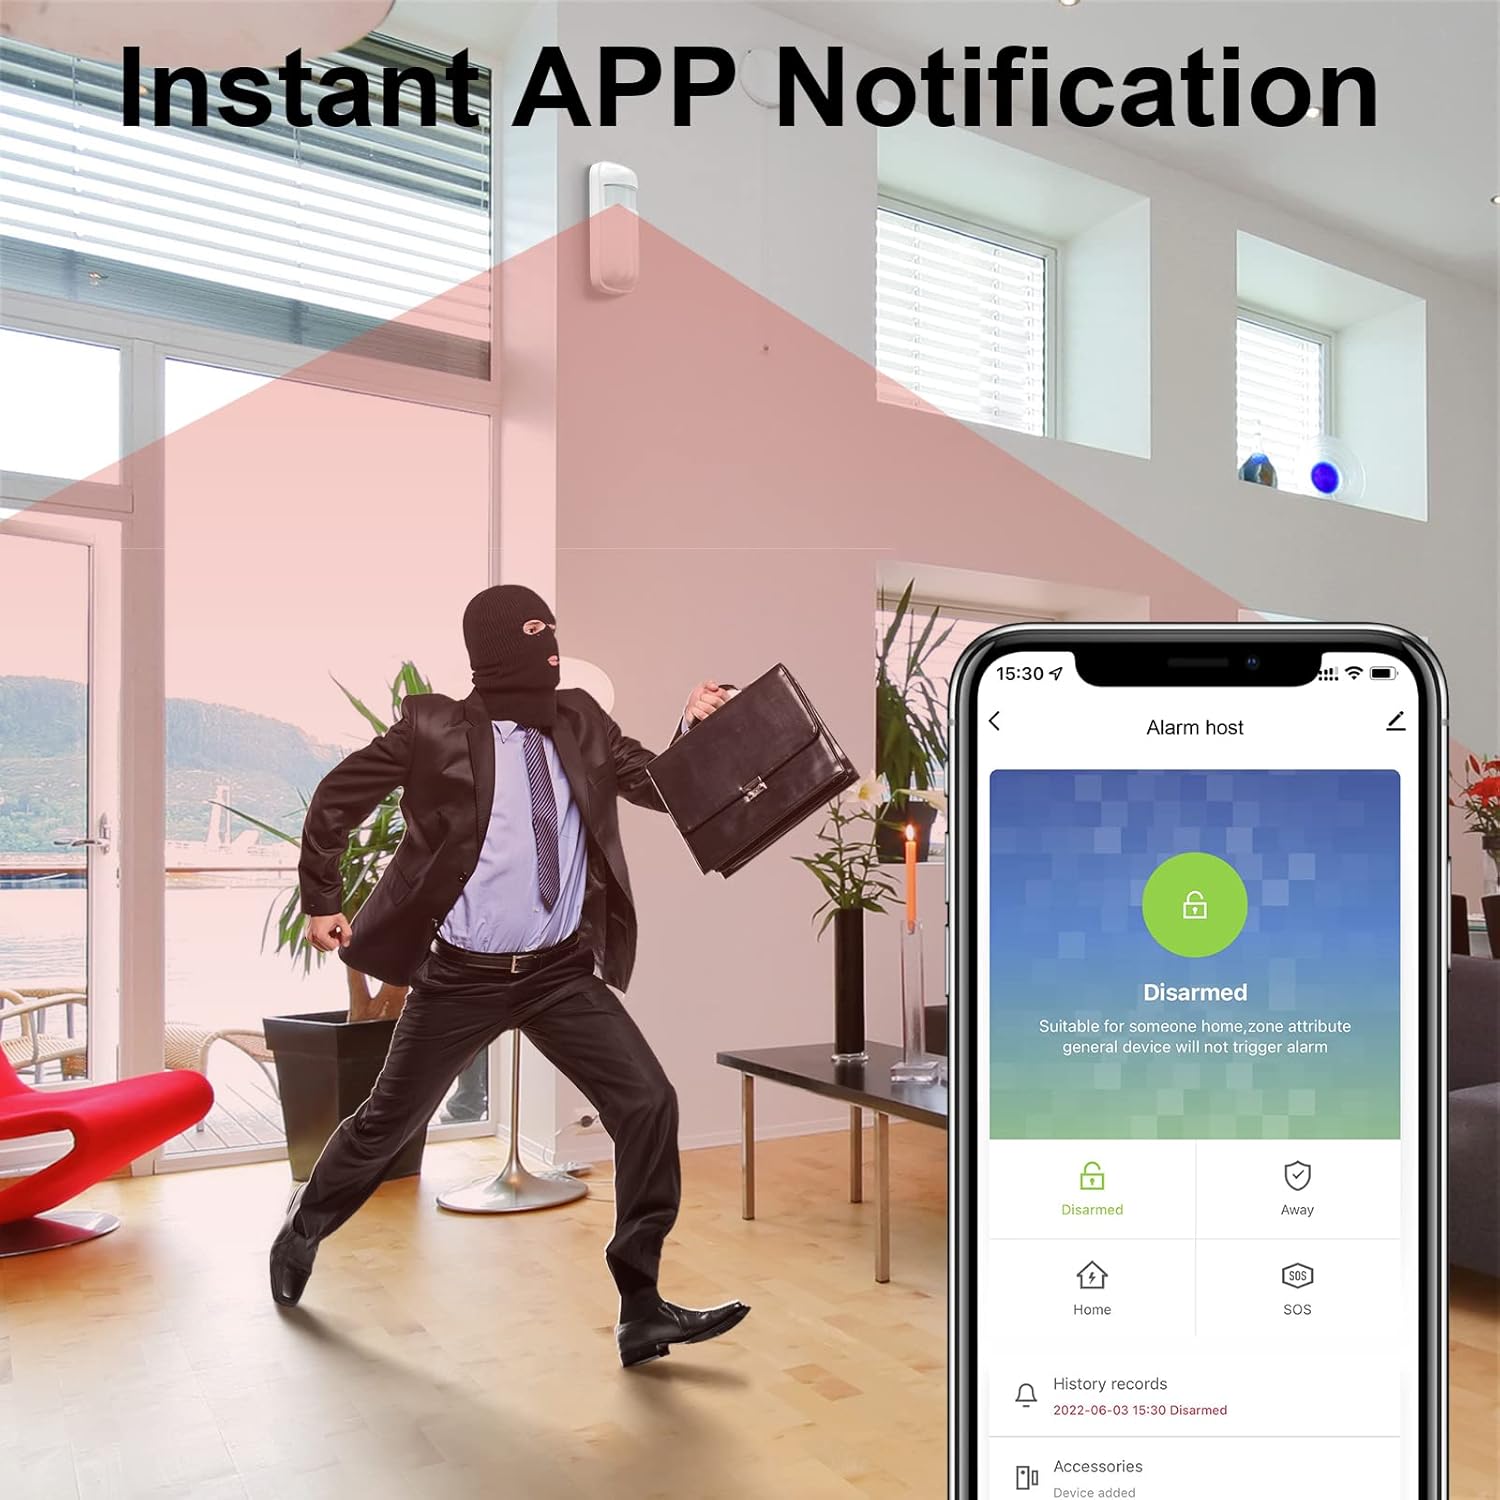
Image: An illustration showing an intruder in a home, with a smartphone displaying an instant app notification for a disarmed alarm system.

Image: An intruder attempting to open a window with a crowbar, while a smartphone displays an alarm notification and sound waves indicate a loud alarm.
4.2 SOS Function
In case of an emergency, press the SOS button on the control panel or the dedicated SOS button on the remote control. This will immediately trigger the alarm and send alerts to pre-programmed emergency contacts.

Image: An elderly couple smiling, with an overlay showing the alarm panel, SOS button, and remote controls, illustrating the ease of use for emergency situations.
4.3 Voice Control with Alexa and Google Assistant
Once the system is integrated with the Smart Life/Tuya Smart app, you can link it to your Amazon Alexa or Google Assistant devices for voice commands.
- Open the Alexa or Google Home app.
- Enable the 'Smart Life' or 'Tuya Smart' skill/service.
- Discover devices. Your alarm system will appear.
- You can now use voice commands such as:
- "Alexa, arm the security system."
- "Hey Google, disarm the alarm."
- "Alexa, what is the status of the home alarm?"

Image: A woman sitting on a bed with a laptop, with speech bubbles indicating voice commands like "Alexa, Please arm the security system." and the system's response "System armed!".
4.4 Adjusting Entry/Exit Delays
The control panel allows you to set a delay for arming and disarming, giving you time to enter or exit without triggering the alarm immediately.
- Access the 'Settings' menu on the control panel.
- Locate 'Entry Delay' and 'Exit Delay' options.
- Adjust the time in seconds as needed. Setting the entry delay to 0 seconds will trigger an immediate alert upon intrusion.
4.5 Solar Siren Operation
The included solar siren works in conjunction with the main security panel. It charges via solar power and provides an audible and visual deterrent when the alarm is triggered.

Image: A solar-powered audible and visual alarm siren mounted on a house wall, indicating its operation in conjunction with the security panel.
5. Maintenance
Regular maintenance ensures the optimal performance and longevity of your alarm system.
- Battery Check: Periodically check the battery status of all wireless sensors and the main panel's backup battery. Replace batteries as needed to prevent system failures.
- Cleaning: Gently wipe the control panel and sensors with a soft, dry cloth. Avoid using abrasive cleaners or solvents.
- Firmware Updates: Check the Smart Life/Tuya Smart app periodically for any available firmware updates for your control panel. Updates can improve performance and add new features.
- Sensor Placement: Ensure sensors remain securely mounted and free from obstructions that could interfere with their operation.
6. Troubleshooting
If you encounter issues with your TZJZ Home Alarm System, refer to the following common problems and solutions:
| Problem | Possible Cause | Solution |
|---|---|---|
| System not connecting to Wi-Fi | Incorrect Wi-Fi password; 5GHz network selected; router too far. | Double-check password. Ensure you are connecting to a 2.4GHz network. Move router closer or use a Wi-Fi extender. |
| Sensors not triggering alarm | Sensor battery low/dead; sensor not paired; incorrect zone settings. | Replace sensor batteries. Re-pair the sensor with the control panel. Verify zone settings in the app/panel. |
| False alarms | Improper sensor placement; pets triggering motion sensors; strong drafts. | Adjust motion sensor sensitivity or reposition it. Ensure door/window sensors are aligned correctly. Close windows/doors to prevent drafts. |
| Remote control not working | Battery dead; not paired. | Replace battery. Re-pair the remote control with the control panel. |
| Siren not sounding immediately with entry delay | Entry delay is active for the main system, but siren might not have its own configurable delay. | The main panel's entry delay applies to the system's alarm trigger. External sirens may not have individual delay settings. Ensure the main panel's delay is set as desired. |
If problems persist, please contact TZJZ customer support for further assistance.
7. Specifications
| Feature | Specification |
|---|---|
| Brand | TZJZ |
| Model Number | PG-107 |
| Power Source | Power Adapter (Main Panel), Solar Powered (Siren), Battery (Sensors) |
| Compatible Devices | Smartphone, Tablet (via Smart Life/Tuya Smart App), Alexa, Google Assistant |
| Connectivity Technology | Wireless (4G, WiFi 2.4GHz) |
| Wireless Frequency | 433MHz/EV1527 (for accessories) |
| Alert Type | Motion, Door/Window Open, SOS, Intrusion |
| Item Dimensions L x W x H | 12.6 x 9 x 4.5 inches |
| Item Weight | 3.56 pounds |
| Batteries | 1 Lithium Polymer battery required (included for main panel) |
8. Warranty and Support
For warranty information and technical support, please refer to the documentation included with your product or contact TZJZ customer service directly. Keep your purchase receipt for warranty claims.
For common inquiries and troubleshooting, you may also visit the TZJZ official website or contact their support channels.


