
Fridgemaster FMDH50PJX
Fridgemaster 50 Pint Dehumidifier User Manual
Model: FMDH50PJX
1. Introduction
Thank you for choosing the Fridgemaster 50 Pint Dehumidifier. This appliance is designed to efficiently remove excess moisture from your indoor environment, creating a more comfortable and healthier living space. It features a built-in pump for continuous drainage, multiple operating modes, and an adjustable humidistat. Please read this manual thoroughly before operating your dehumidifier to ensure safe and effective use.

Figure 1.1: Fridgemaster 50 Pint Dehumidifier
2. Safety Information
To prevent injury to the user or other people and property damage, the following instructions must be followed. Incorrect operation due to ignoring instructions may cause harm or damage.
- Always plug the unit into a grounded electrical outlet.
- Do not operate the dehumidifier if the power cord or plug is damaged.
- Do not block the air intake or exhaust vents.
- Ensure the water bucket is correctly installed before operation.
- Do not use the appliance in areas where flammable gases or combustible materials are present.
- Keep children and pets away from the unit during operation.
- Unplug the unit before cleaning or performing any maintenance.
3. Product Features
The Fridgemaster 50 Pint Dehumidifier is equipped with several features designed for optimal performance and user convenience:
- Efficient Moisture Removal: Capable of removing up to 50 Pint (6.5L) of moisture per day, suitable for spaces up to 4500 square feet.
- Low Noise Airflow System: Operates quietly at just 47 dB(A) on 'Low' fan setting.
- All-Season Performance: Reliable operation in temperatures as low as 38°F.
- Flexible Water Disposal Options: Features a slide-out internal bucket for manual emptying or a quick-connect hose for continuous drainage.
- User-Friendly Controls: Easy-to-use adjustable humidistat for precise humidity control.
- Filter Monitor: Indicates when the washable filter needs cleaning.
- Energy Efficient: Energy Star certified for reduced energy consumption.
- Programmable Timer: 24-hour on/off timer for scheduled operation.
- Full-Tank Alert/Shutoff: Automatically stops operation when the water bucket is full.
4. Components and Controls
Familiarize yourself with the main components and control panel of your dehumidifier:
4.1. Unit Components
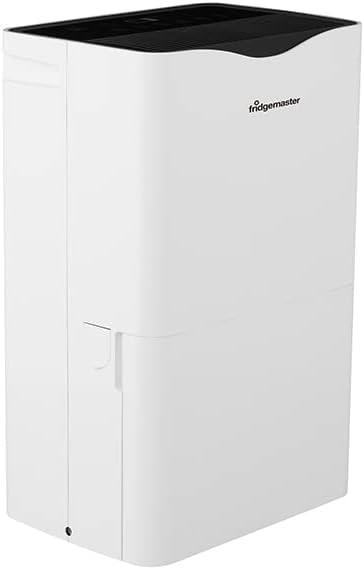
Figure 4.1: Front View (showing air intake, control panel, water bucket)

Figure 4.2: Rear View (showing air filter, continuous drain port, power cord)

Figure 4.3: Removable Water Bucket
4.2. Control Panel
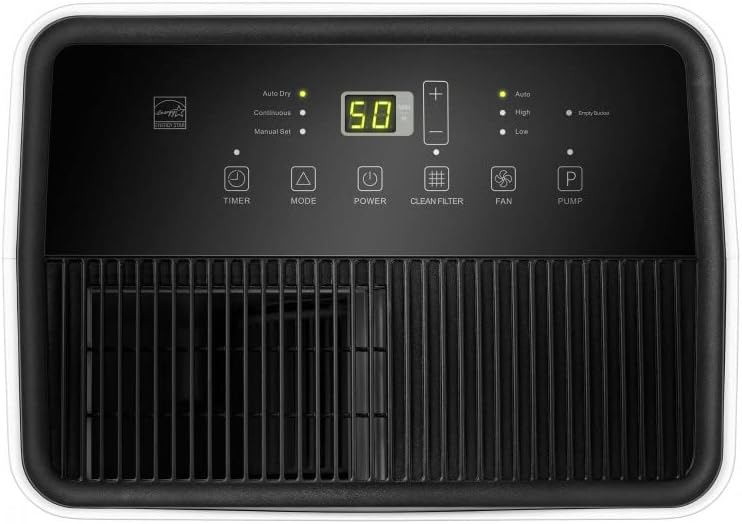
Figure 4.4: Control Panel Layout
The control panel features a digital display and various buttons for setting and monitoring the dehumidifier's functions:
- Digital Display: Shows current humidity level, set humidity, timer settings, and error codes.
- Power Button: Turns the unit on or off.
- Mode Button: Cycles through operating modes: Auto Dry, Continuous, Manual Set.
- Timer Button: Sets the 24-hour on/off timer.
- Fan Button: Adjusts fan speed (High/Low).
- Pump Button: Activates or deactivates the internal pump for continuous drainage.
- Clean Filter Indicator: Illuminates when the air filter needs cleaning.
- Humidity Up/Down Buttons (+/-): Adjusts the desired humidity level in Manual Set mode.
- Empty Bucket Indicator: Illuminates when the water bucket is full and needs to be emptied.
5. Setup
Follow these steps for initial setup of your dehumidifier:
- Unpacking: Carefully remove the dehumidifier from its packaging. Retain packaging materials for future storage or transport.
- Placement: Place the unit on a flat, level surface in an area where the temperature will not fall below 38°F (3°C). Ensure there is at least 8 inches (20 cm) of space around the unit for proper air circulation. Do not place it near heat-generating appliances or in direct sunlight.
- Power Connection: Plug the power cord into a grounded 115V AC, 60Hz electrical outlet.
- Water Drainage Options:
- Manual Drainage (Bucket): The unit will collect water in the internal bucket. When full, the 'Empty Bucket' indicator will light up, and the unit will automatically shut off.
- Continuous Drainage (Hose): For continuous operation without emptying the bucket, connect a standard garden hose (not included) to the continuous drain port on the back of the unit. Ensure the hose is sloped downwards to a floor drain or suitable receptacle.
- Pump Drainage (Included Hose): For vertical drainage, connect the included quick-connect hose to the pump drain port. The internal pump can discharge water up to 15 feet vertically. Ensure the hose is securely connected and directed to a sink or basement window.
6. Operating Instructions
Operating your Fridgemaster dehumidifier is straightforward:
6.1. Power On/Off
- Press the POWER button to turn the unit on or off.
6.2. Setting Desired Humidity Level
- When the unit is on, press the MODE button until 'Manual Set' is selected.
- Use the + or - buttons to set your desired humidity level between 35% RH and 85% RH in 5% increments. The unit will operate until the set humidity is reached, then cycle on and off to maintain it.
6.3. Operating Modes
- Press the MODE button to cycle through:
- Auto Dry: The unit automatically sets the humidity to 50% RH and adjusts fan speed.
- Continuous: The unit runs continuously regardless of humidity level. Ideal for very damp conditions.
- Manual Set: Allows you to manually set the desired humidity level.
6.4. Fan Speed
- Press the FAN button to switch between High and Low fan speeds.
6.5. Timer Function
- Auto-On Timer: With the unit off, press TIMER. Use + or - to set the desired auto-on time (1-24 hours).
- Auto-Off Timer: With the unit on, press TIMER. Use + or - to set the desired auto-off time (1-24 hours).
6.6. Pump Function
- If using the pump drainage option, press the PUMP button to activate the internal pump. The pump indicator light will illuminate.
7. Maintenance
Regular maintenance ensures efficient operation and extends the life of your dehumidifier.
7.1. Emptying the Water Bucket
- When the water bucket is full, the 'Empty Bucket' indicator will light up, and the unit will stop operating.
- Carefully pull out the water bucket from the front of the unit.
- Empty the collected water.
- Slide the bucket back into the unit until it clicks into place. The unit will resume operation.
7.2. Cleaning the Air Filter

Figure 7.1: Clean Filter Indicator

Figure 7.2: Air Filter Location
- The 'Clean Filter' indicator will light up after approximately 250 hours of operation.
- Turn off and unplug the unit.
- Remove the air filter from the rear of the unit.
- Wash the filter with warm, soapy water. Rinse thoroughly and allow it to air dry completely before reinstalling.
- Reinstall the dry filter and plug in the unit. Press the 'Clean Filter' button (or Power button on some models) to reset the indicator.
7.3. Storage
- If storing the unit for an extended period, ensure the water bucket is empty and clean.
- Clean the air filter.
- Coil the power cord neatly.
- Store the unit in an upright position in a cool, dry place, away from direct sunlight and extreme temperatures.
8. Troubleshooting
Before contacting customer service, please refer to the following table for common issues and their solutions:
| Problem | Possible Cause | Solution |
|---|---|---|
| Dehumidifier does not turn on. | No power; Water bucket full or not properly inserted; Temperature too low. | Check power cord connection; Empty and reinsert water bucket; Ensure room temperature is above 38°F (3°C). |
| Unit runs but does not dehumidify. | Air filter clogged; Room temperature too low; Humidity setting too high. | Clean air filter; Ensure room temperature is adequate; Lower the desired humidity setting. |
| Unit is noisy. | Unit not level; Air filter clogged; Obstruction in fan. | Place unit on a level surface; Clean air filter; Check for and remove any obstructions. |
| Water leaks from unit. | Water bucket not properly seated; Continuous drain hose loose or clogged. | Reinsert water bucket correctly; Check hose connection and clear any blockages. |
| Error Code E9 displayed. | Indicates a sensor error or malfunction. | Unplug the unit for 5 minutes, then plug it back in. If the error persists, contact customer support. |
9. Specifications
Key technical specifications for the Fridgemaster 50 Pint Dehumidifier:
| Specification | Value |
|---|---|
| Brand | Fridgemaster |
| Model Number | FMDH50PJX |
| Colour | White |
| Product Dimensions | 35 x 27 x 66 cm (13.8 x 10.6 x 26 inches) |
| Item Weight | 19.7 kg (43.4 lbs) |
| Capacity (Moisture Removal) | 50 Pint (6.5 liters) per day |
| Number of Speeds | 2 (High, Low) |
| Special Features | Digital Display, Built-in Pump |
| Floor Area Coverage | Up to 4500 Square Feet |
| Energy Certification | Energy Star |
10. Warranty and Support
This Fridgemaster dehumidifier comes with a 1-year Exchange Warranty from the date of purchase. This warranty covers defects in materials and workmanship under normal use.
For warranty claims, technical support, or any questions regarding your product, please contact Fridgemaster customer service. Please have your model number (FMDH50PJX) and proof of purchase readily available when contacting support.
Related documentsFMDH50PJX


Ask a question about this manual
Ask about setup, troubleshooting, compatibility, parts, safety, or missing instructions. Manuals+ will review the question and use this page’s manual context to help answer it.