
Introduction
Thank you for choosing the Untrammelife Gold Wagon Wheel Chandelier. This manual provides detailed instructions for the safe installation, operation, and maintenance of your new lighting fixture. Please read all instructions carefully before beginning installation and retain this manual for future reference.

The Untrammelife Gold Wagon Wheel Chandelier, featuring 8 lights and white fabric shades, elegantly installed in a living room setting.
Important Safety Information
WARNING: Risk of electric shock. Disconnect power at the fuse box or circuit breaker before installation or servicing.
CAUTION:
- For your safety, read and understand the information provided in this manual completely before attempting to assemble, install, or operate this product.
- All electrical connections must be in accordance with local codes, ordinances, or the National Electric Code (NEC). Contact a qualified electrician if you are unfamiliar with proper electrical wiring connections.
- Use only the recommended bulb type and wattage to avoid fire or electrical hazards.
- Ensure the fixture is securely mounted to a structurally sound part of the ceiling.
- Wear safety glasses and gloves during installation.
What's Included
Carefully unpack all components and check for any damage. Ensure all parts are present before discarding packaging materials.
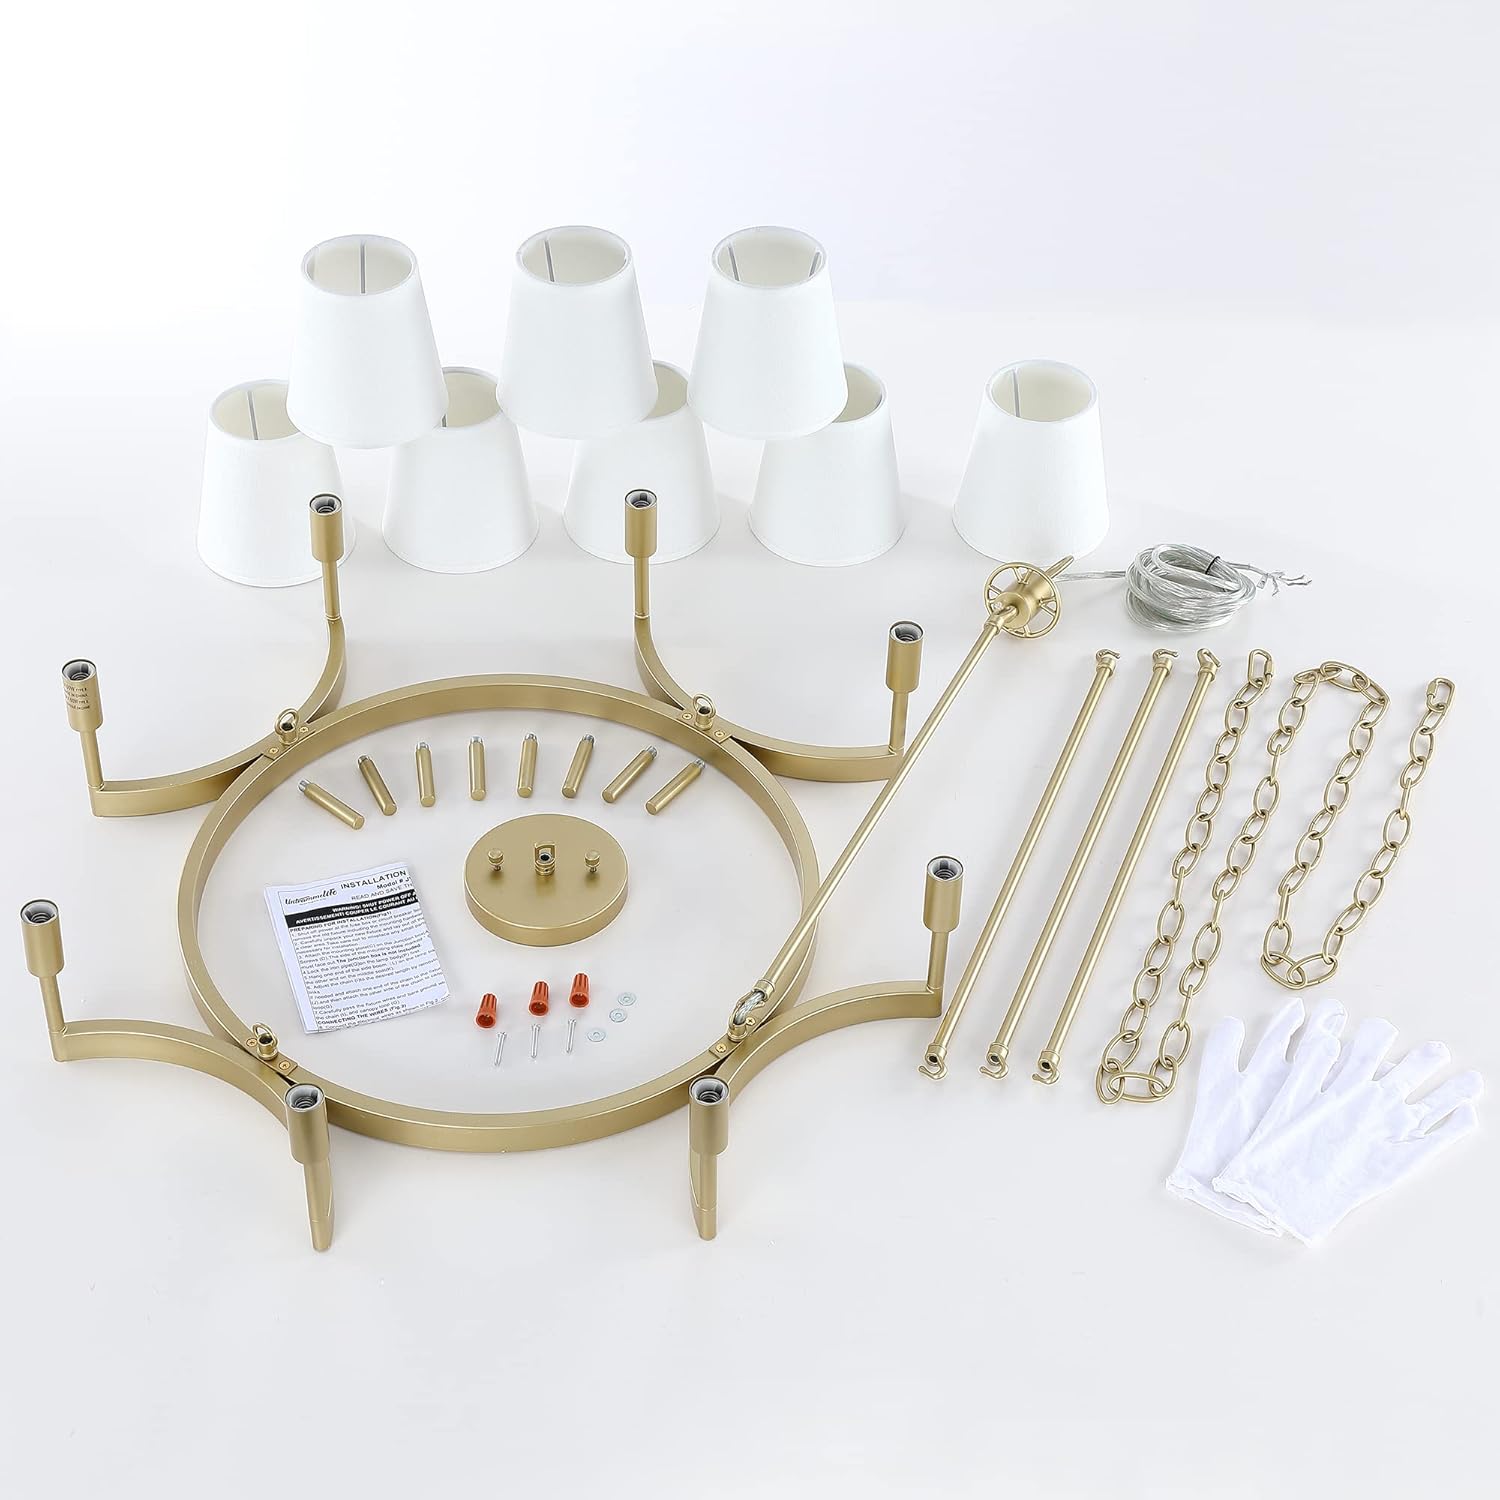
Overview of the chandelier components, including the gold-finished frame, eight white fabric shades, adjustable chain, and installation hardware.
The package includes:
- Chandelier Frame (Wagon Wheel design)
- 8 x Fabric Shades
- Adjustable Hanging Chain
- Mounting Canopy and Hardware
- Installation Instructions
- Gloves (for handling)
Note: Bulbs are NOT included.
Setup and Installation
This chandelier requires assembly. Follow these steps for proper installation. It is recommended to have two people for installation.
- Prepare for Installation:
- Turn off power at the circuit breaker or fuse box.
- Ensure the mounting surface is clean, dry, and flat.
- Gather necessary tools (screwdriver, wire strippers, ladder, etc.).
- Assemble the Chandelier Frame:
Connect the various parts of the gold-finished frame as per the detailed diagram in the included instruction sheet. Ensure all connections are secure.
- Determine Hanging Height:
The chandelier features an adjustable chain with a maximum length of 72 inches. Adjust the chain length to achieve your desired hanging height. The total maximum height from ceiling to bottom of fixture is 92 inches.

Dimensions and adjustable chain feature of the chandelier.
- Mount the Canopy:
Attach the mounting bracket to the junction box in the ceiling. Secure the canopy to the mounting bracket.
- Wire the Fixture:
Connect the fixture's wires to the house wiring according to standard electrical codes (black to black, white to white, ground to ground). Use wire nuts to secure connections.
- Hang the Chandelier:
Carefully lift and hang the chandelier from the chain onto the mounted canopy hook, ensuring it is stable and secure.
- Install Fabric Shades:
Attach the white fabric shades to each of the 8 light sockets. Ensure they are firmly in place.

Detail of the white fabric shades, which provide soft, diffused light.
- Install Bulbs:
Screw in the appropriate E12 base bulbs (not included) into each socket. Do not exceed the maximum wattage of 40W per bulb.

Step-by-step visual guide for chandelier installation.
Operating Instructions
Bulb Requirements
This chandelier requires 8 x E12 base bulbs. The maximum wattage per bulb is 40W. Compatible bulb types include LED, CFL, halogen, or incandescent bulbs.
- Recommended: LED bulbs for energy efficiency and longevity.
- Incandescent: Provides a warm glow.
- Halogen/CFL: Also compatible.

Visual guide for compatible E12 bulb types. Bulbs are not included.
Dimmable Functionality
The chandelier is dimmable when used with dimmable E12 bulbs and a compatible dimmer switch (both sold separately). This allows you to adjust the light intensity to suit your ambiance needs.
Turning On/Off
Once installed and wired correctly, operate the chandelier using your wall switch. If a dimmer switch is installed, you can control both on/off and brightness.
Maintenance
Regular maintenance will help preserve the appearance and functionality of your chandelier.
- Cleaning: Always disconnect power before cleaning. Use a soft, dry cloth to wipe the metal frame. For the fabric shades, gently dust with a soft brush or use a lint roller. Avoid using abrasive cleaners or solvents, as these can damage the finish or fabric.
- Bulb Replacement: Ensure the power is off and bulbs have cooled before replacing. Screw in new E12 base bulbs, ensuring they do not exceed 40W.
- Inspections: Periodically check all connections and mounting hardware to ensure they remain secure.
Troubleshooting
| Problem | Possible Cause | Solution |
|---|---|---|
| Light does not turn on. |
|
|
| Lights flicker or dim unexpectedly. |
|
|
| Fixture is unstable or wobbles. |
|
|
Product Specifications
| Feature | Detail |
|---|---|
| Brand | Untrammelife |
| Model Number | JY2022-149 |
| Material | Iron (Frame), Cotton or Linen (Shades) |
| Color | Brushed Brass (Frame), White (Shades) |
| Style | Modern Farmhouse |
| Light Fixture Form | Chandelier |
| Number of Lights | 8 |
| Bulb Base | E12 |
| Max Wattage per Bulb | 40W |
| Compatible Bulb Types | LED, CFL, Halogen, Incandescent |
| Dimmable | Yes (with dimmable bulbs and compatible dimmer switch, not included) |
| Power Source | Corded Electric |
| Dimensions (L x W x H) | 30"L x 30"W x 25"H |
| Max Hanging Height | 92" (including fixture and 72" chain) |
| Installation Type | Semi Flush Mount |
| Indoor/Outdoor Usage | Indoor |
| Certifications | ETL Listed |
Warranty Information
This Untrammelife product comes with a 5-year warranty from the date of purchase. This warranty covers defects in materials and workmanship under normal use. It does not cover damage resulting from improper installation, accident, misuse, abuse, or unauthorized modifications.
Please retain your proof of purchase for warranty claims.
Customer Support
If you have any questions regarding the installation, operation, or maintenance of your Untrammelife Gold Wagon Wheel Chandelier, please contact our customer support team.
For more information and products, visit the official Untrammelife Store on Amazon.