
1. Introduction
The XTAR VC4 Plus is an advanced four-slot universal battery charger designed for various rechargeable battery types. It features multiple functions including fast charging, real capacity testing, internal resistance measurement, 0V activation, and a long-term storage mode. This manual provides essential information for safe and efficient operation of your charger.

Image 1: XTAR VC4 Plus charger with supported battery types.
2. Key Features
- 3A Fast Charging: Capable of charging a single battery at up to 3A.
- Multi-Type Battery Compatibility: Supports 3.6V/3.7V Li-ion batteries (10440, 14500, 14650, 16340, 17335, 17500, 17670, 18350, 18490, 18500, 18650, 18700, 20700, 21700, 22650, 25500, 26650, 32650) and 1.2V Ni-MH/Ni-Cd batteries (AAAA, AAA, AA, A, SC, C). Note: Not compatible with 1.5V Li-ion AA/AAA batteries.
- Real Capacity Measurement (Grad Mode): Performs a charge-discharge-charge cycle to determine the actual capacity of your batteries.
- Long-Term Storage Mode (Store Mode): Adjusts battery voltage to an optimal level for extended storage, maximizing battery lifespan.
- LCD Display: Provides real-time information including voltage (V), set current (mA), charged capacity (mAh), charging current (mA), battery type, and internal resistance (Ω) for each of the four independent slots.
- 0V Activation Function: Can reactivate deeply discharged batteries.
- Multiple Protections: Includes overcharge, over-voltage, over-current, short-circuit, over-heat, and reverse polarity protection.

Image 2: Safety features of the XTAR VC4 Plus charger.
3. Setup
- Power Connection: Connect the charger to a power source using a QC3.0 18W adapter (not included) for optimal 3A fast charging. Ensure the power source is stable.
- Initial Display: After connecting power, wait for the LCD display to fully light up and initialize before inserting any batteries.
- Battery Insertion: Insert batteries into the charging slots, ensuring correct polarity (+ and - ends). The charger will automatically detect the battery type and begin charging.
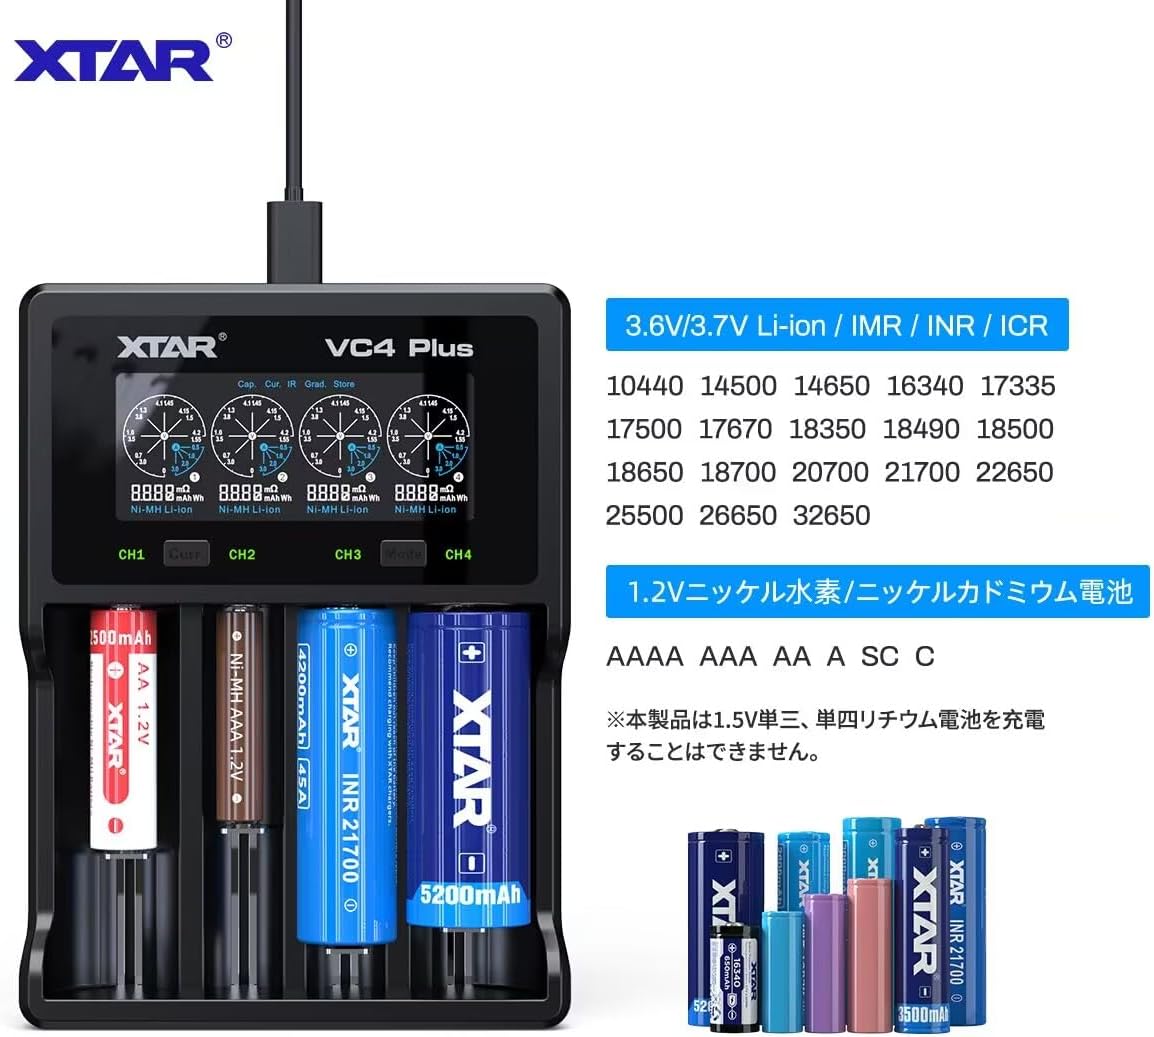
Image 3: Proper battery insertion and initial display.
4. Operation
4.1. Charging
- The charger automatically detects battery type and selects an appropriate charging current.
- For 3A fast charging, ensure you are using a QC3.0 18W power adapter, the battery's internal resistance is below 40mΩ, and only one battery is inserted.
- Ni-MH batteries will charge at a fixed current of 0.5A.
- To manually adjust the charging current, press the 'Curr' button. The available current options are 3000mA, 2000mA, 1000mA, 500mA, 250mA.

Image 4: Adjusting charging current.
4.2. Real Capacity Measurement (Grad Mode)
- Insert the battery into a slot.
- Press the 'Mode' button to cycle through modes until 'Grad' is displayed.
- The charger will perform a full charge, then discharge the battery, and finally recharge it. The discharged capacity will be displayed as the real capacity.

Image 5: Real capacity measurement in Grad mode.
4.3. Long-Term Storage Mode (Store Mode)
- Insert the battery into a slot.
- Press the 'Mode' button to cycle through modes until 'Store' is displayed.
- The charger will adjust the battery's voltage to an optimal level for long-term storage (recommended for storage exceeding one month).

Image 6: Long-term storage mode.
4.4. 0V Activation Function
- The charger can attempt to reactivate over-discharged batteries with a small current of approximately 150mA.
- If the battery voltage does not reach the activation threshold (2.5V for Li-ion, 0.8V for Ni-MH) within 10 minutes, the activation is considered failed.
- You can attempt activation up to three consecutive times. If all attempts fail, the battery is likely faulty and should not be used.
5. Maintenance
- Keep the charger clean and dry. Avoid exposure to moisture or extreme temperatures.
- Regularly inspect the charging slots and contacts for any debris or corrosion. Clean with a dry, soft cloth if necessary.
- Do not attempt to disassemble or modify the charger. This will void the warranty and may cause damage or injury.
- Store the charger in a cool, dry place when not in use.
6. Troubleshooting
6.1. LED Blinks Red / "Err" Displayed
- Ni-MH Battery Identification: For Ni-MH batteries, the red LED will blink for approximately 10 minutes during the identification process. It will turn solid red once identification is complete. This is normal operation.
- Damaged Slot: If a charging slot is damaged, its corresponding LED will blink and "err" will be displayed.
- Reverse Polarity: Ensure the battery is inserted with the correct positive (+) and negative (-) polarity. Reverse insertion will cause an "err" message.
6.2. Display Darkens
- The charger's display automatically enters power-saving mode after a period of inactivity. Press any button to reactivate the backlight. This is a normal function to conserve energy.
6.3. Battery Not Charging / "FULL" Not Displayed
- AAA Battery Contact: For small AAA batteries, ensure proper contact between the battery terminals and the charger's contacts. Misalignment can prevent charging.
- Movement During Capacity Test: If the battery is moved during a capacity measurement (Grad mode), the process may be interrupted, and charging may not complete correctly.
- Re-charging Function: The charger has a re-charging function. If a fully charged battery is not removed promptly, the charger may initiate a trickle charge, and "FULL" may not be continuously displayed.
- High Internal Resistance/Self-Discharge: If the battery's internal resistance is too high or its self-discharge current exceeds the charger's trickle charge current, the charger may not detect a full charge, and "FULL" will not be displayed.
6.4. Ni-MH Battery Heats Up During Charging
- High Internal Resistance: If the battery has high internal resistance, it may continuously heat up during charging without reaching a full charge state.
- Internal Micro Short Circuit: A micro short circuit within the battery can cause severe heating during charging.
- Excessive Charging Current: Selecting a charging current that is too high for the Ni-MH battery can cause significant heating. Always choose a smaller charging current for Ni-MH batteries.
- Degraded Batteries: Avoid charging severely degraded or damaged batteries, as they are prone to overheating.
7. Specifications
| Brand | XTAR |
| Model | VC4 Plus |
| Product Dimensions (D x W x H) | 4.3 x 12.6 x 19 cm |
| Product Weight | 0.34 Kilograms |
| Output Voltage | 3.7 Volts |
| Compatible Battery Types | 3.6V/3.7V Li-ion (10440-32650), 1.2V Ni-MH/Ni-Cd (AAAA-C) |
| UPC | 768472925374 |
| Country of Origin | China |
8. Warranty and Support
The XTAR VC4 Plus charger comes with a 1-year warranty against manufacturer defects. For warranty claims or technical support, please contact XTAR customer service through their official channels or the retailer where the product was purchased.
For additional information and support, you may visit the XTAR Official Store on Amazon.


