
LILLIPUT HVS0401E
LILLIPUT AVMATRIX HVS0401E Video Switcher Mixer User Manual
Model: HVS0401E
1. Introduction
The AVMATRIX HVS0401E is a compact 4-channel video switcher mixer designed for live streaming and recording applications. It features multiple HDMI and DisplayPort inputs, along with various outputs including HDMI PGM, Multiview, USB Type-C for video capture, and LAN for RTMP streaming. This manual provides essential information for setting up, operating, and maintaining your device.
2. What's in the Box
Carefully unpack the box and ensure all items are present:
- Power adapter (x1)
- Tally connector (x1)
- USB cable (x1)
3. Product Overview and Features
The AVMATRIX HVS0401E offers a robust set of features for professional video production.
3.1 Key Features
- Inputs 1-3: HDMI; Input 4: HDMI/DP
- Outputs: HDMI PGM (x2), Multiview (x1), USB Type-C (x1), LAN (x1)
- LAN port for RTMP streaming and firmware upgrades
- USB disk/SD card support for PGM recording
- USB Type-C for video capturing (UVC)
- Audio Mixer: 3.5mm MIC/RCA/HDMI embedded audio
- Picture-in-Picture (PIP) function with adjustable size and position
- AUTO/CUT transitions and MIX/FADE/WIPE effects
- GPIO interface for live tally system
- FTB (Fade to Black) for emergency situations
- Image Still function
3.2 Device Layout

Figure 1: Front view of the AVMATRIX HVS0401E Video Switcher Mixer, highlighting its compact design and control buttons.
3.3 Rich Interfaces
The switcher provides a comprehensive set of input and output interfaces for versatile connectivity.
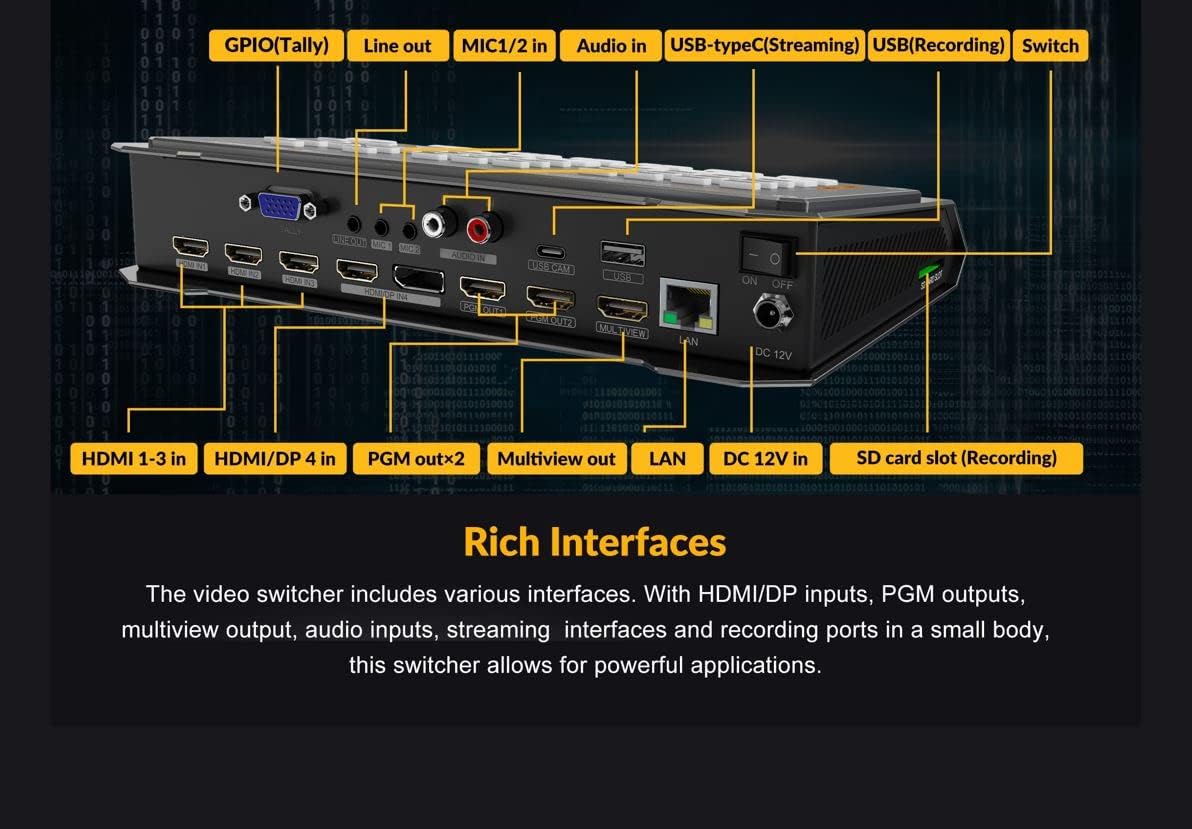
Figure 2: Rear panel of the AVMATRIX HVS0401E, showing various input and output ports including HDMI, DisplayPort, PGM out, Multiview out, USB-C, LAN, audio inputs, and Tally.
3.4 Convenient Control Panel
The intuitive control panel allows for easy management of video sources, transitions, and audio.

Figure 3: Detailed view of the AVMATRIX HVS0401E control panel, illustrating buttons for PVW & PGM selection, audio control, transition effects (MIX/FADE/WIPE, CUT, AUTO), and menu navigation.
4. Setup
Follow these steps to set up your AVMATRIX HVS0401E Video Switcher Mixer:
- Power Connection: Connect the provided power adapter to the DC 12V input on the rear panel and plug it into a power outlet. Turn on the device using the power switch.
- Video Input Connection: Connect your HDMI or DisplayPort video sources (cameras, computers, media players) to the HDMI 1-3 IN and HDMI/DP 4 IN ports.
- Video Output Connection:
- Connect your program display (e.g., monitor, projector) to the HDMI PGM OUT ports.
- Connect a multiview monitor to the Multiview OUT port to see all inputs simultaneously.
- Audio Input Connection: Connect microphones to the MIC 1/2 IN (3.5mm jack) or other audio sources to the AUDIO IN (RCA) ports. HDMI embedded audio will also be detected automatically.
- USB Type-C Connection (for Capture): Connect a USB Type-C cable from the switcher's USB-C port to your computer for video capture using UVC compatible software.
- LAN Connection (for Streaming/Upgrade): Connect an Ethernet cable from the LAN port to your network router for RTMP streaming or firmware updates.
- SD Card/USB Disk (for Recording): Insert an SD card into the SD card slot or a USB disk into the USB (Recording) port for program recording.
5. Operating Instructions
This section outlines the basic operation of the AVMATRIX HVS0401E.
5.1 Input Selection
Use the numbered buttons (1, 2, 3, 4) on the control panel to select your desired video input for Preview (PVW) and Program (PGM). The top row of buttons typically selects the Preview source, and the bottom row selects the Program source.
5.2 Transitions
The switcher supports various transition effects:
- CUT: Performs an immediate switch between Preview and Program. Press the CUT button.
- AUTO: Performs an automated transition between Preview and Program with a set speed. Press the AUTO button. Transition speed can be adjusted via the menu.
- MIX/FADE/WIPE: These are different types of transition effects. Select the desired effect and then use the BAR (T-Bar) to manually control the transition.
5.3 Audio Mixing
The built-in audio mixer allows you to control audio levels for each input. Use the dedicated audio controls on the panel or access the audio mixer settings via the menu. The MUTE function is available for emergency situations.
5.4 Recording
To record your program output:
- Ensure an SD card or USB disk is inserted.
- Navigate to the recording settings in the menu to configure recording parameters (format, bitrate, etc.).
- Initiate recording using the designated record button or menu option.
5.5 Live Streaming
The LAN port enables RTMP streaming:
- Connect the switcher to your network via the LAN port.
- Access the device's web interface via its IP address (refer to the manual for default IP or how to find it).
- Configure RTMP streaming settings (server URL, stream key) within the web interface.
- Start streaming to platforms like YouTube, Facebook, Twitch, etc.

Figure 4: Illustration of the AVMATRIX HVS0401E's capability to live stream via its Ethernet port to various social media platforms.
5.6 USB Capture & Streaming
Utilize the USB Type-C port for direct video capture to a computer.

Figure 5: Diagram showing the AVMATRIX HVS0401E connected to a computer via USB-C for video capture, compatible with software like OBS Studio.
5.7 Visible Web Page Controls
The device can be controlled and monitored via a web interface, accessible through its LAN connection.
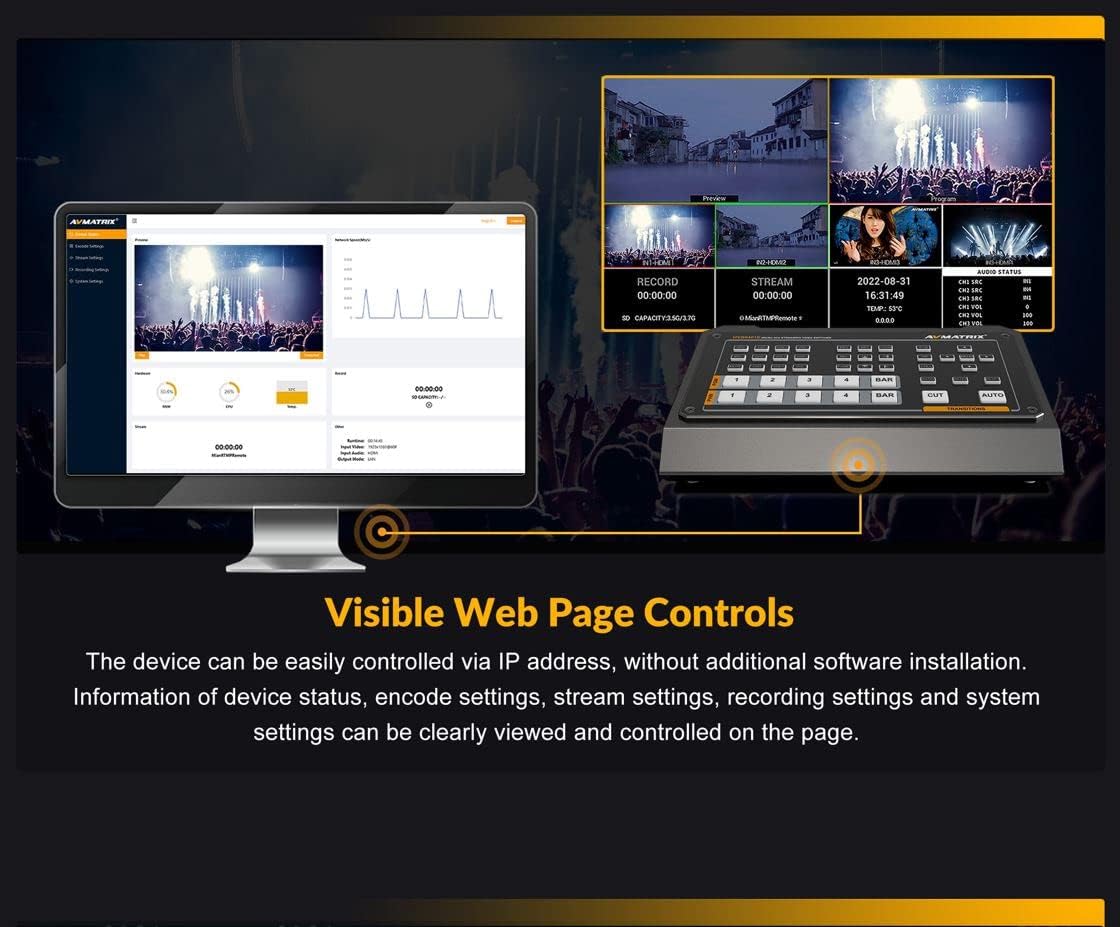
Figure 6: Screenshot of the AVMATRIX HVS0401E's web-based control interface, displaying device status, encoding settings, stream information, and recording options.
6. Maintenance
Proper maintenance ensures the longevity and optimal performance of your AVMATRIX HVS0401E.
- Cleaning: Use a soft, dry cloth to clean the exterior of the device. Avoid using liquid cleaners or solvents, as they may damage the finish or internal components.
- Ventilation: Ensure the device has adequate ventilation to prevent overheating. Do not block the ventilation openings.
- Storage: When not in use, store the switcher in a cool, dry place away from direct sunlight and extreme temperatures.
- Firmware Updates: Regularly check the manufacturer's website for firmware updates to ensure your device has the latest features and bug fixes. Updates can typically be performed via the LAN port.
7. Troubleshooting
If you encounter issues with your AVMATRIX HVS0401E, refer to the following common problems and solutions:
- No Video Output:
- Check all HDMI/DP cable connections to ensure they are secure.
- Verify that the input source is powered on and outputting a signal.
- Ensure the correct input is selected on the switcher.
- Confirm that the output display is correctly connected and set to the appropriate input.
- No Audio:
- Check audio cable connections (MIC, RCA).
- Verify audio levels in the switcher's audio mixer.
- Ensure the audio source is active and outputting sound.
- If using HDMI embedded audio, confirm the source device is sending audio.
- Recording Failure:
- Check if the SD card or USB disk is properly inserted and has sufficient free space.
- Ensure the storage device is formatted correctly (FAT32/exFAT/NTFS).
- Verify recording settings in the menu.
- Streaming Issues:
- Confirm the LAN cable is securely connected and your network is active.
- Check RTMP server URL and stream key settings in the web interface.
- Ensure your internet connection is stable and has sufficient upload bandwidth.
- Device Not Responding:
- Power cycle the device by turning it off, waiting a few seconds, and turning it back on.
- If the issue persists, perform a factory reset (refer to the full product manual for instructions, if available).
8. Specifications
Detailed technical specifications for the AVMATRIX HVS0401E:
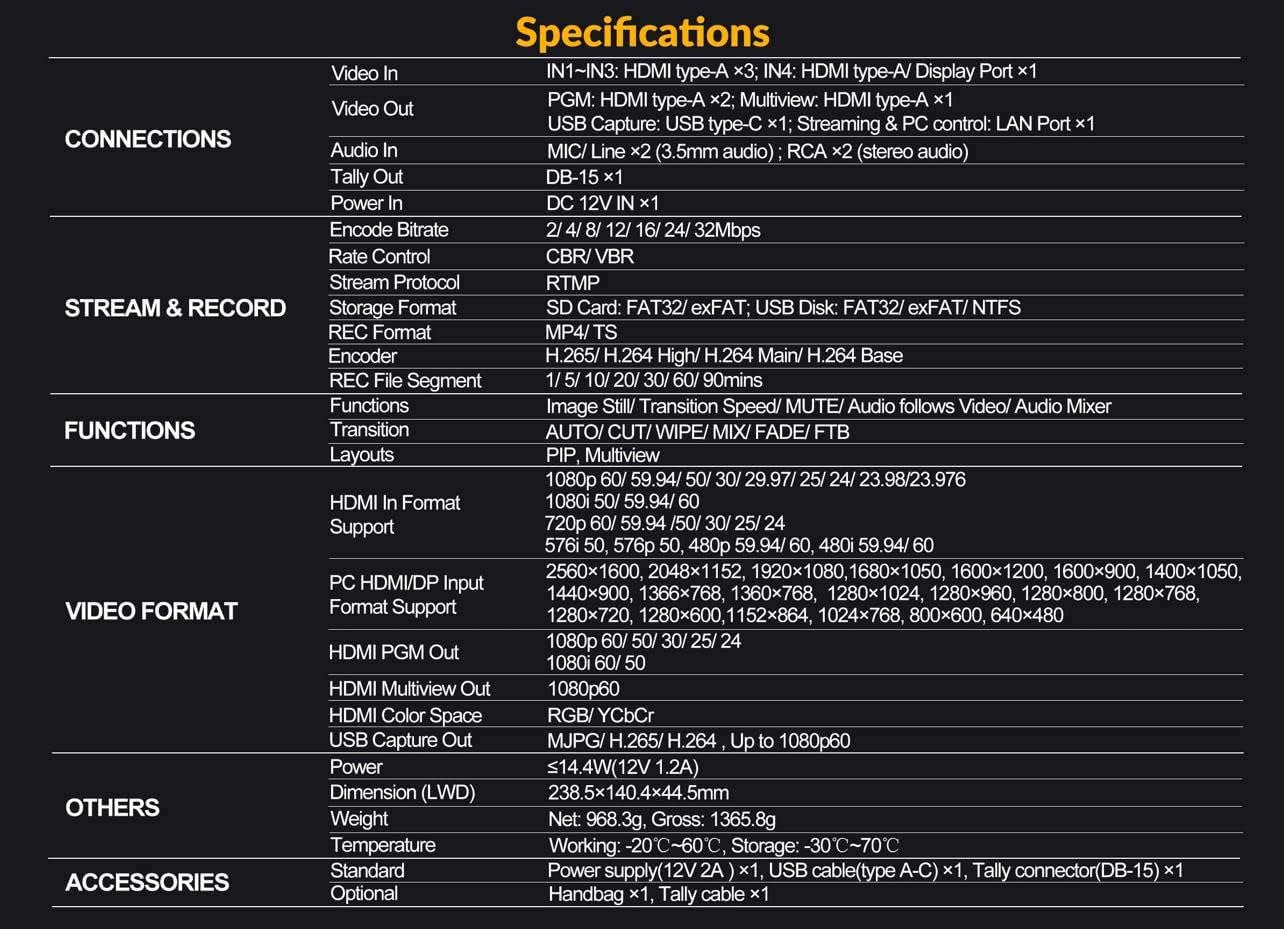
Figure 7: Comprehensive specifications table for the AVMATRIX HVS0401E, detailing connections, stream & record parameters, functions, video formats, and other physical attributes.
| Category | Specification |
|---|---|
| Video In | IN1-IN3: HDMI type-A (x3), IN4: HDMI type-A / Display Port (x1) |
| Video Out | PGM: HDMI type-A (x2), Multiview: HDMI type-A (x1), USB Capture: USB type-C (x1), Streaming & PC control: LAN Port (x1) |
| Audio In | MIC/Line (3.5mm audio), RCA (x2 stereo audio) |
| Tally Out | DB-15 (x1) |
| Power In | DC 12V (x1) |
| Encode Bitrate | 2/4/8/12/16/24/32Mbps |
| Rate Control | CBR/VBR |
| Stream Protocol | RTMP |
| Storage Format | SD Card: FAT32/exFAT; USB Disk: FAT32/exFAT/NTFS |
| REC Format | MP4/TS |
| Encoder | H.265/H.264 High/H.264 Main/H.264 Base |
| REC File Segment | 1/5/10/20/30/60/90mins |
| Functions | Image Still/Transition Speed/MUTE/Audio follows Video/Audio Mixer |
| Transition | AUTO/CUT/WIPE/MIX/FADE/FTB |
| Layouts | PIP, Multiview |
| HDMI In Format Support | 1080p 60/59.94/50/30/29.97/25/24/23.98/23.976, 1080i 60/59.94/50, 720p 60/59.94/50/30/25/24, 576i 50, 576p 50, 480i 59.94/60, 480p 59.94/60 |
| PC HDMI/DP Input Format Support | 2560x1600, 2048x1152, 1920x1080/1680x1050, 1600x1200, 1600x900, 1400x1050, 1440x900, 1366x768, 1360x768, 1280x1024, 1280x960, 1280x800, 1280x768, 1280x720, 1200x600, 1152x864, 1024x768, 800x600, 640x480 |
| HDMI PGM Out | 1080p 60/50/30/25/24, 1080i 60/50 |
| HDMI Multiview Out | 1080p60 |
| RGB/YCBCR | RGB/YCbCr |
| USB Capture Out | MJPG/H.265/H.264, Up to 1080p60 |
| Power | ≤14.4W (12V 1.2A) |
| Dimension (LWD) | 238.5x140.4x44.5mm |
| Weight | Net: 968.3g, Gross: 1365.8g |
| Temperature | Working: -20°C ~ 60°C, Storage: -30°C ~ 70°C |
| Standard Accessories | Power supply (12V 2A) x1, USB cable (type-A C) x1, Tally connector (DB-15) x1 |
| Optional Accessories | Handbag x1, Tally cable x1 |
9. Warranty and Support
Warranty information for the AVMATRIX HVS0401E is typically provided with the product packaging or available on the manufacturer's official website. For technical support, troubleshooting assistance, or warranty claims, please contact LILLIPUT customer service or visit their support portal. Ensure you have your product model number (HVS0401E) and purchase details ready when seeking support.
Related documentsHVS0401E

Ask a question about this manual
Ask about setup, troubleshooting, compatibility, parts, safety, or missing instructions. Manuals+ will review the question and use this page’s manual context to help answer it.