

1. Important Safety Instructions
Please read all instructions carefully before using this heater. Failure to follow these instructions may result in fire, electric shock, or injury.
- Do not use this heater outdoors. It is designed for indoor use only.
- Always plug heaters directly into a wall outlet/receptacle. Never use with an extension cord or relocatable power tap (outlet/power strip).
- This heater is hot when in use. To avoid burns, do not let bare skin touch hot surfaces.
- Keep combustible materials, such as furniture, pillows, bedding, papers, clothes, and curtains at least 3 feet (0.9 m) from the front of the heater and keep them away from the sides and rear.
- Extreme caution is necessary when any heater is used by or near children or invalids and whenever the heater is left operating and unattended.
- Always unplug heater when not in use.
- Do not operate any heater with a damaged cord or plug or after the heater malfunctions, has been dropped or damaged in any manner. Return heater to authorized service facility for examination, electrical or mechanical adjustment, or repair.
- Do not insert or allow foreign objects to enter any ventilation or exhaust opening as this may cause an electric shock or fire, or damage the heater.
- To prevent a possible fire, do not block air intakes or exhaust in any manner. Do not use on soft surfaces, like a bed, where openings may become blocked.
- This heater has an automatic overheat protection system. If the heater overheats, it will automatically shut off. Unplug the heater, wait 10 minutes for it to cool down, then plug it back in.
- This heater is equipped with a tip-over safety switch. If the heater is accidentally tipped over, it will automatically shut off. Place the heater on a firm, level surface to resume operation.
2. Product Overview
The PELONIS PSH10C2ABB is a compact and portable 1500W ceramic electric fan heater designed for efficient indoor heating. It features multiple heat settings and a fan-only mode for year-round use.
Key Features:
- 3 Heat Settings: 700W, 900W, and 1500W for customizable warmth.
- Fan-Only Mode: Allows for air circulation without heat, suitable for all seasons.
- Adjustable Thermostat: Maintain your desired room temperature.
- Compact and Portable Design: Easy to move between rooms with a cool-touch handle.
- Ceramic Heating Element: Provides rapid and energy-efficient heating.
- Safety Features: Overheat protection and tip-over switch for enhanced safety.
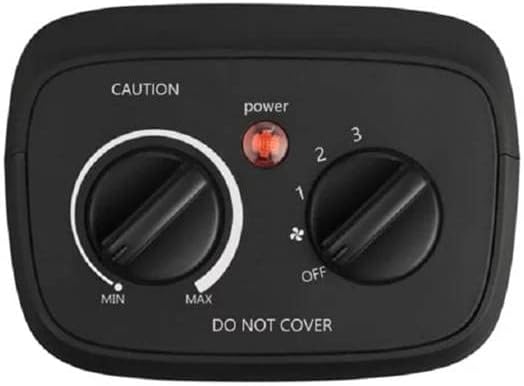
Image: Top view of the heater's control panel, showing the thermostat dial (Min to Max) and the mode selector dial (Off, Fan, Heat 1, Heat 2, Heat 3) with a power indicator light.
3. Setup
Package Contents:
- PELONIS PSH10C2ABB Ceramic Electric Fan Heater
- User Manual
Placement:
- Unpack the heater from its packaging and remove all packing materials.
- Place the heater on a firm, level, and stable surface. Ensure it is at least 3 feet (0.9 meters) away from walls, furniture, and other combustible materials.
- Ensure the power cord is not pinched or placed under the heater.
- Plug the heater directly into a 127V AC, 60Hz wall outlet. Do not use extension cords or power strips.

Image: The PELONIS ceramic heater positioned on a shelf, demonstrating proper placement in a living space.
4. Operating Instructions
The heater features two control dials on the top panel: one for thermostat control and one for mode selection.
Mode Selection Dial:
This dial controls the power and operating mode of the heater. Rotate the dial to select your desired setting:
- OFF: Turns the heater off.
- FAN (indicated by fan icon): Activates the fan without heat, providing air circulation.
- HEAT 1 (700W): Low heat setting.
- HEAT 2 (900W): Medium heat setting.
- HEAT 3 (1500W): High heat setting for maximum warmth.
Thermostat Control Dial:
This dial allows you to set your desired room temperature. It works in conjunction with the heat settings.
- Turn the Mode Selection Dial to one of the HEAT settings (1, 2, or 3).
- Rotate the Thermostat Control Dial clockwise towards "MAX" for higher temperatures, or counter-clockwise towards "MIN" for lower temperatures.
- Once the room reaches your desired temperature, slowly turn the Thermostat Control Dial counter-clockwise until the heater turns off. The heater will now cycle on and off to maintain this temperature.
Power Indicator Light: A red light on the control panel illuminates when the heater is powered on and operating.
5. Maintenance
Regular cleaning and proper storage will help ensure the longevity and efficient operation of your heater.
Cleaning:
- Always unplug the heater and allow it to cool completely before cleaning.
- Use a soft, damp cloth to wipe the exterior surfaces of the heater. Do not use abrasive cleaners or solvents.
- Use a vacuum cleaner with a brush attachment to gently remove dust and lint from the air intake and exhaust grilles.
- Never immerse the heater in water or allow water to drip into the interior of the heater.
Storage:
When not in use, store the heater in its original packaging or a clean, dry place. Wrap the power cord loosely to prevent damage.
6. Troubleshooting
| Problem | Possible Cause | Solution |
|---|---|---|
| Heater does not turn on. |
|
|
| Heater produces no heat in a heat setting. |
|
|
| Heater cycles on and off frequently. |
|
|
7. Specifications
- Model: PSH10C2ABB (DUDULAILE-311-2643)
- Brand: PELONIS
- Power Output: 700W / 900W / 1500W
- Voltage: 127 Volts
- Number of Speeds: 3 (Heat settings) + Fan-only
- Dimensions: Approximately 26 x 22 x 13 cm (Package dimensions, actual unit is similar)
- Weight: Approximately 500 g
- Special Features: Compact, space-saving, energy-saving, lightweight, portable, overheat protection, tip-over switch.
- Color: Black

Image: Diagram showing the approximate dimensions of the PELONIS heater: 23cm height, 10cm depth, 20cm width.
8. Warranty and Support
For warranty information and customer support, please refer to the warranty card included with your product or visit the official PELONIS website. Keep your purchase receipt as proof of purchase for any warranty claims.
If you experience any issues not covered in the troubleshooting section, please contact PELONIS customer service for assistance.
Online Resources:
- Official PELONIS Website: www.pelonis.com (Note: This is a placeholder URL, please refer to your product documentation for the correct website.)


